
PlopJS: The Tool Every Developer Needs for a Faster Workflow
Increase Your Efficiency and Save Time with PlopJS


One of the things that I love about programming is that the sky is the limit. There’s a magical moment when you encounter a problem that code can solve. For example, when you find yourself doing a monotonous, repetitive task, code allows you to automate, streamlining your workflow.
One of my favorite tools for writing these time-saving scripts is PlopJs. It’s a tiny tool with a lot of power.
What types of automation are we talking about?
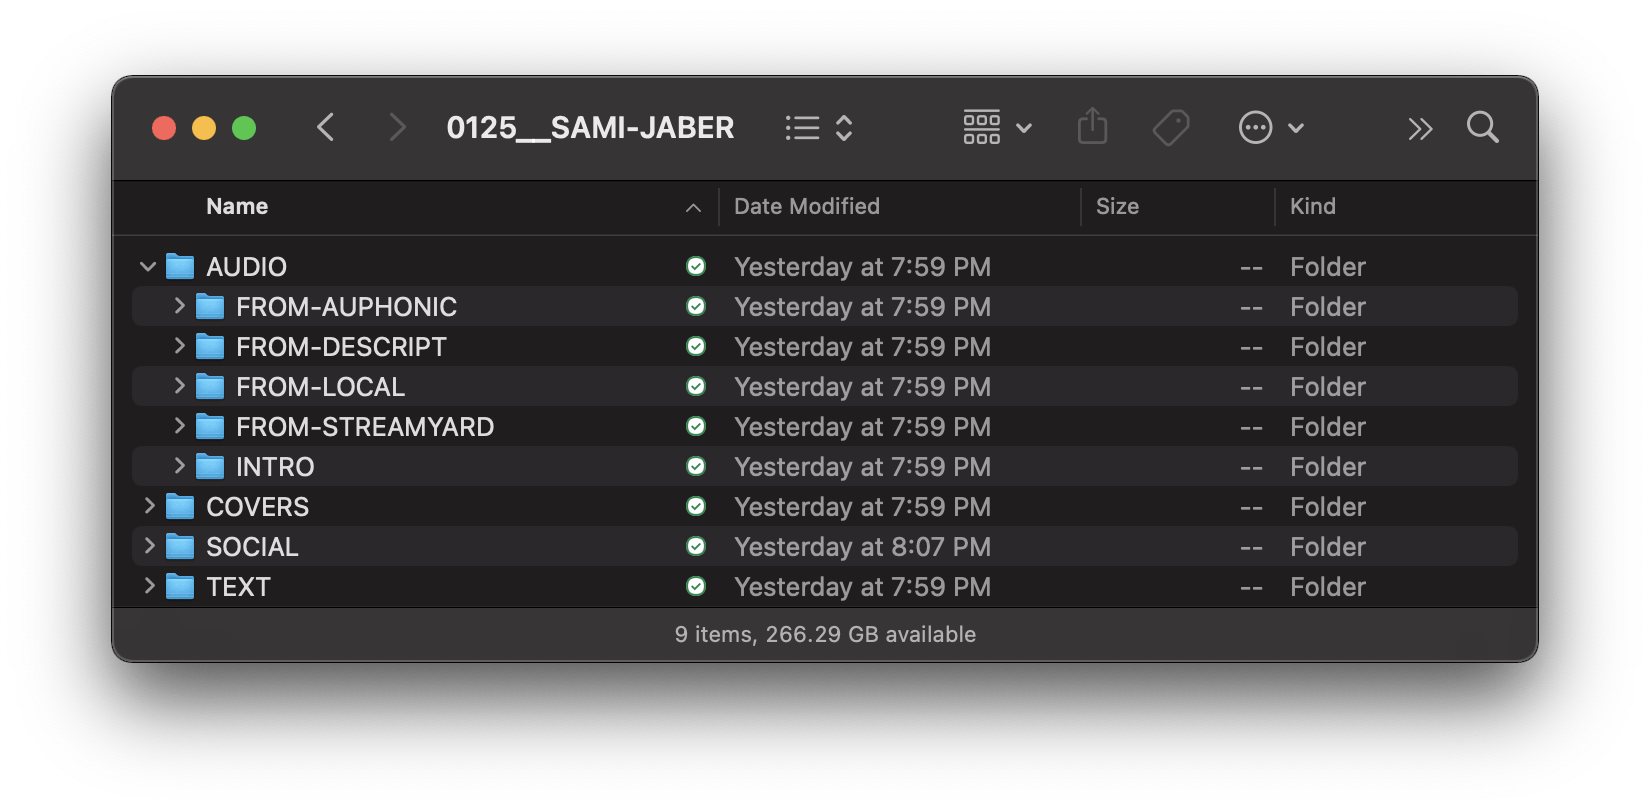
One of the lessons that I learned early on is that folder structure and file organization matter. Nerdy, I know. 🤓 But, when I open a project in the Finder, I don’t want to go on an archeological dig, excavating nested folders upon nested folders, in search of what I’m looking for. The easiest way to overcome that challenge is consistency. Create a system.
Nobody likes talking about systems and processes (at least most “normal” people 😉 don’t). But, the beauty is that you can go to any project folder and know exactly where to go.
I cohost a podcast, called Compressed.fm. For each episode, I have a specific directory structure to keep all the audio files and phases of the project organized:
In the past, I've used a "template folder" that I would duplicate each time we recorded a new episode. — And that worked, except there are always a handful of things I would need to customize for each episode.
This is one of those mundane tasks that we can automate!
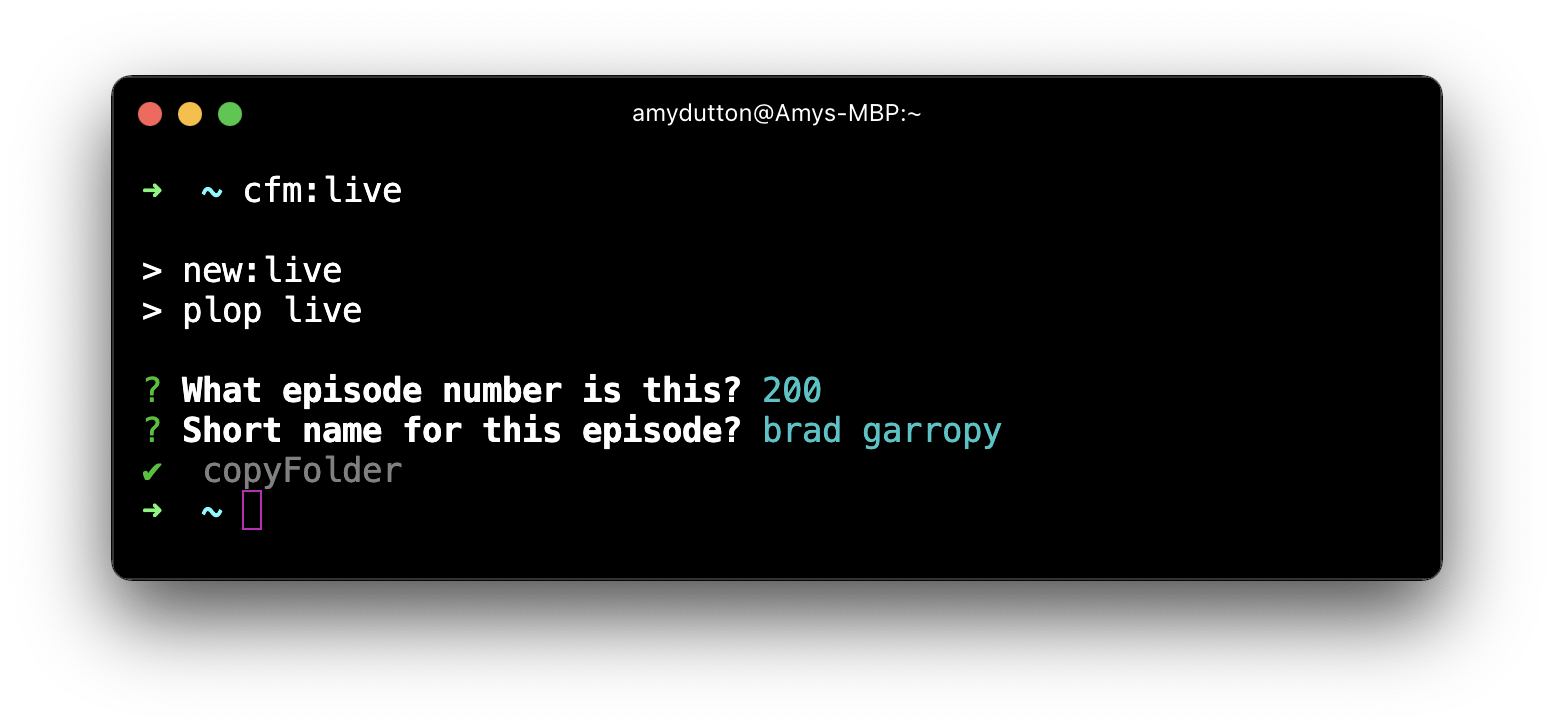
I wrote a PlopJs script and now I can run a single command within the Terminal. It will prompt me for the episode number and short name. Then, it will generate all the associated files and folders based on my responses.
On this project, I’m also using Plop to generate the show notes for each episode. Before, I would create a markdown file for the show notes, but would always have to go hunting for the sponsor information. What description did they want to use? What tracking links did they want to use? It’s not hard to look up this information, but after 100+ episodes, a small task like this does add up.
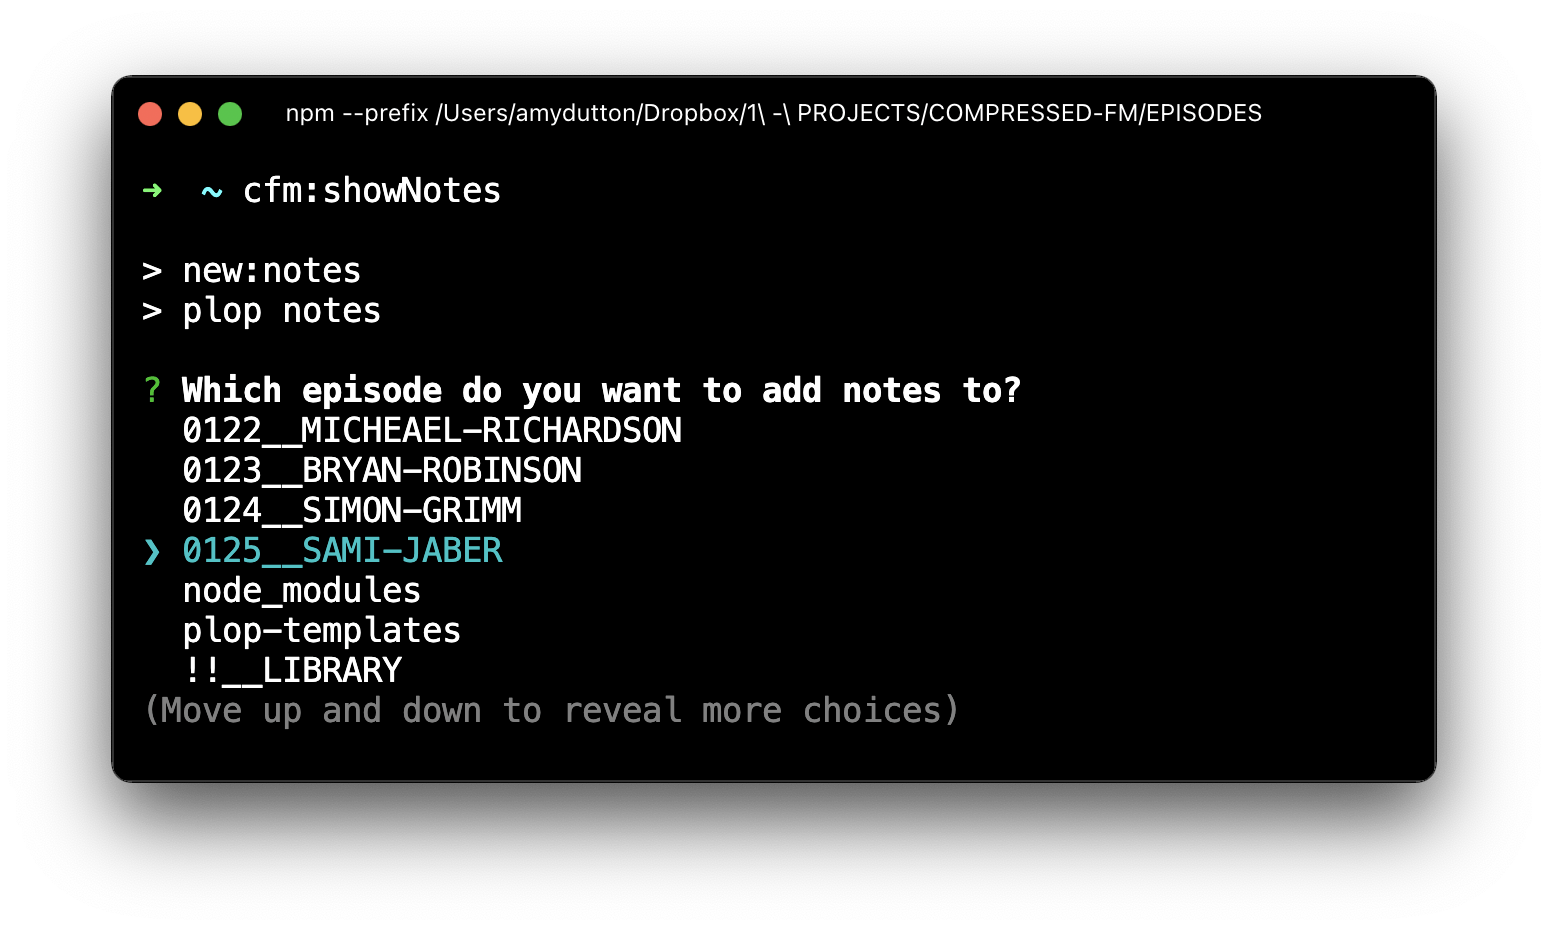
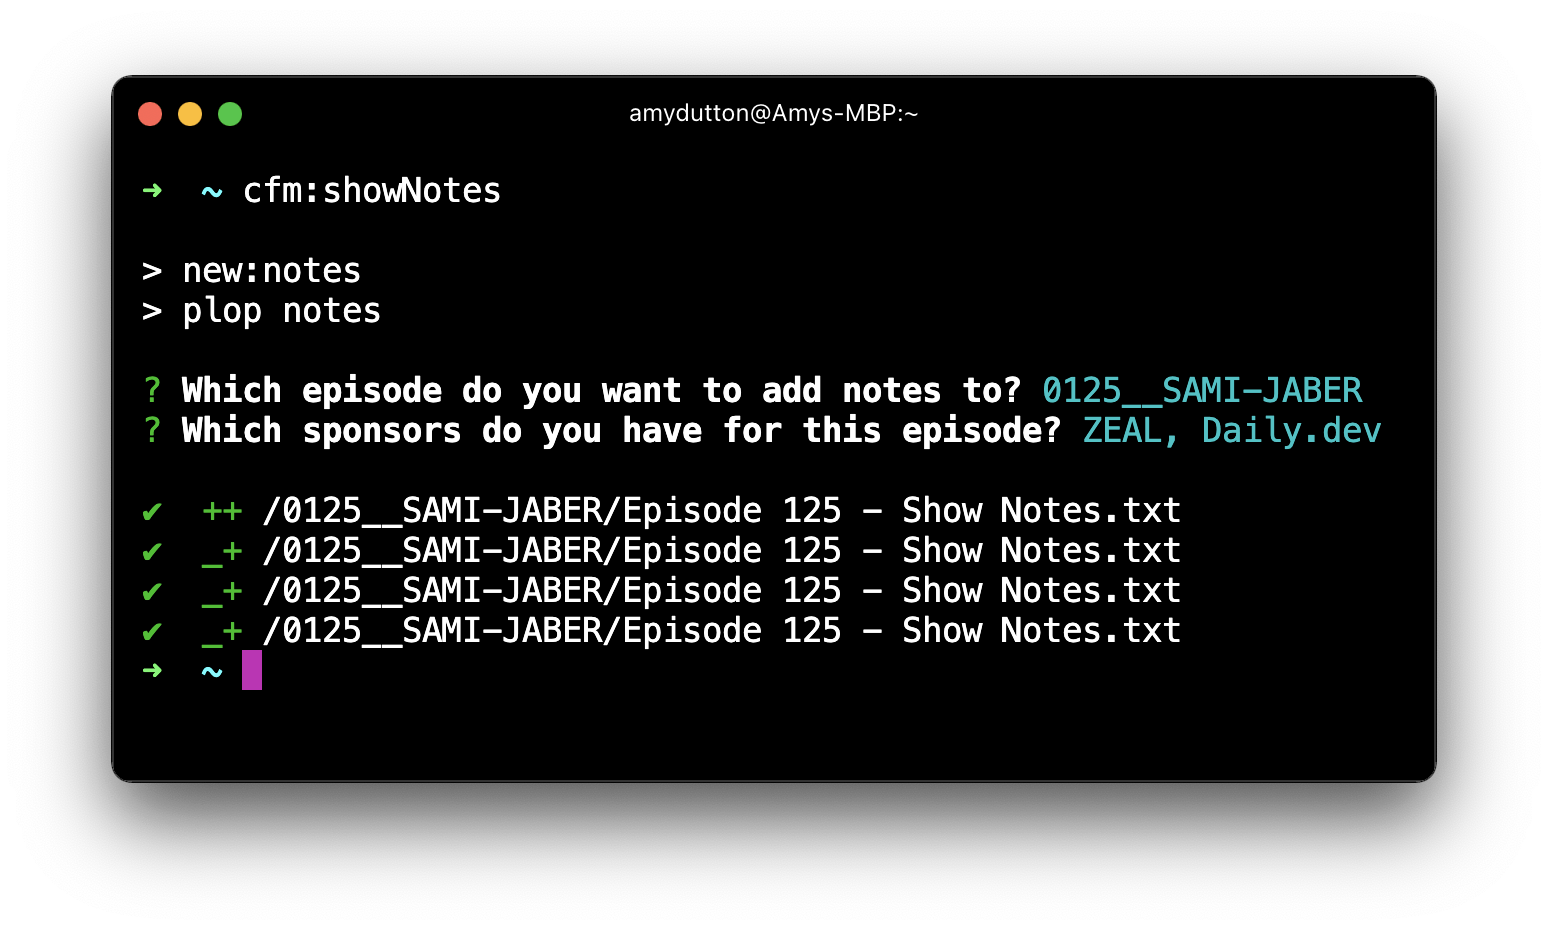
Within the Terminal, I can run cfm:showNotes and it will ask me which episode I want to add notes for. It generates this list dynamically based on the episode folders in my project.
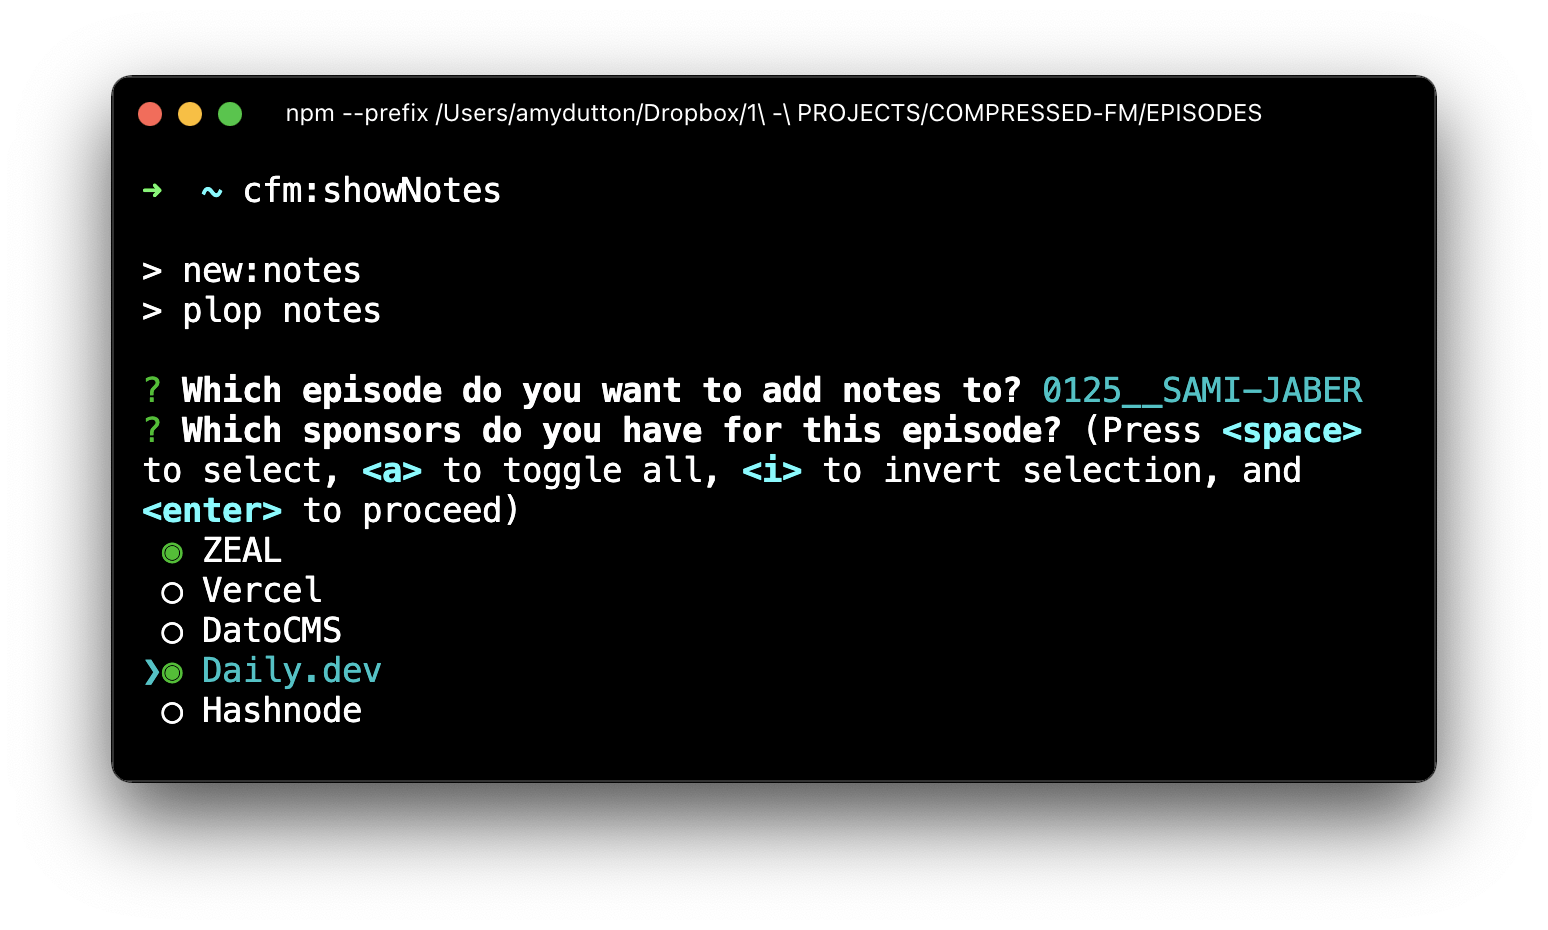
Next, it will ask me which sponsors should be included. I have a plop templates folder with a markdown file for each sponsor. Each file includes the sponsor description that I want to include within the show notes. I provided Plop with a list of all the sponsors and the markdown files with their information. Plop displays that list in such a way that I can pick as many (or as few) sponsors as I want.
From there Plop has all the information it needs to generate a text file with the Show Notes.
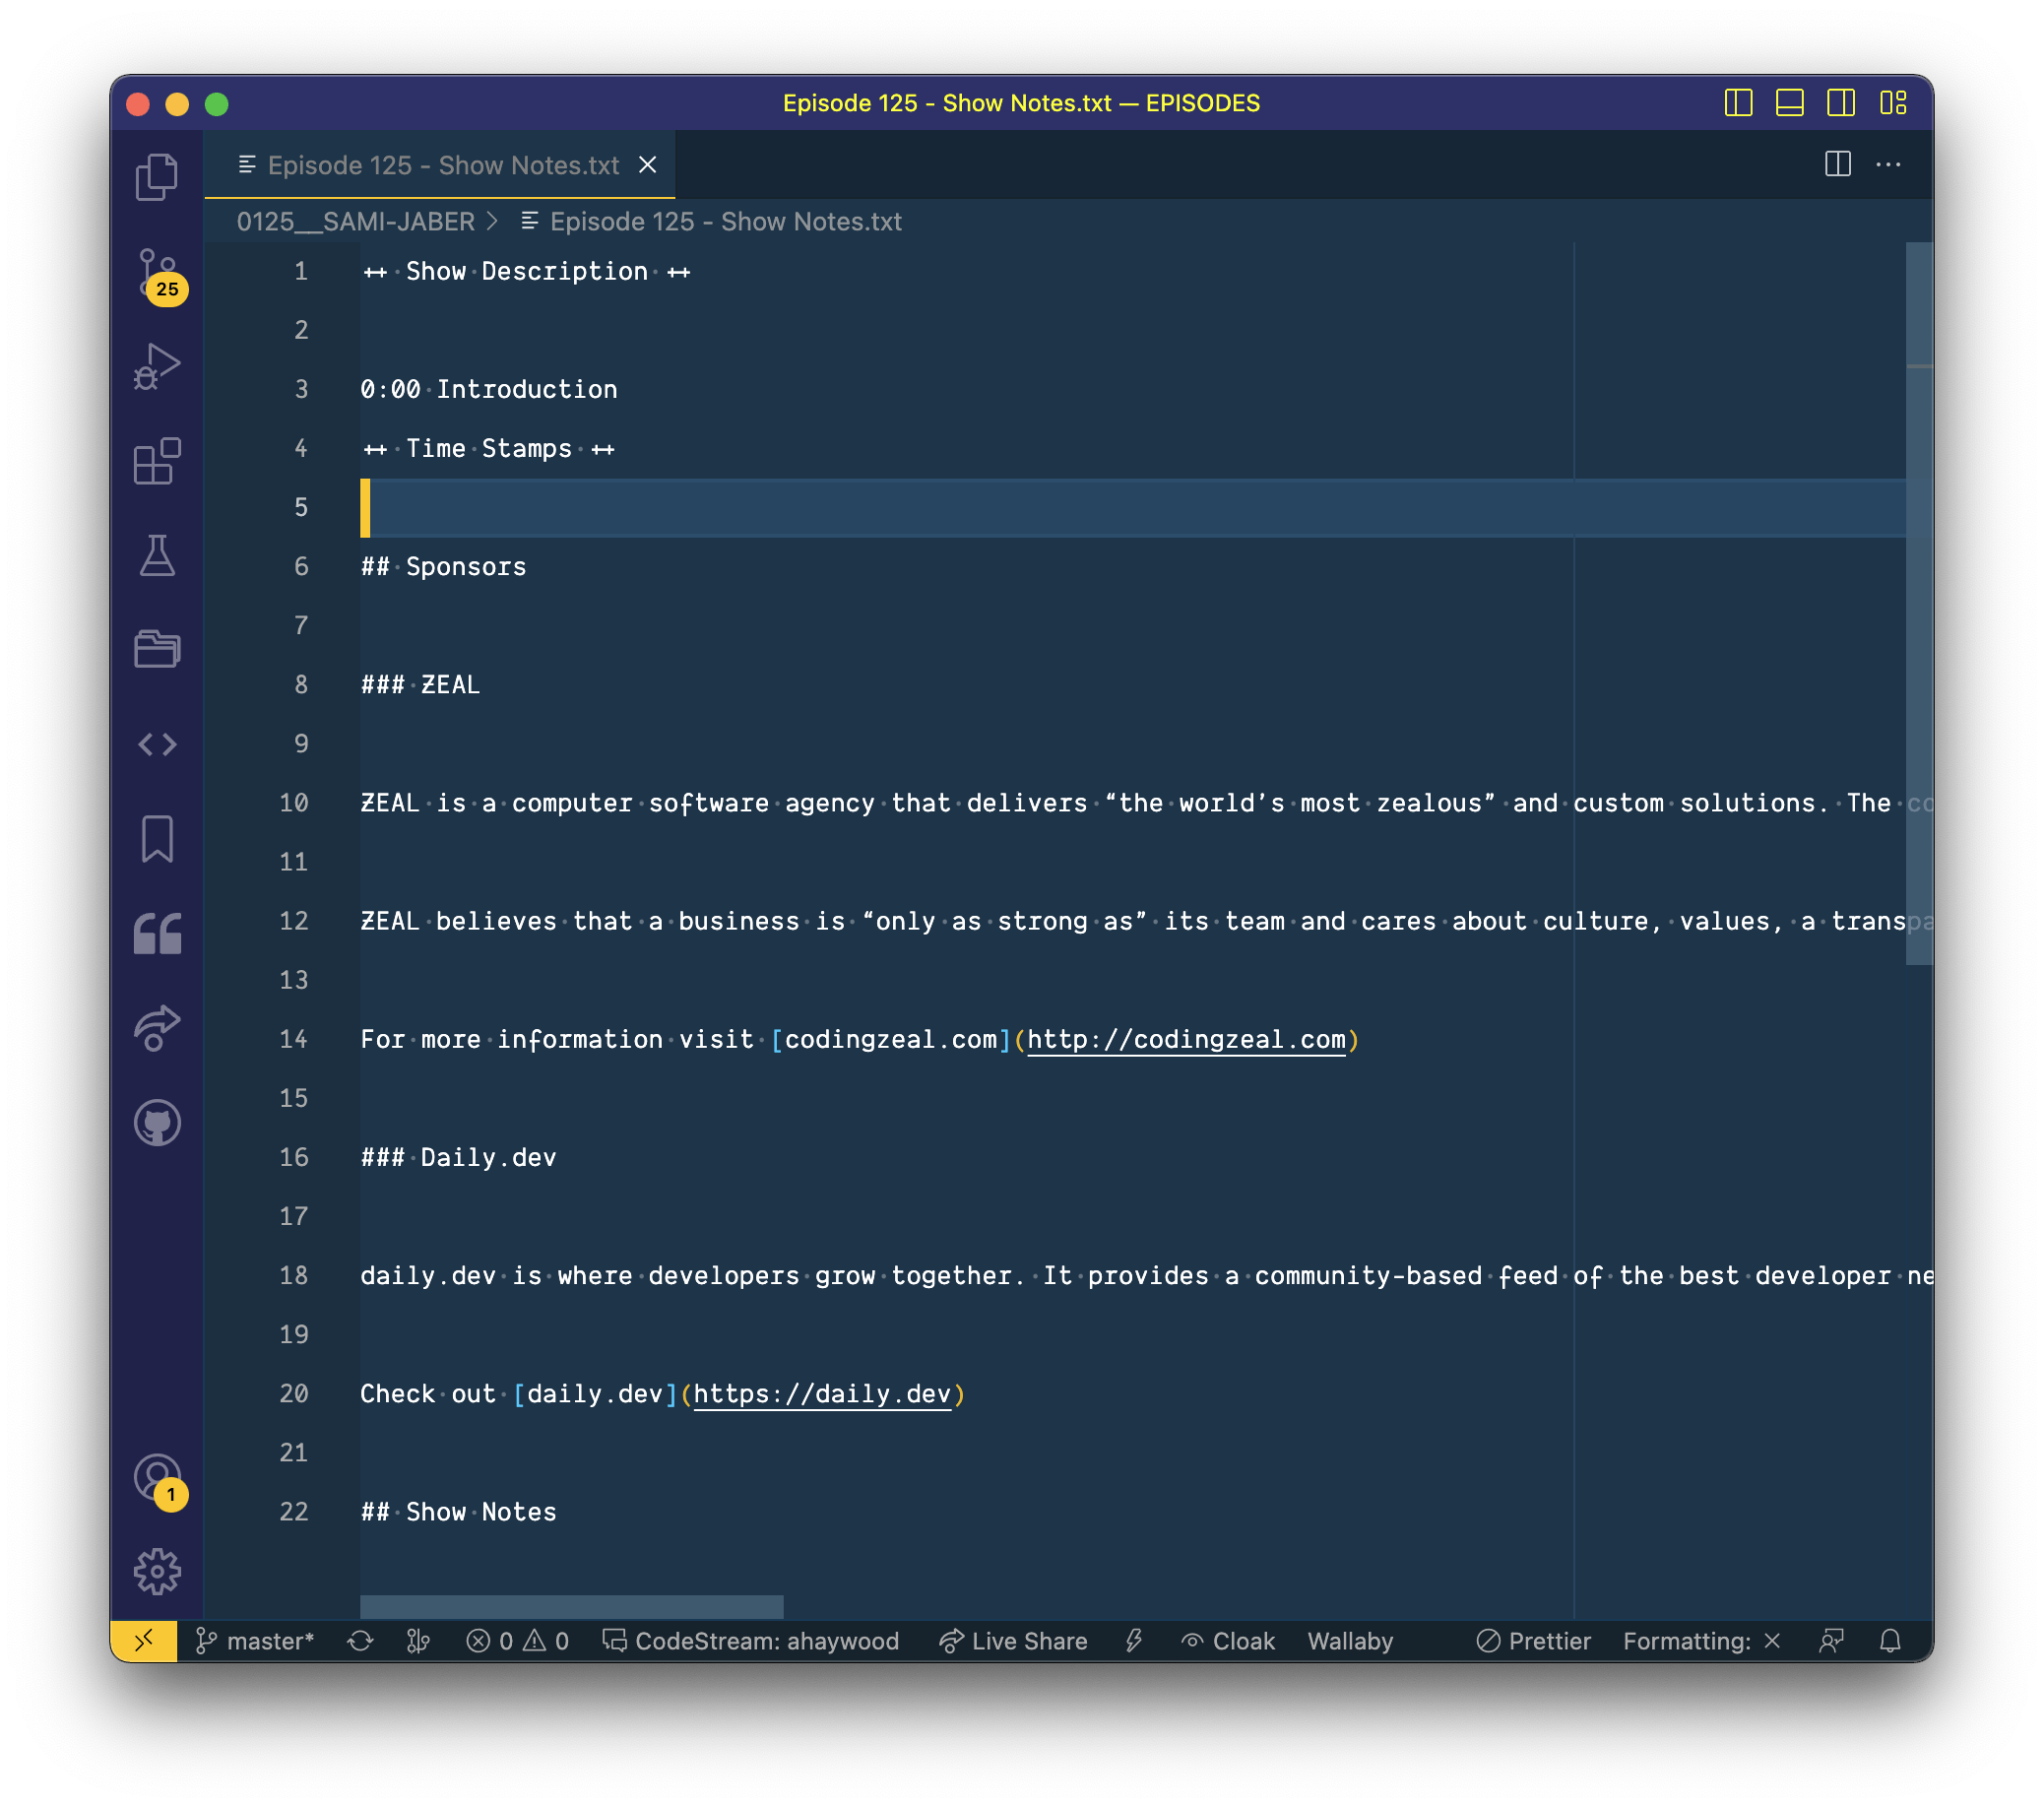
Here’s the finished result. The information at the top, show description, time stamps, and the sponsors heading are all part of the template. The specific sponsors are added dynamically. Essentially it’s taking a single file and then appending additional content from another file.
Let’s look at another example, maybe folder organization isn’t as exciting to you, as it is to me. 😜 But, if you spend your days (and nights) writing code, you can also use Plop to generate component files.
I didn’t fully realize the beauty of using a generator to stub out component code for me until I started working with Redwood.js. They have a whole library of generators available within their CLI. Running a single command will generate all the boilerplate code you need for creating a component, layout, page, etc. With PlopJs, though, you can bring that same functionality to any project that you work on.
By running a single command, you can have it generate the component code, a storybook file, and a Jest/Cypress/Playwright test file(!!)
I’ve been working on rebuilding my personal website on Astro, primarily because it makes working with MDX so easy. But, the pain point comes in managing the frontmatter for each content type. For articles and blog posts, I have several data points I’m adding inside the frontmatter section. Then, for the “uses” section, I have a different set of frontmatter data. In fact, I have several more content types, all with different sets of front matter.
Plop solves this problem. I have different templates set up for each content type. I can even prompt the user and pre-fill the front matter based on the user’s input. Chef’s kiss!
How do I start a Plop project and what does the code look like?
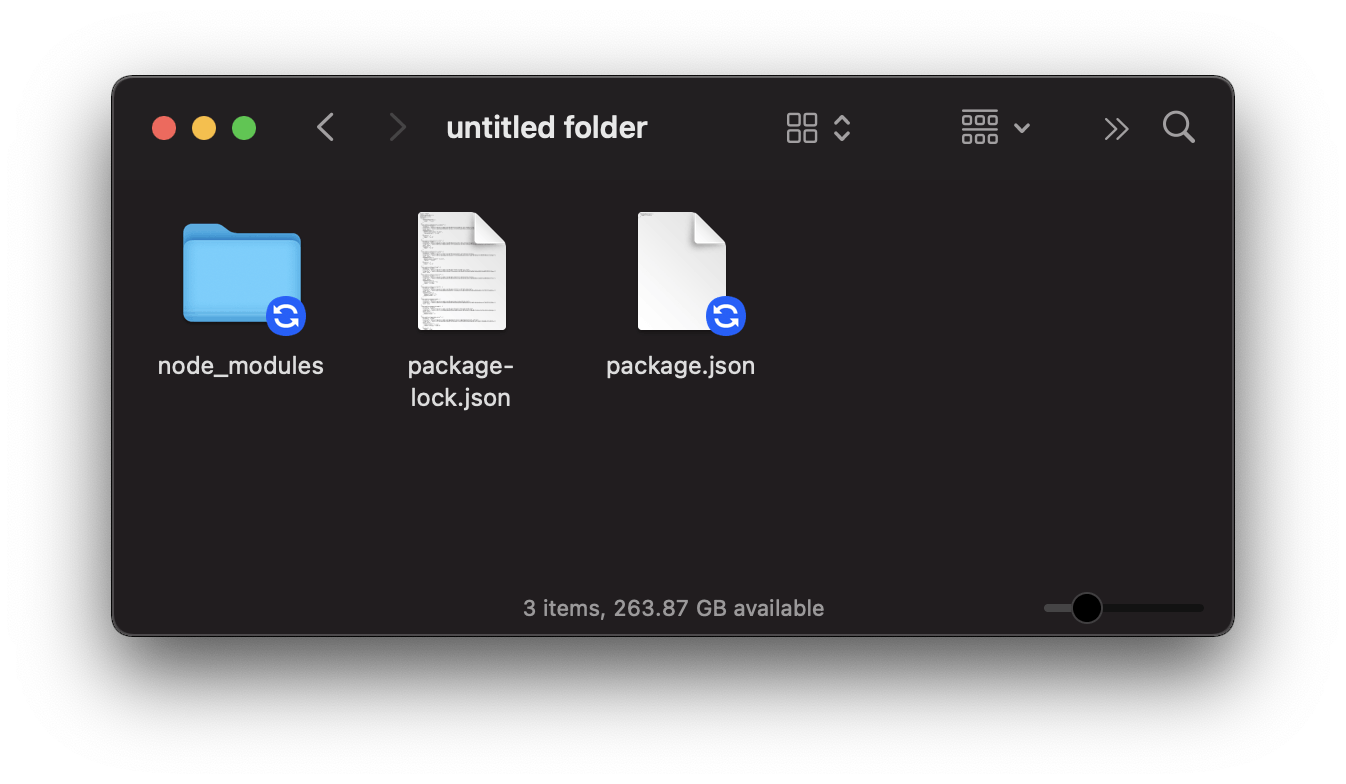
Within the directory you want your Plop script to live, run this command from the Terminal:
npm install --save-dev plop
This will generate 3 files:
A node_modules folder for all your libraries, packages, and third-party code.
A package.json file. This will give you a starting point for your scripts
A package-lock.json file. This will lock down the versions for each package
Inside, we can create a fourth file: plopfile.js. This is where we’ll define all of our generators, actions, and helpers.
A basic Plopfile is really… basic:
export default function (plop) {
    // create your generators here
    plop.setGenerator('basics', {
        description: 'this is a skeleton plopfile',
        prompts: [], // array of inquirer prompts
        actions: []  // array of actions
    });
};
We’ve established a node module that exports a function and accepts
plopas a parameter.Inside, we have a single generator called
basicsThe
descriptiondescribes what the generator doespromptsis an array of prompts. Each prompt is represented by a single object.actionstake the information that the user provided from each prompt.actionsis another array where each action is represented as another object.
Let’s talk through the scripts that I wrote for the Compressed.fm podcast, line-by-line. Between these 2 generators, this should cover 99% of your use cases.
Let’s start with our episode generator that stubs out all of our files:
plop.setGenerator('episode', {
  description: 'create a new episode',
  prompts: []
});
First, let’s call our generator episode since we’re generating this folder structure for each new episode that we create. Then, I’ll provide a generic description: “create a new episode.”
Next, we want to ask the user 2 questions.
What episode number is this?
Short name for the episode?
Each prompt should be represented as its own object within the prompts array. There are several properties we’ll need to specify for each:
type- This is thetypeof prompt. PlopJS uses the InquirerJS library to gather user data. You should refer to Inquirer’s documentation for the latest and greatest. Plus, there are several custom plugins that the community has created. But, here, I’ll cover a few of the highlights:input- this is a string. For our use case, this is exactly what we need to get the short name of the episodenumber- this is a number (bet you didn’t see that one coming?!)confirm- this is a boolean. I’m sure you’ve seen this prompt before in other places:(Y/n)list,rawlist, orexpand- these are all string inputs, but you provide an array of choices within a separate property calledchoicesYou can also specify thedefaultvalue and whether the user should be able toloopthrough the options (once they get to the bottom of the list, does it loop the user back to the top?) All three of these options behave similarly, but each of their displays is slightly different.checkbox- surprisingly enough, this is a string too. It also takes an array ofchoices. But, it allows the user to select multiple options, checking a specific option.password- this is a string, but the user’s input will be masked and replaced with*editor- this is a string, but it accounts for a larger input by launching an instance of the user’s preferred editor on a temporary file.
name- this is a string used to store the user’s answers. You can think of this as the variable name.message- this is a string containing the question that you want to print to the Terminal.
plop.setGenerator('episode', {
  description: 'create a new episode',
  prompts: [{
    type: 'number',
    name: 'episodeNumber',
    message: 'What episode number is this?'
  }, {
    type: 'input',
    name: 'episodeShortName',
    message: 'Short name for this episode?'
  }],
});
Lastly, we’ll need to specify an actions property. We need to do something with the information that the user provided. Just like the prompt property, this takes an array of actions. Each action is represented by a single object.
Several actions are built in. I’ll cover the highlights here, but you’ll need to refer to the documentation for more specifics.
add- this adds a file to our project. With this action, you’ll need to specify a template that will be used to create the file. It’s encouraged that within your project folder, you’ll have a plop-templates folder where all these templated files and folders live. The templates support the handlebar format so you can inject the user’s input into the template.
If you’re new to handlebars, have no fear! You only need to know a couple of things.
Your file will end in
.hbs, the handlebar extensionInside your file, if you want to reference a variable, wrap it in double curly brackets:
{{ episodeNumber }}. With handlebars, you can also specify modifiers to format the text you’re passing in. For example, by addingtitleCasein front of my variablename, it will capitalize the first letter of each word:{{ titleCase name }}
addMany- allows you to add multiple files to our project with a single actionmodify- you can use this action in one of two ways. You can either specify apatternto find and replace the text in your file. Or, you can use atransformproperty to transform the file contents.append- this action allows you to append data in a file to a particular locationCustom Action - you can create your own, custom actions. PlopJS is just JavaScript, so anything you do in JavaScript, you can do it within Plop.
For our episode folder generator, I created a custom action. add and addMany is built in, but it’s used specifically for working with files, not folders. Besides, I wanted to copy the entire directory structure instead of having to write a single action to generate each folder individually. That doesn’t sound easy or fun and would probably be difficult to maintain.
Instead of the plop-templates folder, I created a subfolder called episode. Inside I have my templated file and folder structure setup.
Now, let’s create a custom action. The Plop API gets us access to a setActionType method. The first parameter it takes is the name of the action that you want to create. The second parameter takes a function that does all the heavy lifting.
By default, the function takes 3 parameters:
answers- this is an object that contains answers to all the generator promptsconfig- this is the action configuration object from the actions array, set in your generator.plop- this is the plop API. There are several methods you can use.
The body of the function is where all the magic happens. ✨
plop.setActionType("copyFolder", (answers, config, plop) => {

  const source = plop.renderString(config.source, answers);
  const target = plop.renderString(config.target, answers);

  fs.mkdirSync(target);

  fs.copy(source, target, (err) => {
    if (err) {
      console.log('Whoops! We had an issue copying the folder')
      return console.error(err)
    }
  })

})
In my custom action, I used the
renderStringmethod to get thesourceandtargetthat I set inside the generator action:plop.setGenerator('episode', { ... actions: [{ type: "copyFolder", source: './plop-templates/episode', target: '{{leadingZeros episodeNumber}}__{{upperCase (dashCase episodeShortName)}}', }] });Then, I use the Node file system API to grab the source
fs.mkdirSync(target)and make a copyfs.copy()If there’s a problem, then it will display an error in the console.
Here’s the generator code, all together:
plop.setGenerator('episode', {
  description: 'create a new episode',
  prompts: [{
    type: 'number',
    name: 'episodeNumber',
    message: 'What episode number is this?'
  }, {
    type: 'input',
    name: 'episodeShortName',
    message: 'Short name for this episode?'
  }],
  actions: [{
    type: "copyFolder",
    source: './plop-templates/episode',
    target: '{{leadingZeros episodeNumber}}__{{upperCase (dashCase episodeShortName)}}',
  }]
});
You’ll notice that when I created the target file path, I used handlebars to make the target path dynamic.
If the user said that we’re on episode 123 and the short name of the episode is Sami Jaber, then the folder it creates is named 0123__SAMI-JABER.
The double curly brackets are part of the handlebars templating language. The value on the far right is the variable — in this case, the episodeNumber and the episodeShortName that the user provided. Then, the value on the left is the modifier or helper.
Plop has several helpers that it providers out of the box. These are mostly case modifiers:
camelCase- changesTheFormatToThissnakeCase- changes_the_format_to_thisdashCaseorkebabCase- chages-the-case-to-thisdotCase- changes.theformat.to.thispathCase- chages/the/case/to/thisproperCaseorpascalCase- changesTheFormatToThislowerCase- changes the format to thissentenceCase- Changes the format to thisconstantCase- CHANGES_THE_FORMAT_TO_THIStitleCase- Changes The Format to This
Despite all these options, there’s not one for uppercase. So, we’ll need to roll up our sleeves and write a little bit of code:
plop.setHelper('upperCase', (txt) => txt.toUpperCase());
As part of Plop’s API, you can use the setHelper method to create your own helper. The first parameter is a string specifying what you want to name your helper. The second parameter is a function. Here, you’re writing regular JavaScript code. I’m passing in the text that I want to modify and then returning the reformatted string.
JavaScript has a built method for converting strings to uppercase, so this helper is pretty simple. But, I also wrote a custom helper to add leading zeros.
This helper looks to see if the text being passed in is less than 10, if it is, then it will return the string with three leading zeros. Otherwise, it will check to see if the number is less than 100. If it is, then we only need two leading zeros. Lastly, it checks to see if the text is less than 1000. If so, then only adds one 0. If none of these conditions match, then it will return the string as is.
plop.setHelper('leadingZeros', (text) => {
  if (text < 10) {
    return `000${text}`;
  }

  if (text < 100) {
    return `00${text}`;
  }

  if (text < 1000) {
    return `0${text}`;
  }

  return text
});
Awesome!
Now, let’s look at the show notes generator. There are a few key differences. Here’s the entire generator, but we’ll break it down line by line, below.
plop.setGenerator('notes', {
  description: 'creates the show notes',
  prompts: [{
    type: 'list',
    name: 'whichEpisode',
    message: 'Which episode do you want to add notes to?',
    choices: () => {
      // get all the directories within the current folder
      return readdirSync('.', { withFileTypes: true })
        .filter(dirent => dirent.isDirectory())
        .map(dirent => dirent.name);
    },
  }, {
    type: 'checkbox',
    name: 'sponsors',
    message: 'Which sponsors do you have for this episode?',
    choices: [
      { name: 'ZEAL', value: 'zeal.md' },
      { name: 'Vercel', value: 'vercel.md' },
      { name: 'DatoCMS', value: 'datocms.md' },
      { name: 'Daily.dev', value: 'dailydev.md' },
      { name: 'Hashnode', value: 'hashnode.md' }
    ]
  }],
  actions: ({ sponsors, whichEpisode }) => {
    let actions = [];

    // create the file based on the template
    actions.push({
      type: 'add',
      path: '{{whichEpisode}}/Episode {{epNumber whichEpisode}} - Show Notes.txt',
      templateFile: 'plop-templates/show-notes.md.hbs',
      abortOnFail: true,
      skipIfExists: true
    })

    // append all the sponsor information to the file
    sponsors.map(sponsor => {
      const sponsorFile = sponsor;
      actions.push(
        {
          type: 'append',
          path: '{{whichEpisode}}/Episode {{epNumber whichEpisode}} - Show Notes.txt',
          templateFile: 'plop-templates/sponsors/' + sponsorFile,
          abortOnFail: true
        });
    })

    actions.push({
      type: 'append',
      path: '{{whichEpisode}}/Episode {{epNumber whichEpisode}} - Show Notes.txt',
      template: "## Show Notes"
    })

    return actions
  }
})
With the first prompt, I’m using Node’s readdirSync() method to read all the files within the current folder (.)
{
    type: 'list',
    name: 'whichEpisode',
    message: 'Which episode do you want to add notes to?',
    choices: () => {
      // get all the directories within the current folder
      return readdirSync('.', { withFileTypes: true })
        .filter(dirent => dirent.isDirectory())
        .map(dirent => dirent.name);
    },
  }
Then, I’m filtering the result to only display the contents that are folders or directories
Then, I loop over each with a
mapfunction to display the names of the directories. This is used to populate thechoicesproperty.choicesis supposed to take an array, but here, I’m giving a function that returns an array. 😎
For the Sponsor prompt, I hard coded in an array of options where the name is what gets displayed in the Terminal and the value corresponds to a markdown file inside my plop-templates folder.
{
    type: 'checkbox',
    name: 'sponsors',
    message: 'Which sponsors do you have for this episode?',
    choices: [
      { name: 'ZEAL', value: 'zeal.md' },
      { name: 'Vercel', value: 'vercel.md' },
      { name: 'DatoCMS', value: 'datocms.md' },
      { name: 'Daily.dev', value: 'dailydev.md' },
      { name: 'Hashnode', value: 'hashnode.md' }
    ]
  }
- The
type: checkboxallows me to select as many sponsors as I want. This is perfect because some episodes have 1 sponsor, while others have 3.
For our actions object, this needs an array. Instead, I’m giving it a function but, it returns our array. The cool part about this: it allows me to process the sponsors, loop over them, and push each action to an actions array that gets returned at the bottom of the function. This is particularly helpful because I don’t know how many action steps I have. It all depends on how many sponsors the user selects.
actions: ({ sponsors, whichEpisode }) => {
    let actions = [];

    // create the file based on the template
    actions.push({
      type: 'add',
      path: '{{whichEpisode}}/Episode {{epNumber whichEpisode}} - Show Notes.txt',
      templateFile: 'plop-templates/show-notes.md.hbs',
      abortOnFail: true,
      skipIfExists: true
    })

    // append all the sponsor information to the file
    sponsors.map(sponsor => {
      const sponsorFile = sponsor;
      actions.push(
        {
          type: 'append',
          path: '{{whichEpisode}}/Episode {{epNumber whichEpisode}} - Show Notes.txt',
          templateFile: 'plop-templates/sponsors/' + sponsorFile,
          abortOnFail: true
        });
    })

    actions.push({
      type: 'append',
      path: '{{whichEpisode}}/Episode {{epNumber whichEpisode}} - Show Notes.txt',
      template: "## Show Notes"
    })

    return actions
  }
The first
actionthat I add to the array, uses the standardaddevent that adds an event to my folder.Then, the remaining actions
append(another standard Plop event) the content of my files to the newly created file.
Triggering our Scripts
Now, that we’ve written these scripts, let’s trigger them from the command line.
Within our package.json file, inside the scripts block, I’m going to add a script for each generator:
"scripts": {
  "new:episode": "plop episode",
  "new:notes": "plop notes"
},
- The command
plopwill triggerplop. Then, here,episodeandnotesare the names of the generators that I created.
Now, I can run npm new:episode in the Terminal, which will trigger our episode generator and npm new:notes will trigger our notes generator.
Of course, you could also simply run plop episode and plop notes within the Terminal, but I find using the scripts section of the package.json file a little easier. 🤷♀️
Power Tip: Create aliases for your PlopJS Scripts and Trigger them from Alfred
For the scripts that I use the most, I’ve created aliases within my Oh My Zsh config file:
# Compressed.fm
# This generates a new project structure for an episode
alias cfm:episode="npm --prefix /Users/amydutton/COMPRESSED-FM/EPISODES run new:episode"
# This generates a new project structure for a live episode
alias cfm:live="npm --prefix /Users/amydutton/COMPRESSED-FM/EPISODES run new:live"
# This generates a text file with the sponsor information included
alias cfm:showNotes="npm --prefix /Users/amydutton/COMPRESSED-FM/EPISODES run new:notes"

# Everything Svelte Lesson
# This generates a new project structure for a lesson
alias es:lesson="npm --prefix /Users/amydutton/EVERYTHING-SVELTE/COURSE run new:lesson"
alias es:update="npm --prefix /Users/amydutton/EVERYTHING-SVELTE/COURSE run update:lesson"
alias es:appendix="npm --prefix /Users/amydutton/EVERYTHING-SVELTE/COURSE run new:appendix"
I’m also a big fan of Alfred. The easiest way to describe Alfred is to call it an app launcher or Spotlight replacement. However, it does so much more than that. For example, I can invoke these commands from Alfred.
Hopefully, these examples will get your creative juices flowing for various use cases. If you’re interested in exploring more and all that Plop has to offer, I’d recommend starting with the Plop documentation.
There’s also a fantastic awesome repository on GitHub called awesome-plop that highlights various actions, helpers, and generators that the community has created.
Within this post, I also mentioned several workflows that I’m using to manage the Compressed.fm podcast. I’ve open-sourced those files. You’re more than welcome to fork that project, using it as a starting point.