The Hard Parts of Building an Application, Made Easy with Supabase


Table of contents
One of the things that I’m discovering about myself is that I work really well in short, intense sprints. It’s easier for me to work hard and knock out a project quickly, than to spread it out over time. I get bored and loose interest. Instead of fighting it, I’ve started to lean in, and created a Two Week Build Challenge.
The rules are simple:
Pick something to build
Build it in 2 weeks
Ship it
Plus, projects are always better with community, where you can build in public for accountability.
Project Overview

I started building a simple landing page to gather email addresses, but this quickly turned into a SaaS app of it’s own.
Users can register for an account.
Once an account is set up, users can create a project and provide daily updates.
Each user has a profile page, where you can see all of their updates. Creating a great feed for following progress on each project:

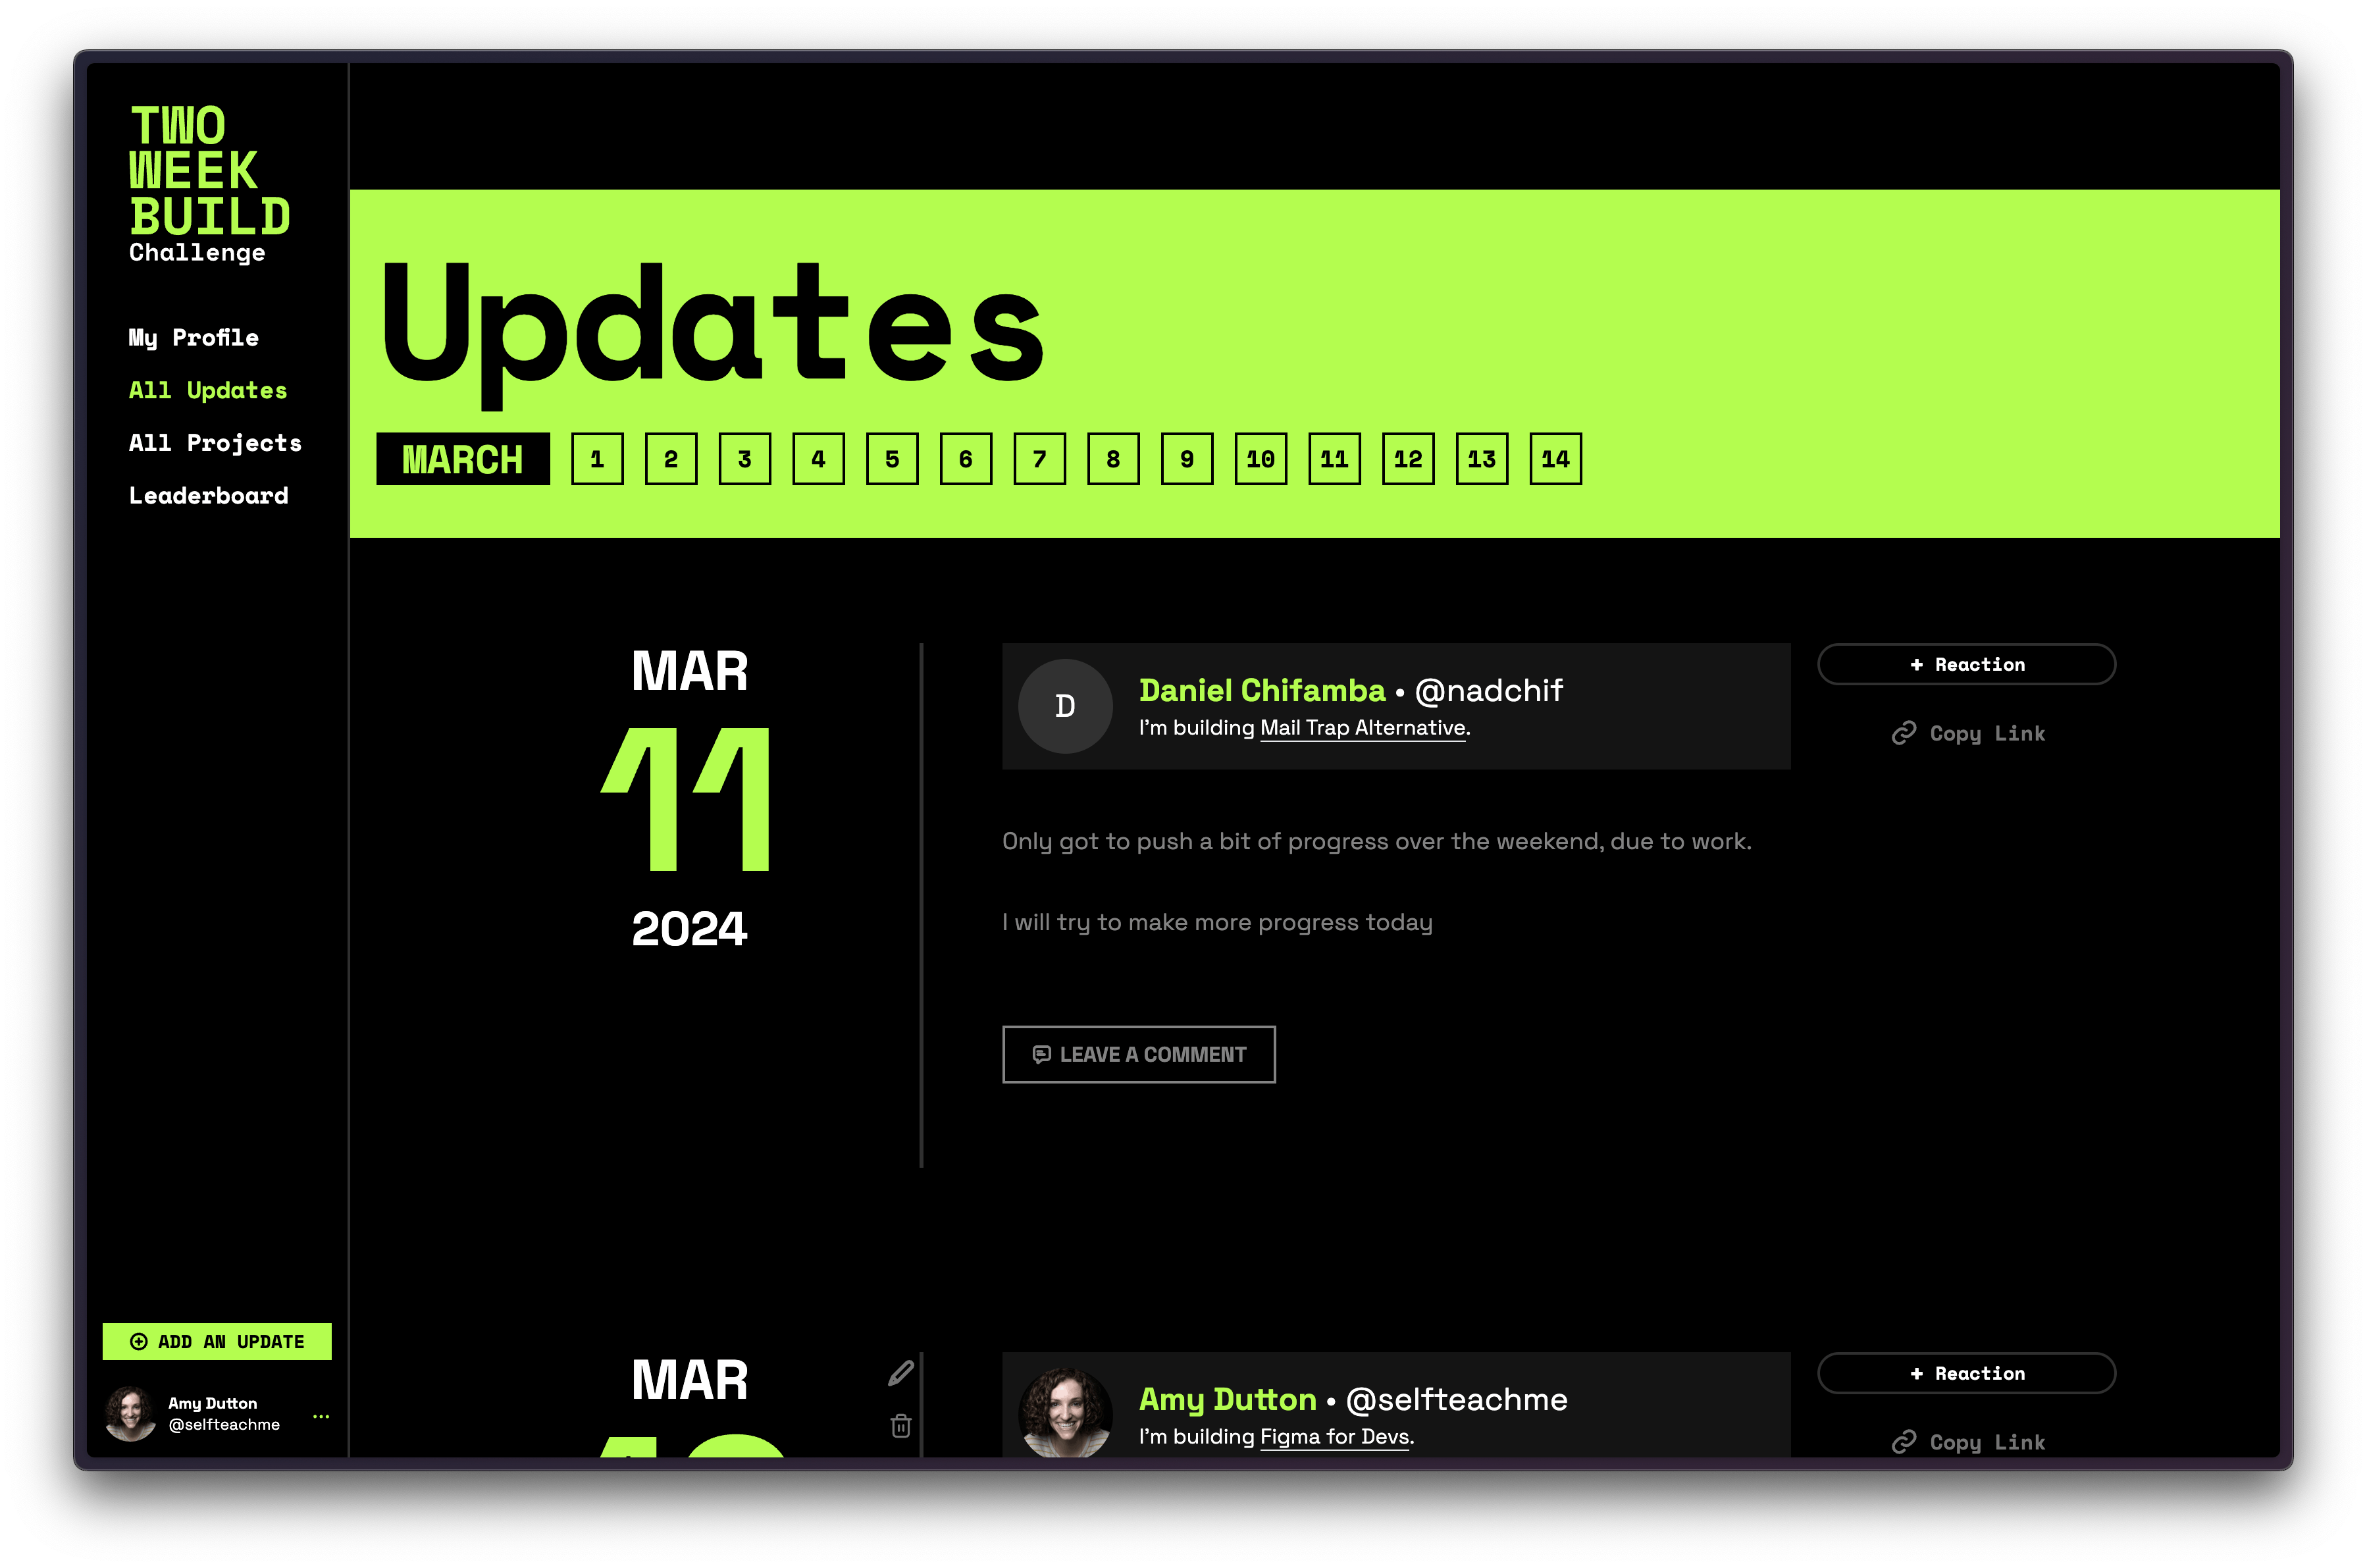
Since I wanted to build community and encourage engagement, I also wanted to see a daily feed of updates:
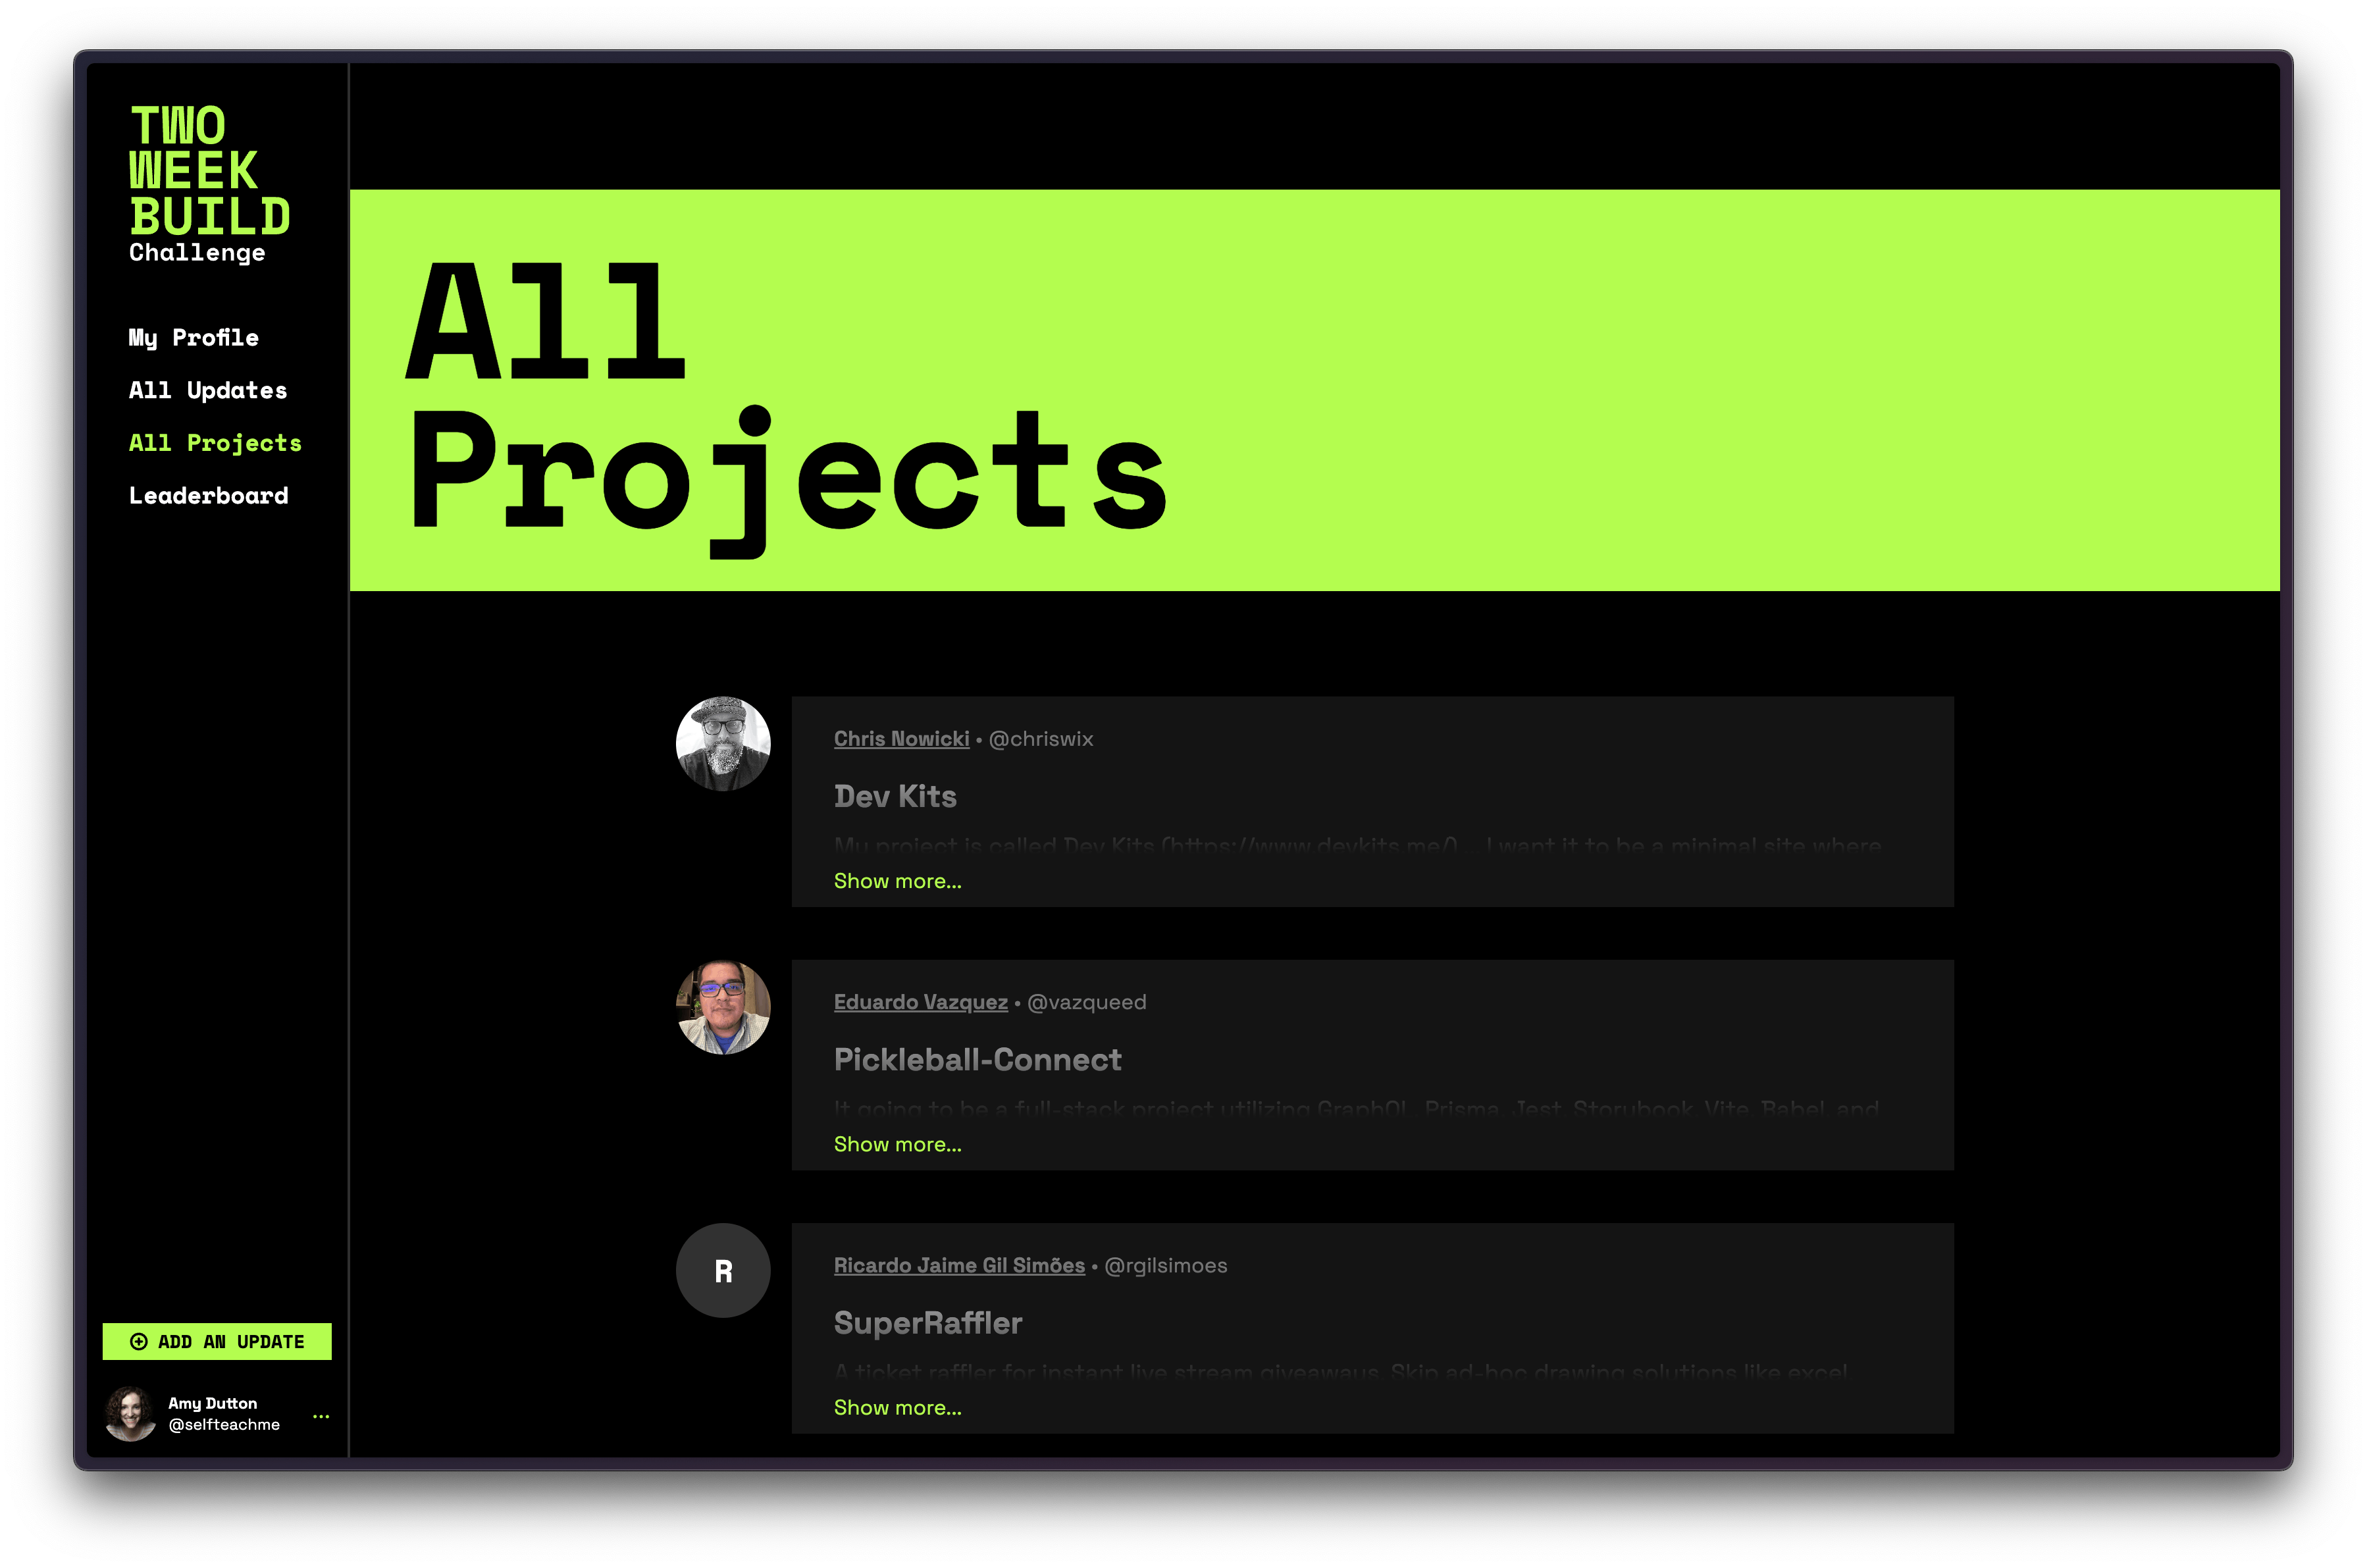
There’s also a list of all the projects that everyone is working on:
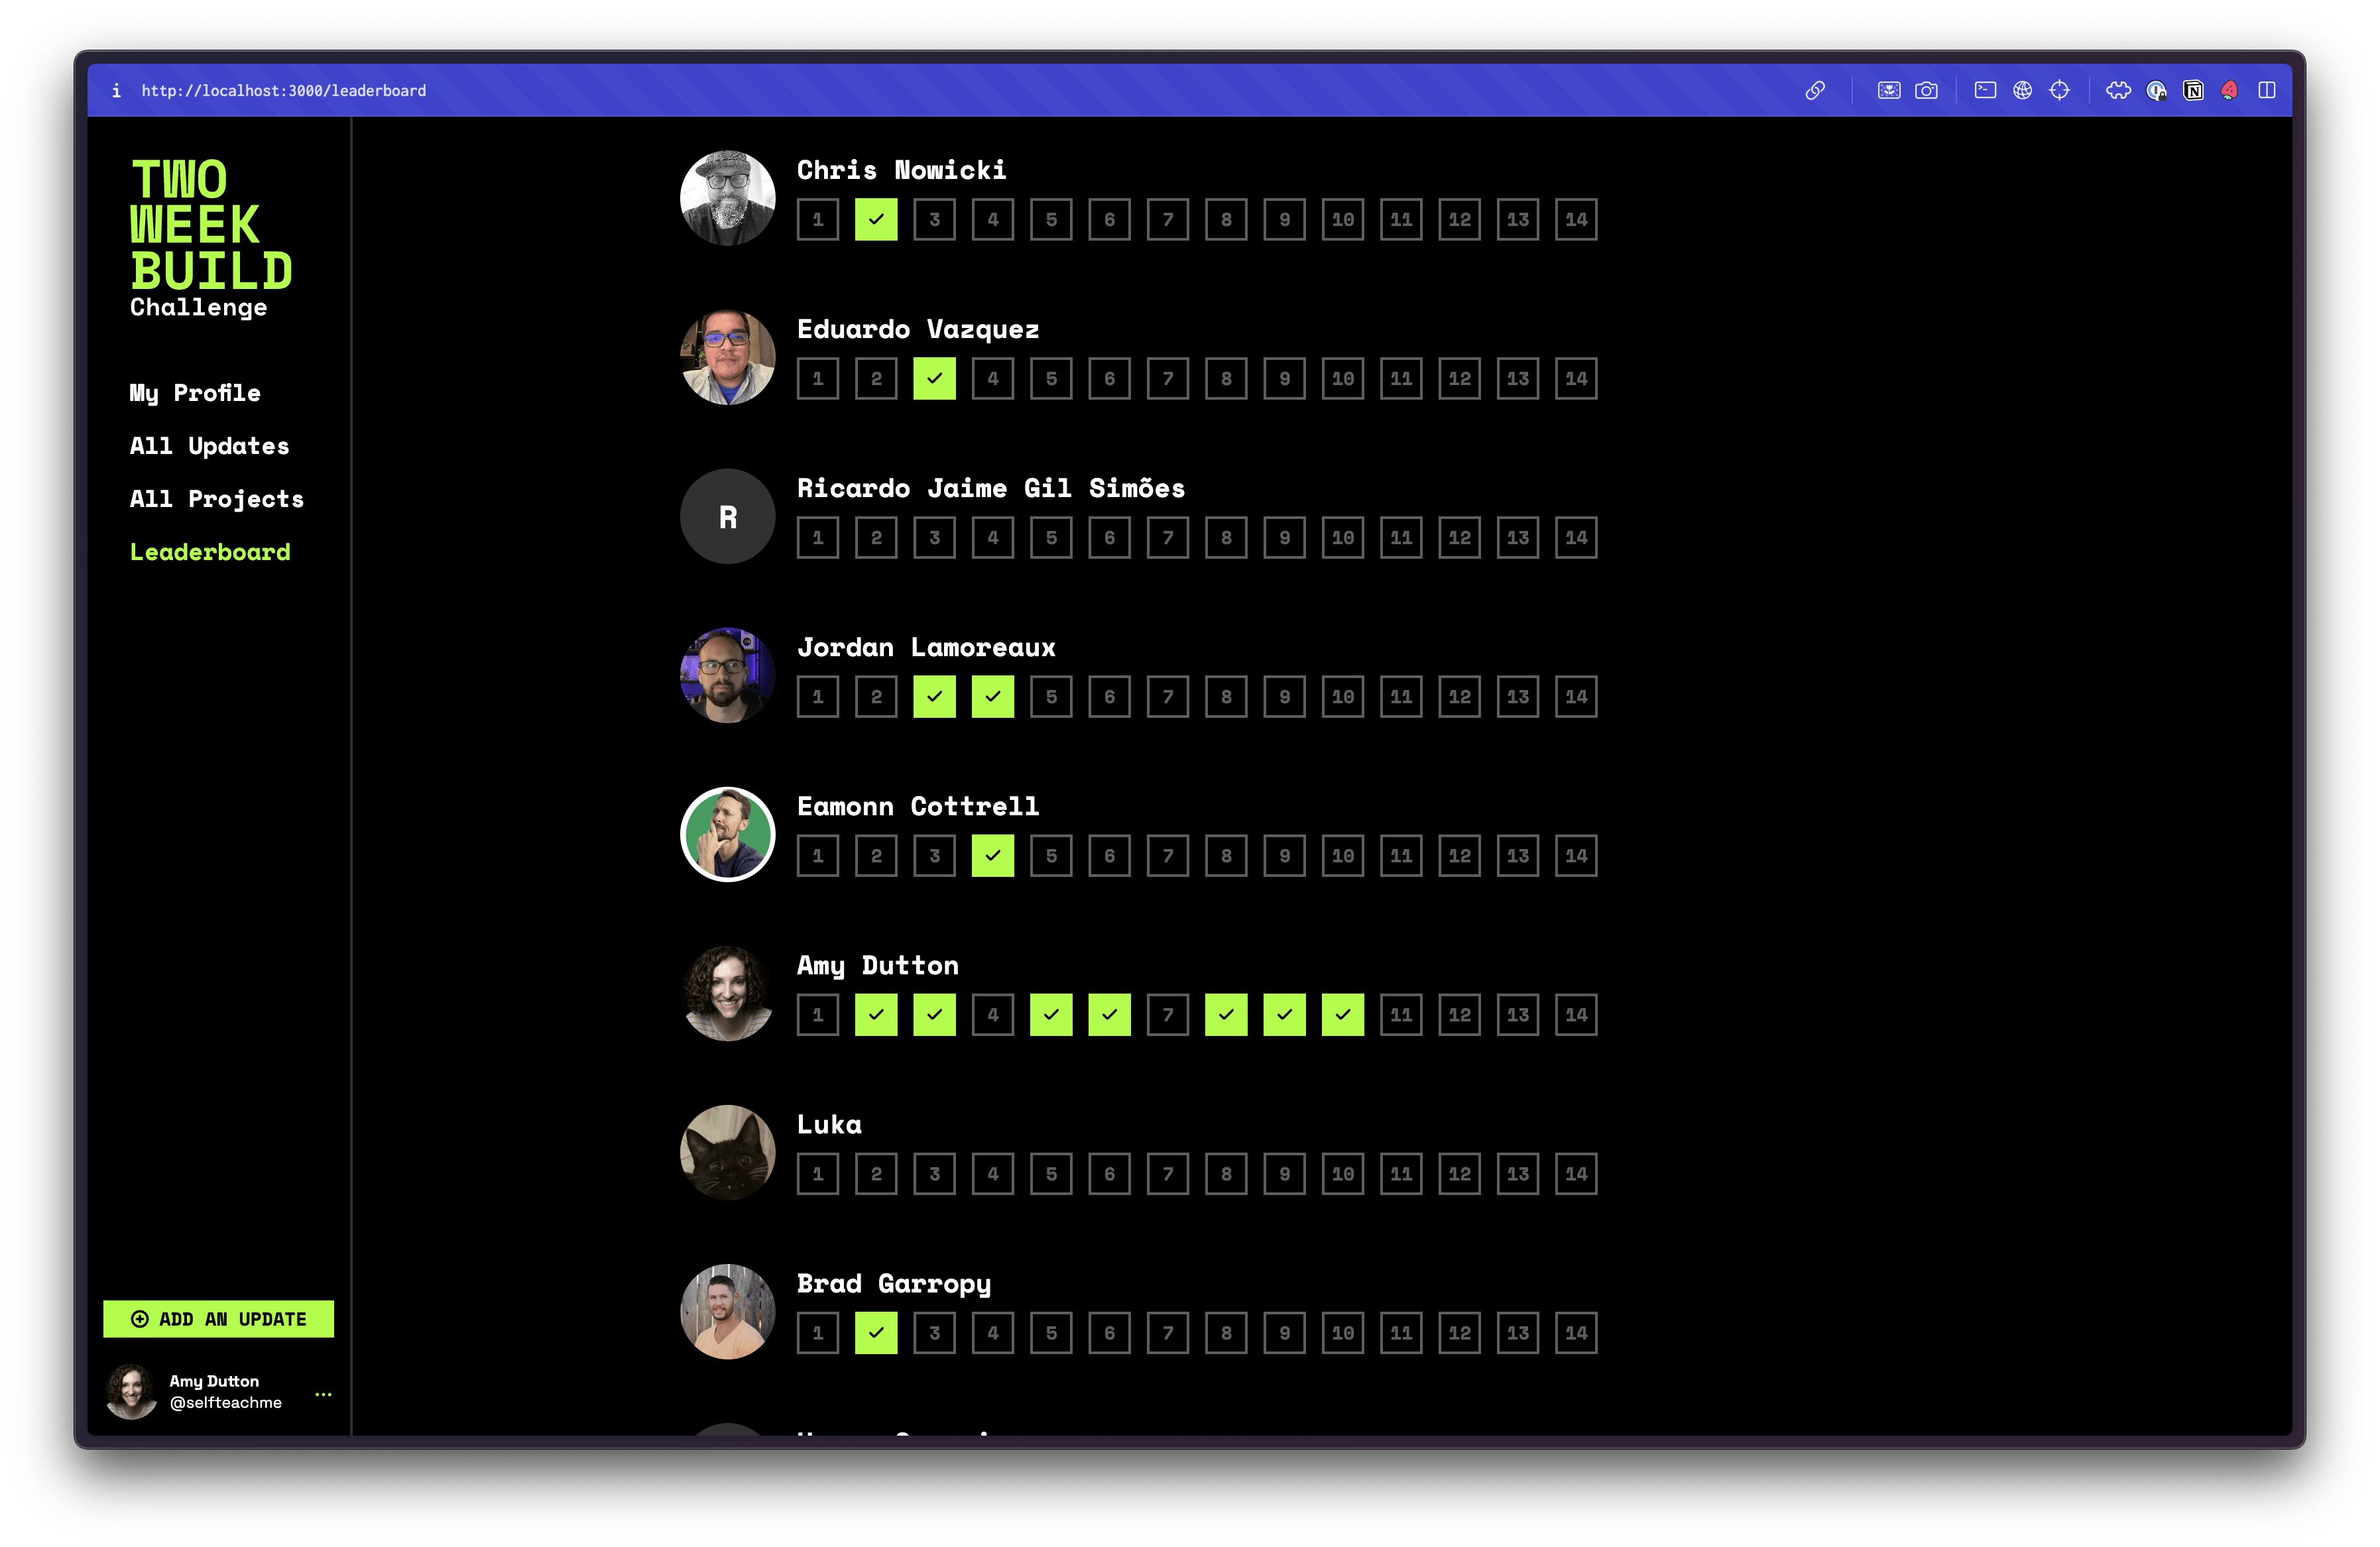
Lastly, I’m competitive, so I created a leaderboard. The intention here isn’t to create an unhealthy culture, but to get in a habit of providing regular updates. So, even if the day’s update was, “I didn’t do anything today, tomorrow’s another day.” That counts!

Even though the page designs may seem simplistic, there’s a lot going on behind the scenes.
Selfishly, I love reading about tech stacks and the development decisions within a project 🤓. So, here’s my deep dive.
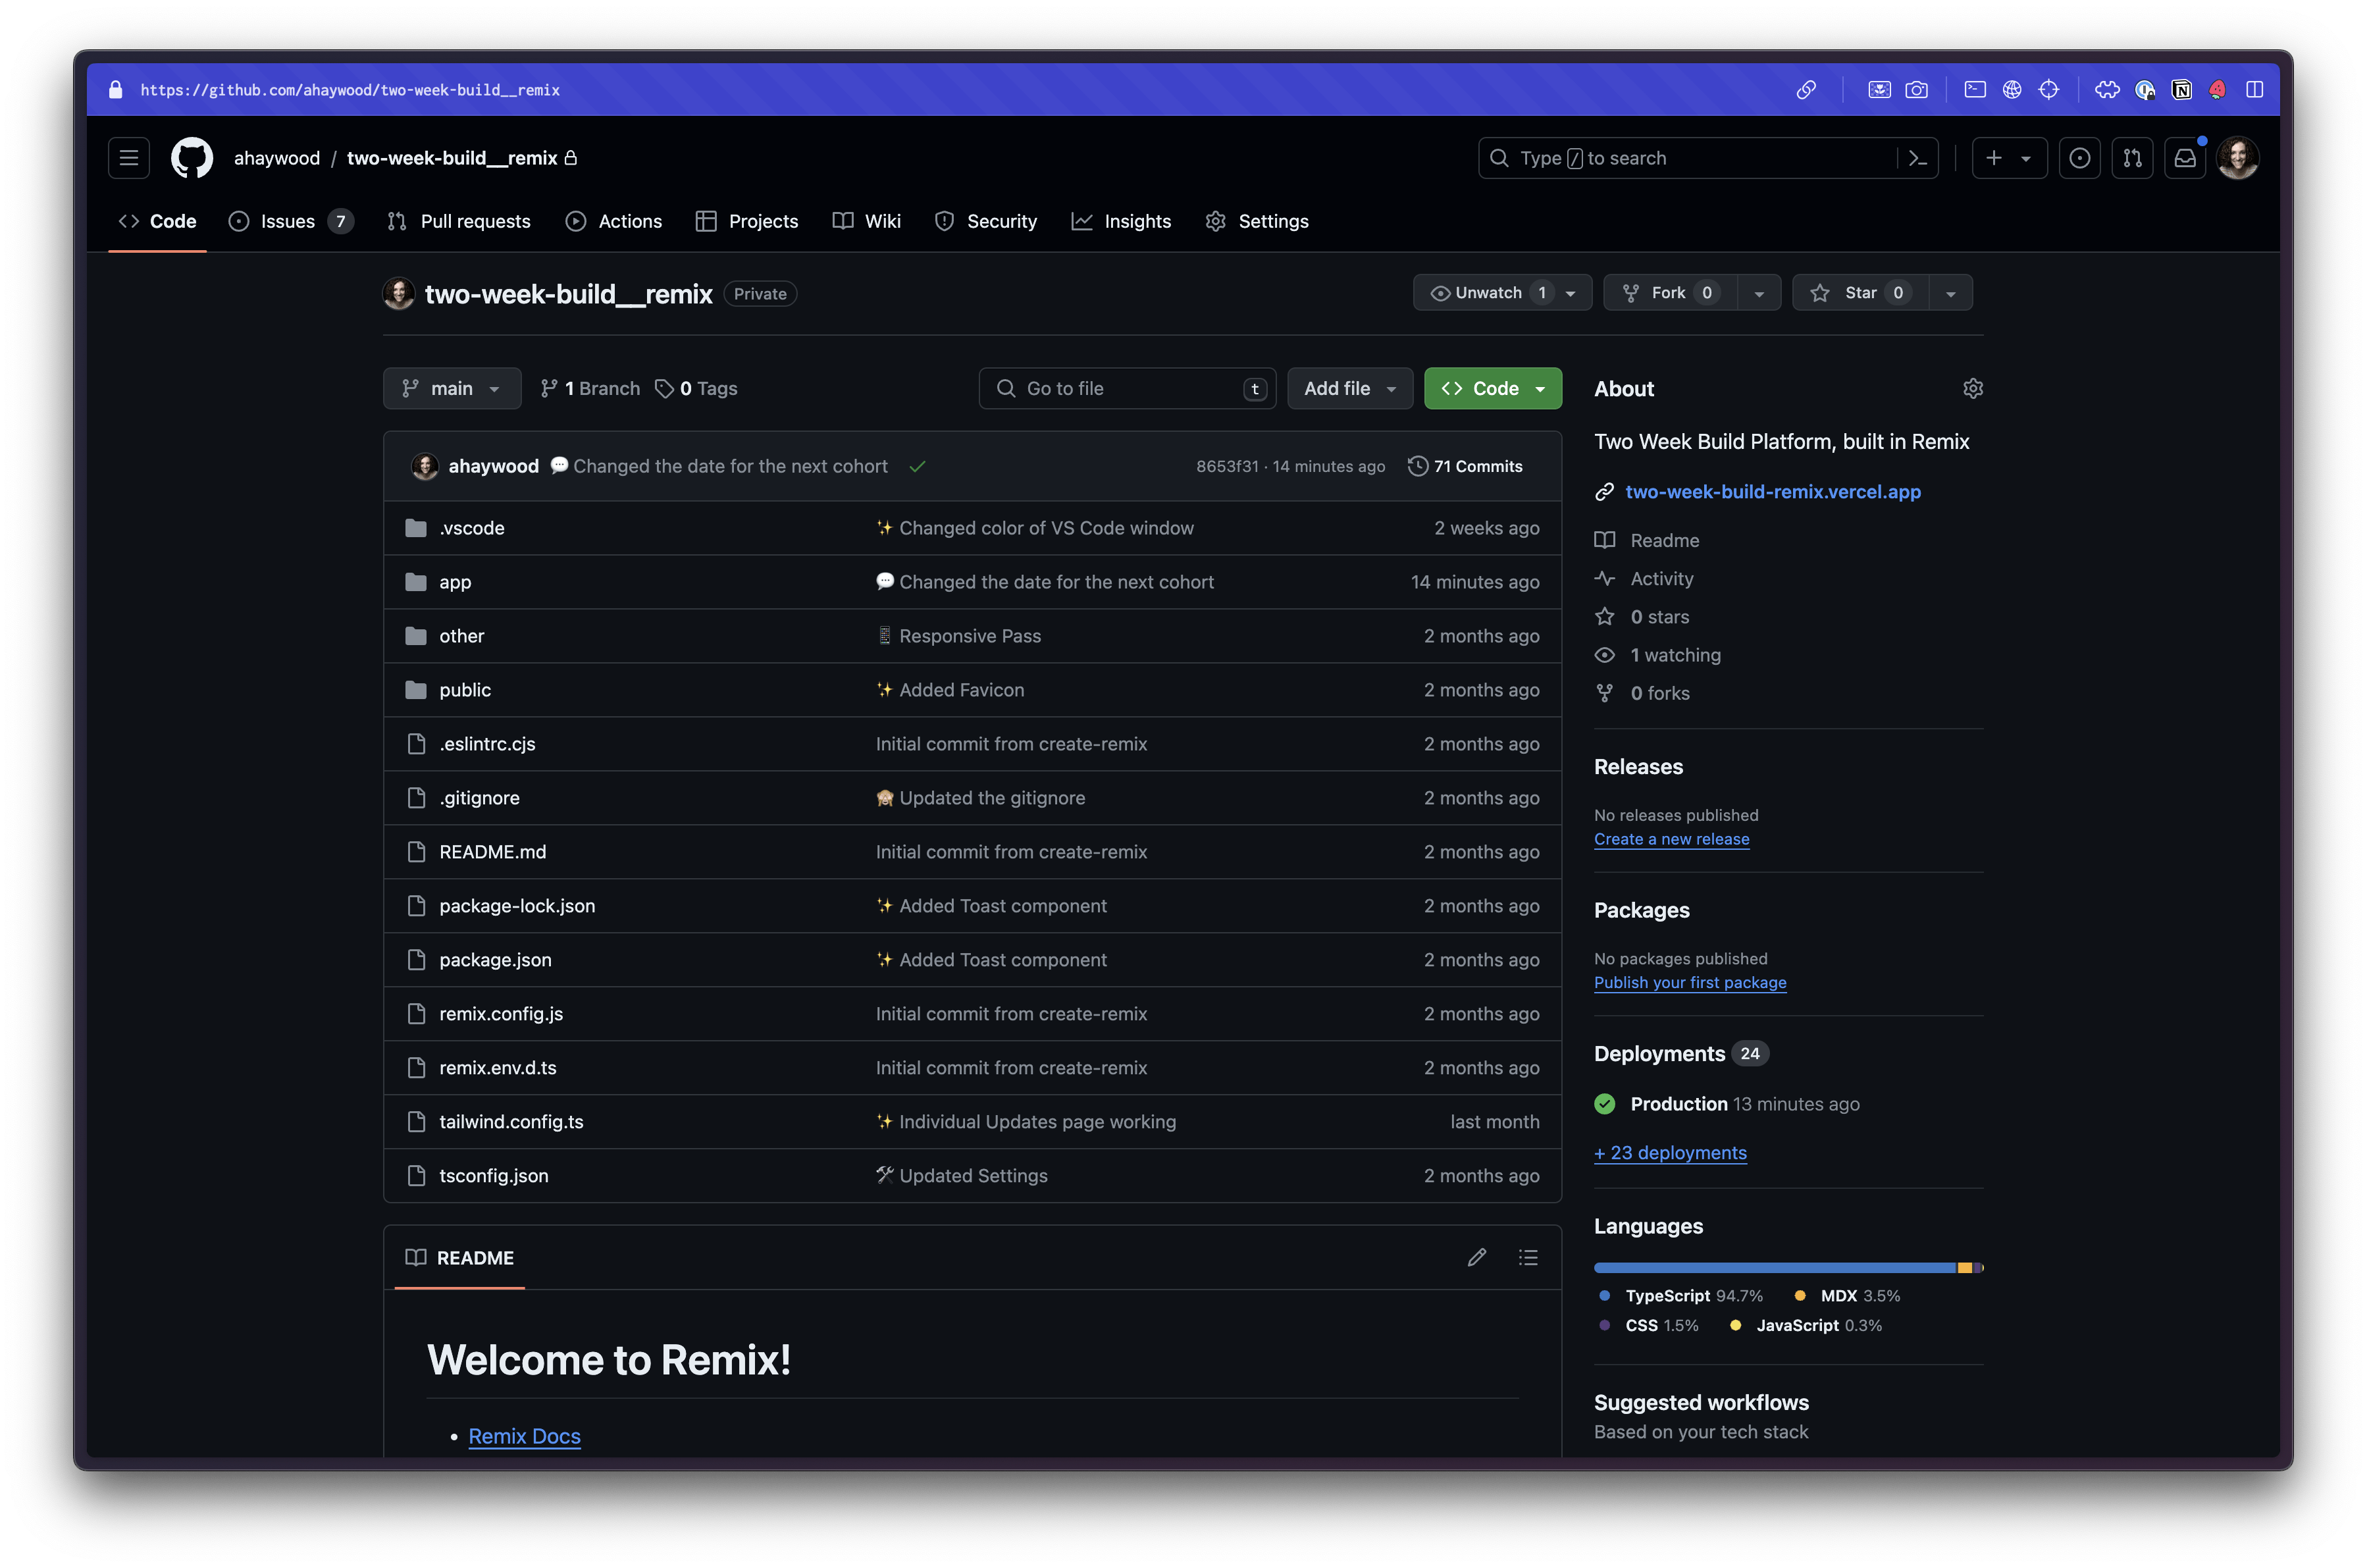
But first, if you want to take a look at the code, everything is open source and on GitHub .
I’m also running a May cohort, if you're interested in joining.
The Tech Stack
Why this Stack?
Funny you should ask. The first iteration of the site was on Astro(!!) The original version of the site was a simple landing page with an email signup form (powered by Kwes Forms). But, as my ideas about the project grew, it became harder to maintain within Astro.
Don’t get me wrong, everything that I wanted to do could be done within Astro. It just felt like I was butting up against its edges. For example, within Astro, you can use Astro’s component system, but you can also bring your own frontend (React, Vue, Svelte, Lit, Preact, Solid, or Alpine). This is great for pieces that require interactivity or need state.
✅ You can stick a React component inside an Astro component (an island).
❌ But, you can’t stick an Astro component inside a React component.
I ran into several instances where I had an Astro component, would nest a React component, and would need to go back to Astro. You can’t do that. Once you nest a React component, you have to stay in React. — Instances like this only became more complicated when you start talking to a database.
I still love Astro and will continue to reach for it when I need a marketing or content focused site.
I did take other frameworks into consideration.
I’m a lead maintainer on the RedwoodJS core team. Naturally, I know (and love) Redwood. So, why didn’t I reach for that? A couple of reasons.
I like to keep tabs on what other frameworks are doing. I believe all the frameworks are good in their own right. And, we all make each other better. The best way to truly learn a framework’s pros and cons is to build a project on top of it. Call it “competitive analysis.”
The second reason is RedwoodJS is a SPA, a single page application. This architecture is perfect if you’re building an application that sits behind a log in. It struggles if your URLs need to unfurl or crawlers need to index your site (Google has gotten better). With Redwood, this won’t always be the case. We’re working on a React Server Components and SSR implementation that will resolve these issues.
All that’s to say, I went with Remix.
For the backend, Supabase was always part of the plan. I’m a huge fan of their backend as a service. Aside from being a great database solution, they also provide auth and storage. — I made good use of all the things. Here, I’m going to do a deep dive on how I’ve implemented these features and solved some of the more complicated aspects of this project.
Supabase Auth
Let’s start with Auth.
Supabase has a built-in auth system. If you use their database for your backend, you’re not required to use their auth. You could setup your own implementation.
The opposite is also true, you could use the Supabase auth system, without their database.
In my case, why would I use one without the other? I need auth and I need a database, so it only made sense to use both.
Plus, Supabase’s auth system also makes it easy to integrate with third party oAuth systems like Google, Apple, Twitter, and GitHub, just to name a few.

For this project, I kept it simple: email and password only. But, it’s nice knowing that I could easily extend my authentication options.
Supabase has a Server-Side Auth package that makes it easy to integrate.
I’ll walk through the steps here, but you can find additional documentation on their site.
Once you spin up a project within Supabase, you’ll need to grab the Supabase URL and Anon Keys and stick these inside your projects .env file:

Then, you’ll want to install the appropriate packages:
npm install @supabase/ssr @supabase/supabase-js
Within your Remix project, you’ll want to account for the loader, action, and component.
If you look at the documentation on Supabase’s site it says that this code is the loader:
import { type LoaderFunctionArgs } from '@remix-run/node'
import { createServerClient, parse, serialize } from '@supabase/ssr'

export async function loader({ request }: LoaderFunctionArgs) {
  const cookies = parse(request.headers.get('Cookie') ?? '')
  const headers = new Headers()

  const supabase = createServerClient(process.env.SUPABASE_URL!, process.env.SUPABASE_ANON_KEY!, {
    cookies: {
      get(key) {
        return cookies[key]
      },
      set(key, value, options) {
        headers.append('Set-Cookie', serialize(key, value, options))
      },
      remove(key, options) {
        headers.append('Set-Cookie', serialize(key, '', options))
      },
    },
  })

  return new Response('...', {
    headers,
  })
}
I refactored it slightly, so that I wouldn’t have duplicate code all over my project. I created a file a file inside my app director called supabase.server.ts. By making the file name server.ts it specifies that this code has to run on the server and never the client.
import { createServerClient, parse, serialize } from '@supabase/ssr'

export const createSupabaseServerClient = (request: Request) => {
  const cookies = parse(request.headers.get("Cookie") ?? "");
  const headers = new Headers();

  return createServerClient(
    process.env.SUPABASE_URL!,
    process.env.SUPABASE_ANON_KEY!,
    {
      cookies: {
        get(key) {
          return cookies[key];
        },
        set(key, value, options) {
          headers.append("Set-Cookie", serialize(key, value, options));
        },
        remove(key, options) {
          headers.append("Set-Cookie", serialize(key, "", options));
        },
      },
    }
  );
}
You’ll notice a few key differences. Instead of exporting a loader function, I’m exporting a function called createSupabaseServerClient. I’m still passing in a request, that I’ll pass in from the actual loader, but instead of returning a new Response, I’m returning the createServerClient function.
Now, I can use this within the loader of any page or layout throughout my application:
import { createSupabaseServerClient } from "~/supabase.server";

export async function loader({ request, params }: LoaderFunctionArgs) {
  const supabase = createSupabaseServerClient(request);

  ...

}
Next up, Supabase provides an action function:
import { type ActionFunctionArgs } from '@remix-run/node'
import { createServerClient, parse, serialize } from '@supabase/ssr'

export async function action({ request }: ActionFunctionArgs) {
  const cookies = parse(request.headers.get('Cookie') ?? '')
  const headers = new Headers()

  const supabase = createServerClient(process.env.SUPABASE_URL!, process.env.SUPABASE_ANON_KEY!, {
    cookies: {
      get(key) {
        return cookies[key]
      },
      set(key, value, options) {
        headers.append('Set-Cookie', serialize(key, value, options))
      },
      remove(key, options) {
        headers.append('Set-Cookie', serialize(key, '', options))
      },
    },
  })

  return new Response('...', {
    headers,
  })
}
If you study this code, you’ll notice it looks VERY similar to the loader code. The only difference is:
export async function loader({ request }: LoaderFunctionArgs) {

// vs

export async function action({ request }: ActionFunctionArgs) {
Which means … we can use our supabase.server.ts inside both functions! 😎
Now, we have our component code:
import { type LoaderFunctionArgs } from "@remix-run/node";
import { useLoaderData } from "@remix-run/react";
import { createBrowserClient } from "@supabase/ssr";

export async function loader({}: LoaderFunctionArgs) {
  return {
    env: {
      SUPABASE_URL: process.env.SUPABASE_URL!,
      SUPABASE_ANON_KEY: process.env.SUPABASE_ANON_KEY!,
    },
  };
}

export default function Index() {
  const { env } = useLoaderData<typeof loader>();

  const supabase = createBrowserClient(env.SUPABASE_URL, env.SUPABASE_ANON_KEY);

  return ...
}
I refactored this a little bit too. Within my app directory, I created a file called supabase.client.ts. As you probably guessed, this is code that only runs on the client.
import { createBrowserClient } from '@supabase/ssr'

export const createSupabaseBrowserClient = () => {
  return createBrowserClient(window.ENV.SUPABASE_URL, window.ENV.SUPABASE_ANON_KEY);
}
You’ll notice that I’m referencing a couple of environmental variables: SUPABASE_URL and SUPABASE_ANON_KEY. We need a way of getting these variables from our .env file to our client code.
In the code Supabase provided, it’s able to call them directly, on the server, in our loader function using process.env.SUPABASE_URL! and process.env.SUPABASE_ANON_KEY!. (The ! insists that this exists.) Since these are returned, we can access them inside our component using the useLoaderData hook.
We’ll want to do something similar but different within our root.tsx file. This is the entry point to our application. We can expose our environmental variables here, making them available throughout our entire application. Just like any other route, we can export a loader function from within our root.tsx file as well.
export async function loader() {
  // * If you had add any environment variables to your .env file, you can expose them here
  return json({
    ENV: {
      SUPABASE_URL: process.env.SUPABASE_URL!,
      SUPABASE_ANON_KEY: process.env.SUPABASE_ANON_KEY!,
    },
  });
}
Now, within our App function, we can use useLoaderData to retrieve our environmental variables:
export default function App() {
  const data = useLoaderData<typeof loader>();
Now, we just need to attach it the window. Right above the closing </body> tag:
<script
  dangerouslySetInnerHTML={{
    __html: `window.ENV = ${JSON.stringify(data.ENV)}`,
  }}
/>
I also ran into a few instances where I’d get linting errors with my environmental variables. I finally resolved them by adding a custom definition. Within my app/global.d.ts file:
declare global {
  interface Window {
    ENV: {
      SUPABASE_URL: string;
      SUPABASE_ANON_KEY: string;
    };
  }
}
NOTE: Below/After the declare bock, I have additional type definitions. For example, I define types that mirror the content stored within the database:
export type Project = {
  id: string,
  name: string,
  updates?: Update[],
  user_id?: string,
  cohort_id?: string,
  created_at?: string,
  description: string
  cohorts?: Cohort
}
Now that we have our basic building blocks set up, we need to actually implement this into our login workflow. Again, we’re focused on just the email/password implementation. (And if you’re following along with Supabase’s Documentation we’re on Email Auth with PKCE flow for SSR).
First, we need to create a file app/routes/auth.confirm.tsx and add the following code:
import { redirect, type LoaderFunctionArgs } from '@remix-run/node'
import { createServerClient, parse, serialize } from '@supabase/ssr'
import { type EmailOtpType } from '@supabase/supabase-js'

export async function loader({ request }: LoaderFunctionArgs) {
  const requestUrl = new URL(request.url)
  const token_hash = requestUrl.searchParams.get('token_hash')
  const type = requestUrl.searchParams.get('type') as EmailOtpType | null
  const next = requestUrl.searchParams.get('next') || '/'
  const headers = new Headers()

  if (token_hash && type) {
    const cookies = parse(request.headers.get('Cookie') ?? '')

    const supabase = createServerClient(process.env.SUPABASE_URL!, process.env.SUPABASE_ANON_KEY!, {
      cookies: {
        get(key) {
          return cookies[key]
        },
        set(key, value, options) {
          headers.append('Set-Cookie', serialize(key, value, options))
        },
        remove(key, options) {
          headers.append('Set-Cookie', serialize(key, '', options))
        },
      },
    })

    const { error } = await supabase.auth.verifyOtp({
      type,
      token_hash,
    })

    if (!error) {
      return redirect(next, { headers })
    }
  }

  // return the user to an error page with instructions
  return redirect('/auth/auth-code-error', { headers })
}
Next, we need to update the URLs within our email templates to point to the confirmation endpoint. Within Supabase, click on the Authentication nav item, then Email Templates, and update the source.
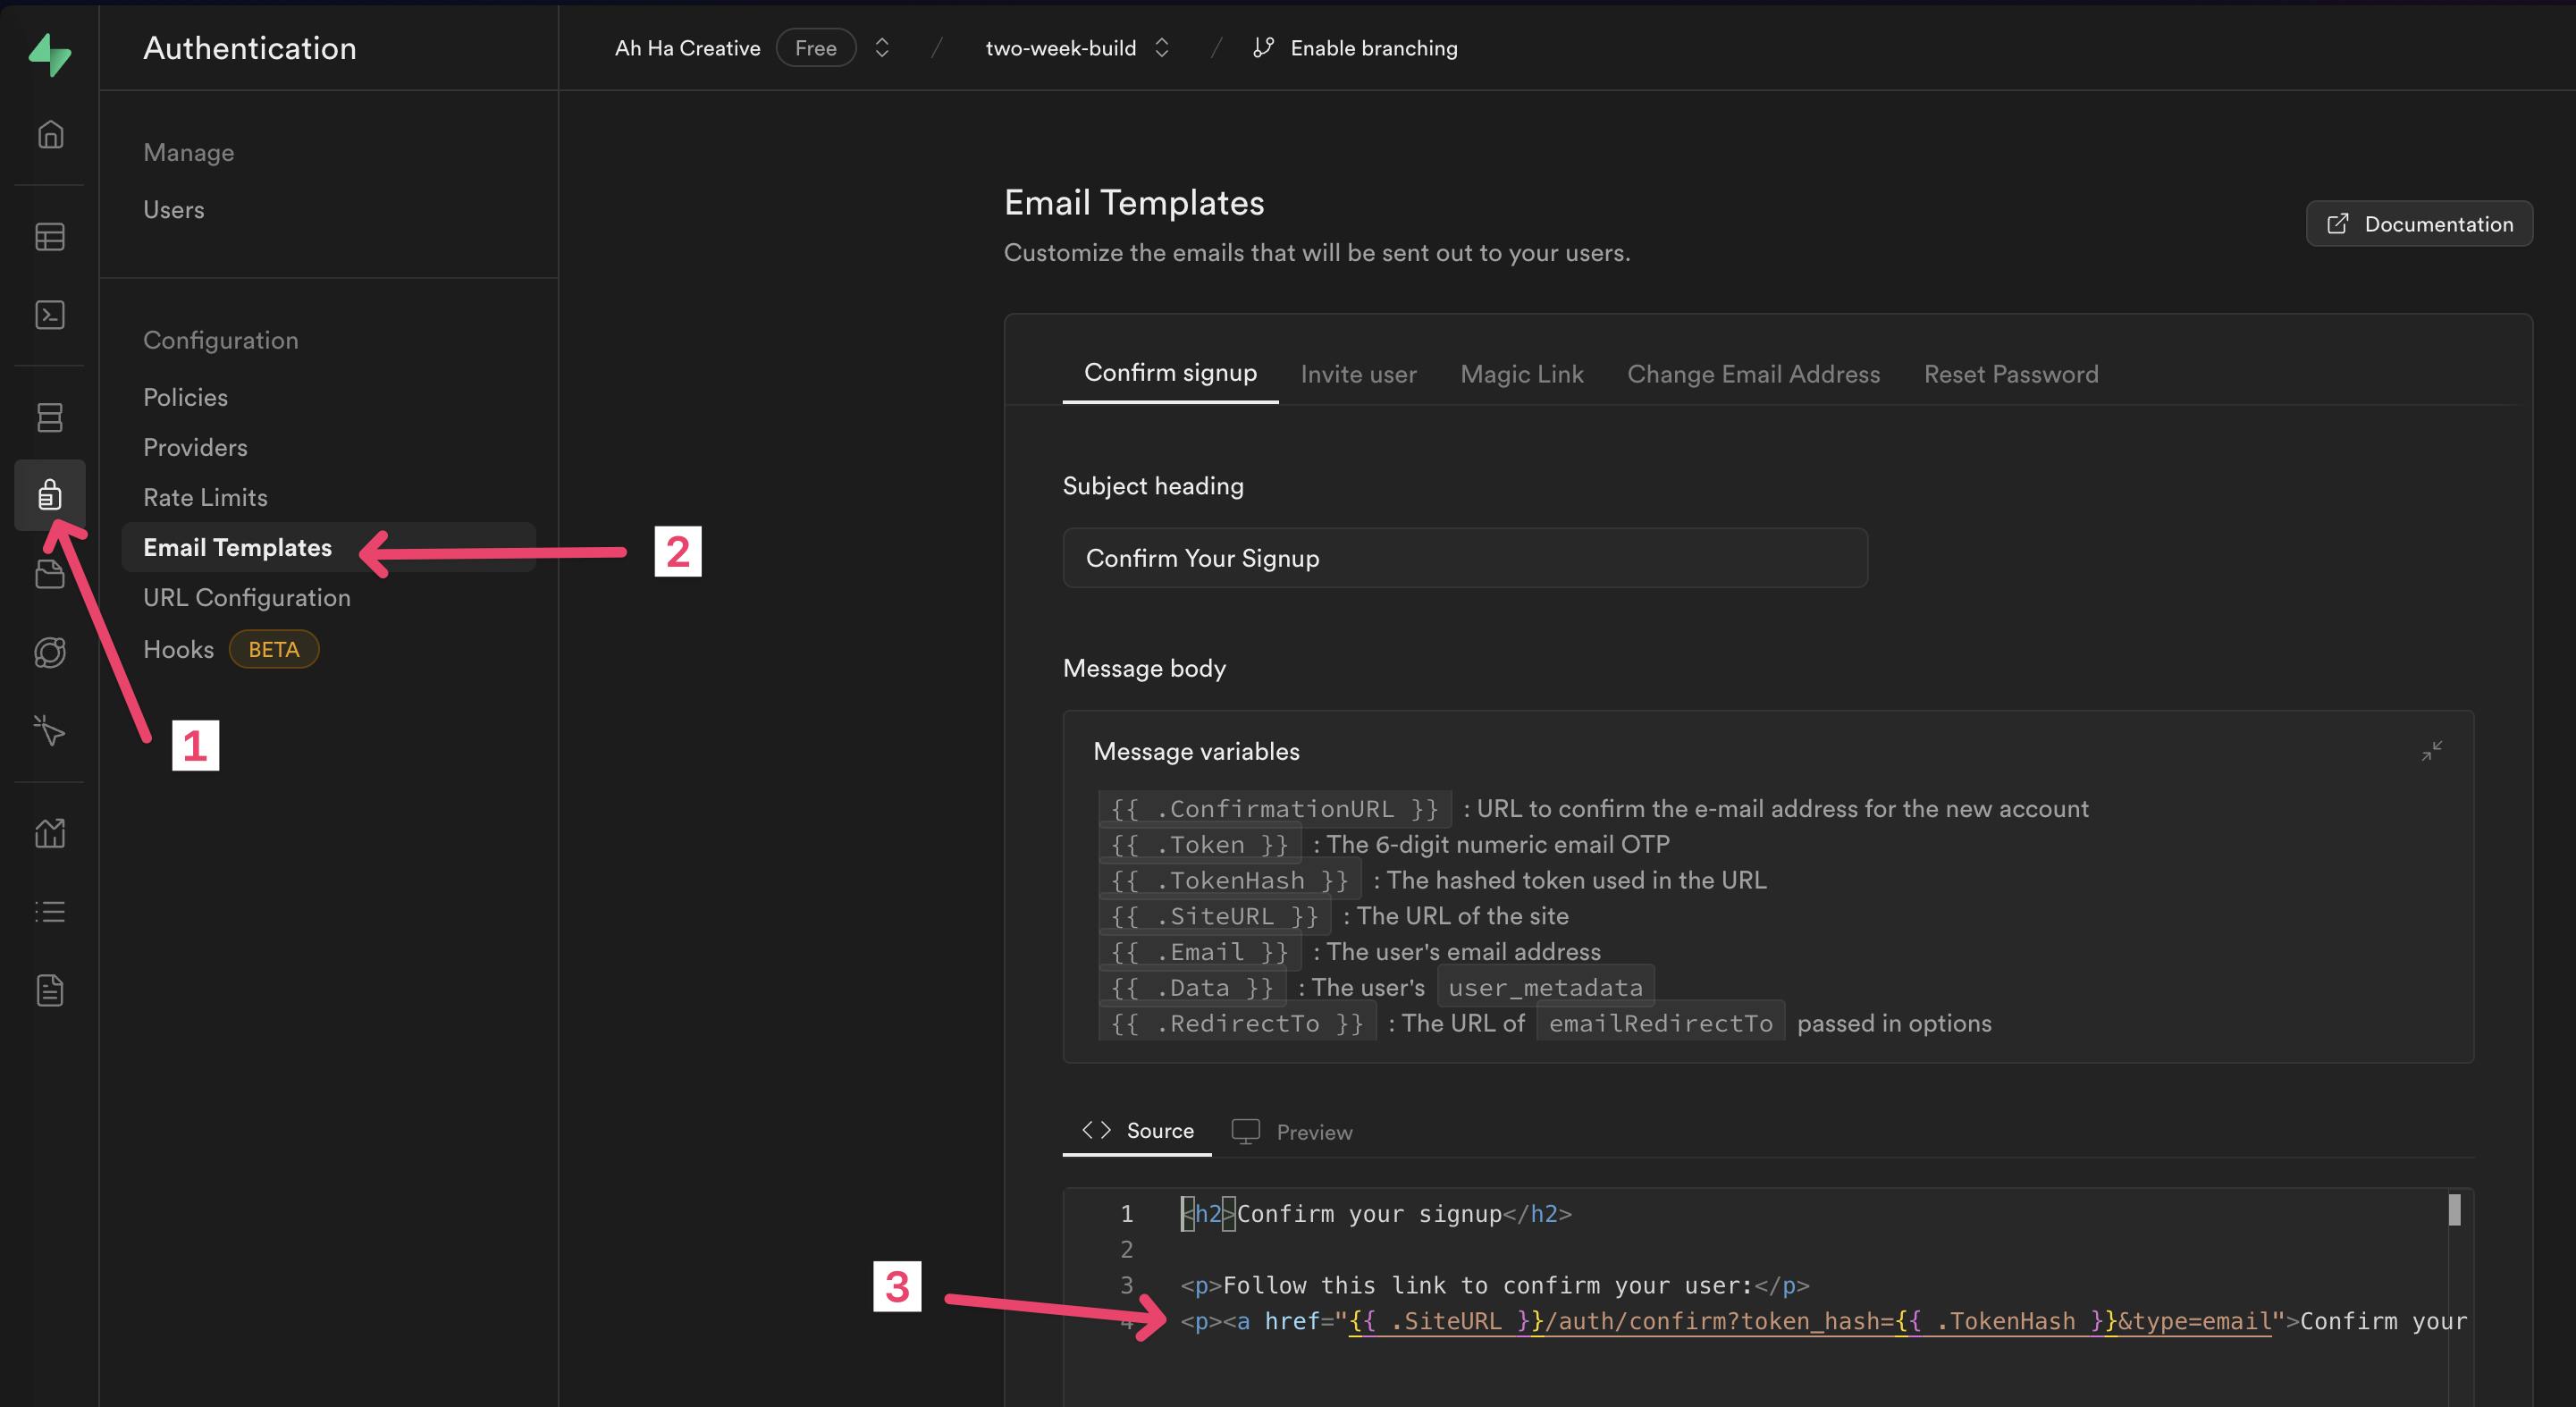
The Sign up Template:
<h2>Confirm your signup</h2>

<p>Follow this link to confirm your user:</p>
<p>
  <a href="{{ .SiteURL }}/auth/confirm?token_hash={{ .TokenHash }}&type=email"
    >Confirm your email</a
  >
</p>
Invite User Template:
<h2>You have been invited</h2>

<p>
  You have been invited to create a user on {{ .SiteURL }}. Follow this link to accept the invite:
</p>

<p>
  <a
    href="{{ .SiteURL }}/auth/confirm?token_hash={{ .TokenHash }}&type=invite&next=/path-to-your-update-password-page"
    >Accept the invite</a
  >
</p>
NOTE: I skipped over the Magic Link template, since I’m not using that functionality.
Change Email Address template:
<h2>Confirm Change of Email</h2>

<p>Follow this link to confirm the update of your email from {{ .Email }} to {{ .NewEmail }}:</p>
<p>
  <a href="{{ .SiteURL }}/auth/confirm?token_hash={{ .TokenHash }}&type=email_change">
    Change Email
  </a>
</p>
Reset Password template:
<h2>Reset Password</h2>

<p>Follow this link to reset the password for your user:</p>
<p>
  <a
    href="{{ .SiteURL }}/auth/confirm?token_hash={{ .TokenHash }}&type=recovery&next=/path-to-your-update-password-page"
    >Reset Password</a
  >
</p>
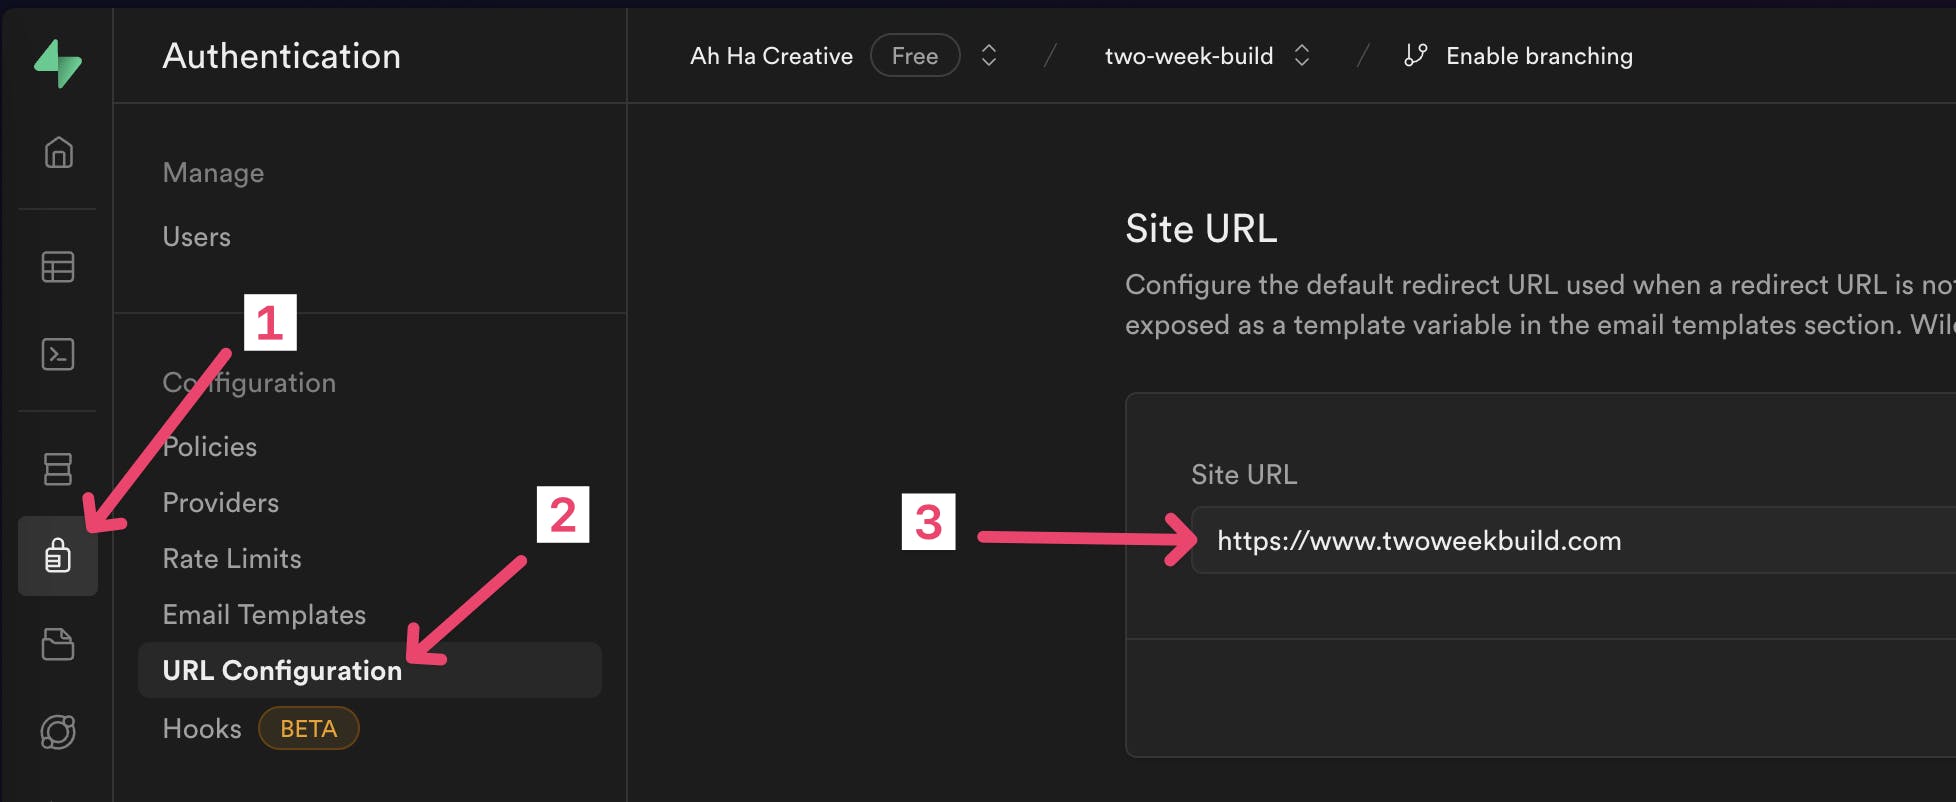
You may have noticed that all these templates reference a {{ .SiteURL }} variable. You can change this under, Authentication > URL Configuration. If you’re developing locally, you’ll probably want this to say http://localhost:3000 but once you launch your project, don’t forget to update it to the production URL.
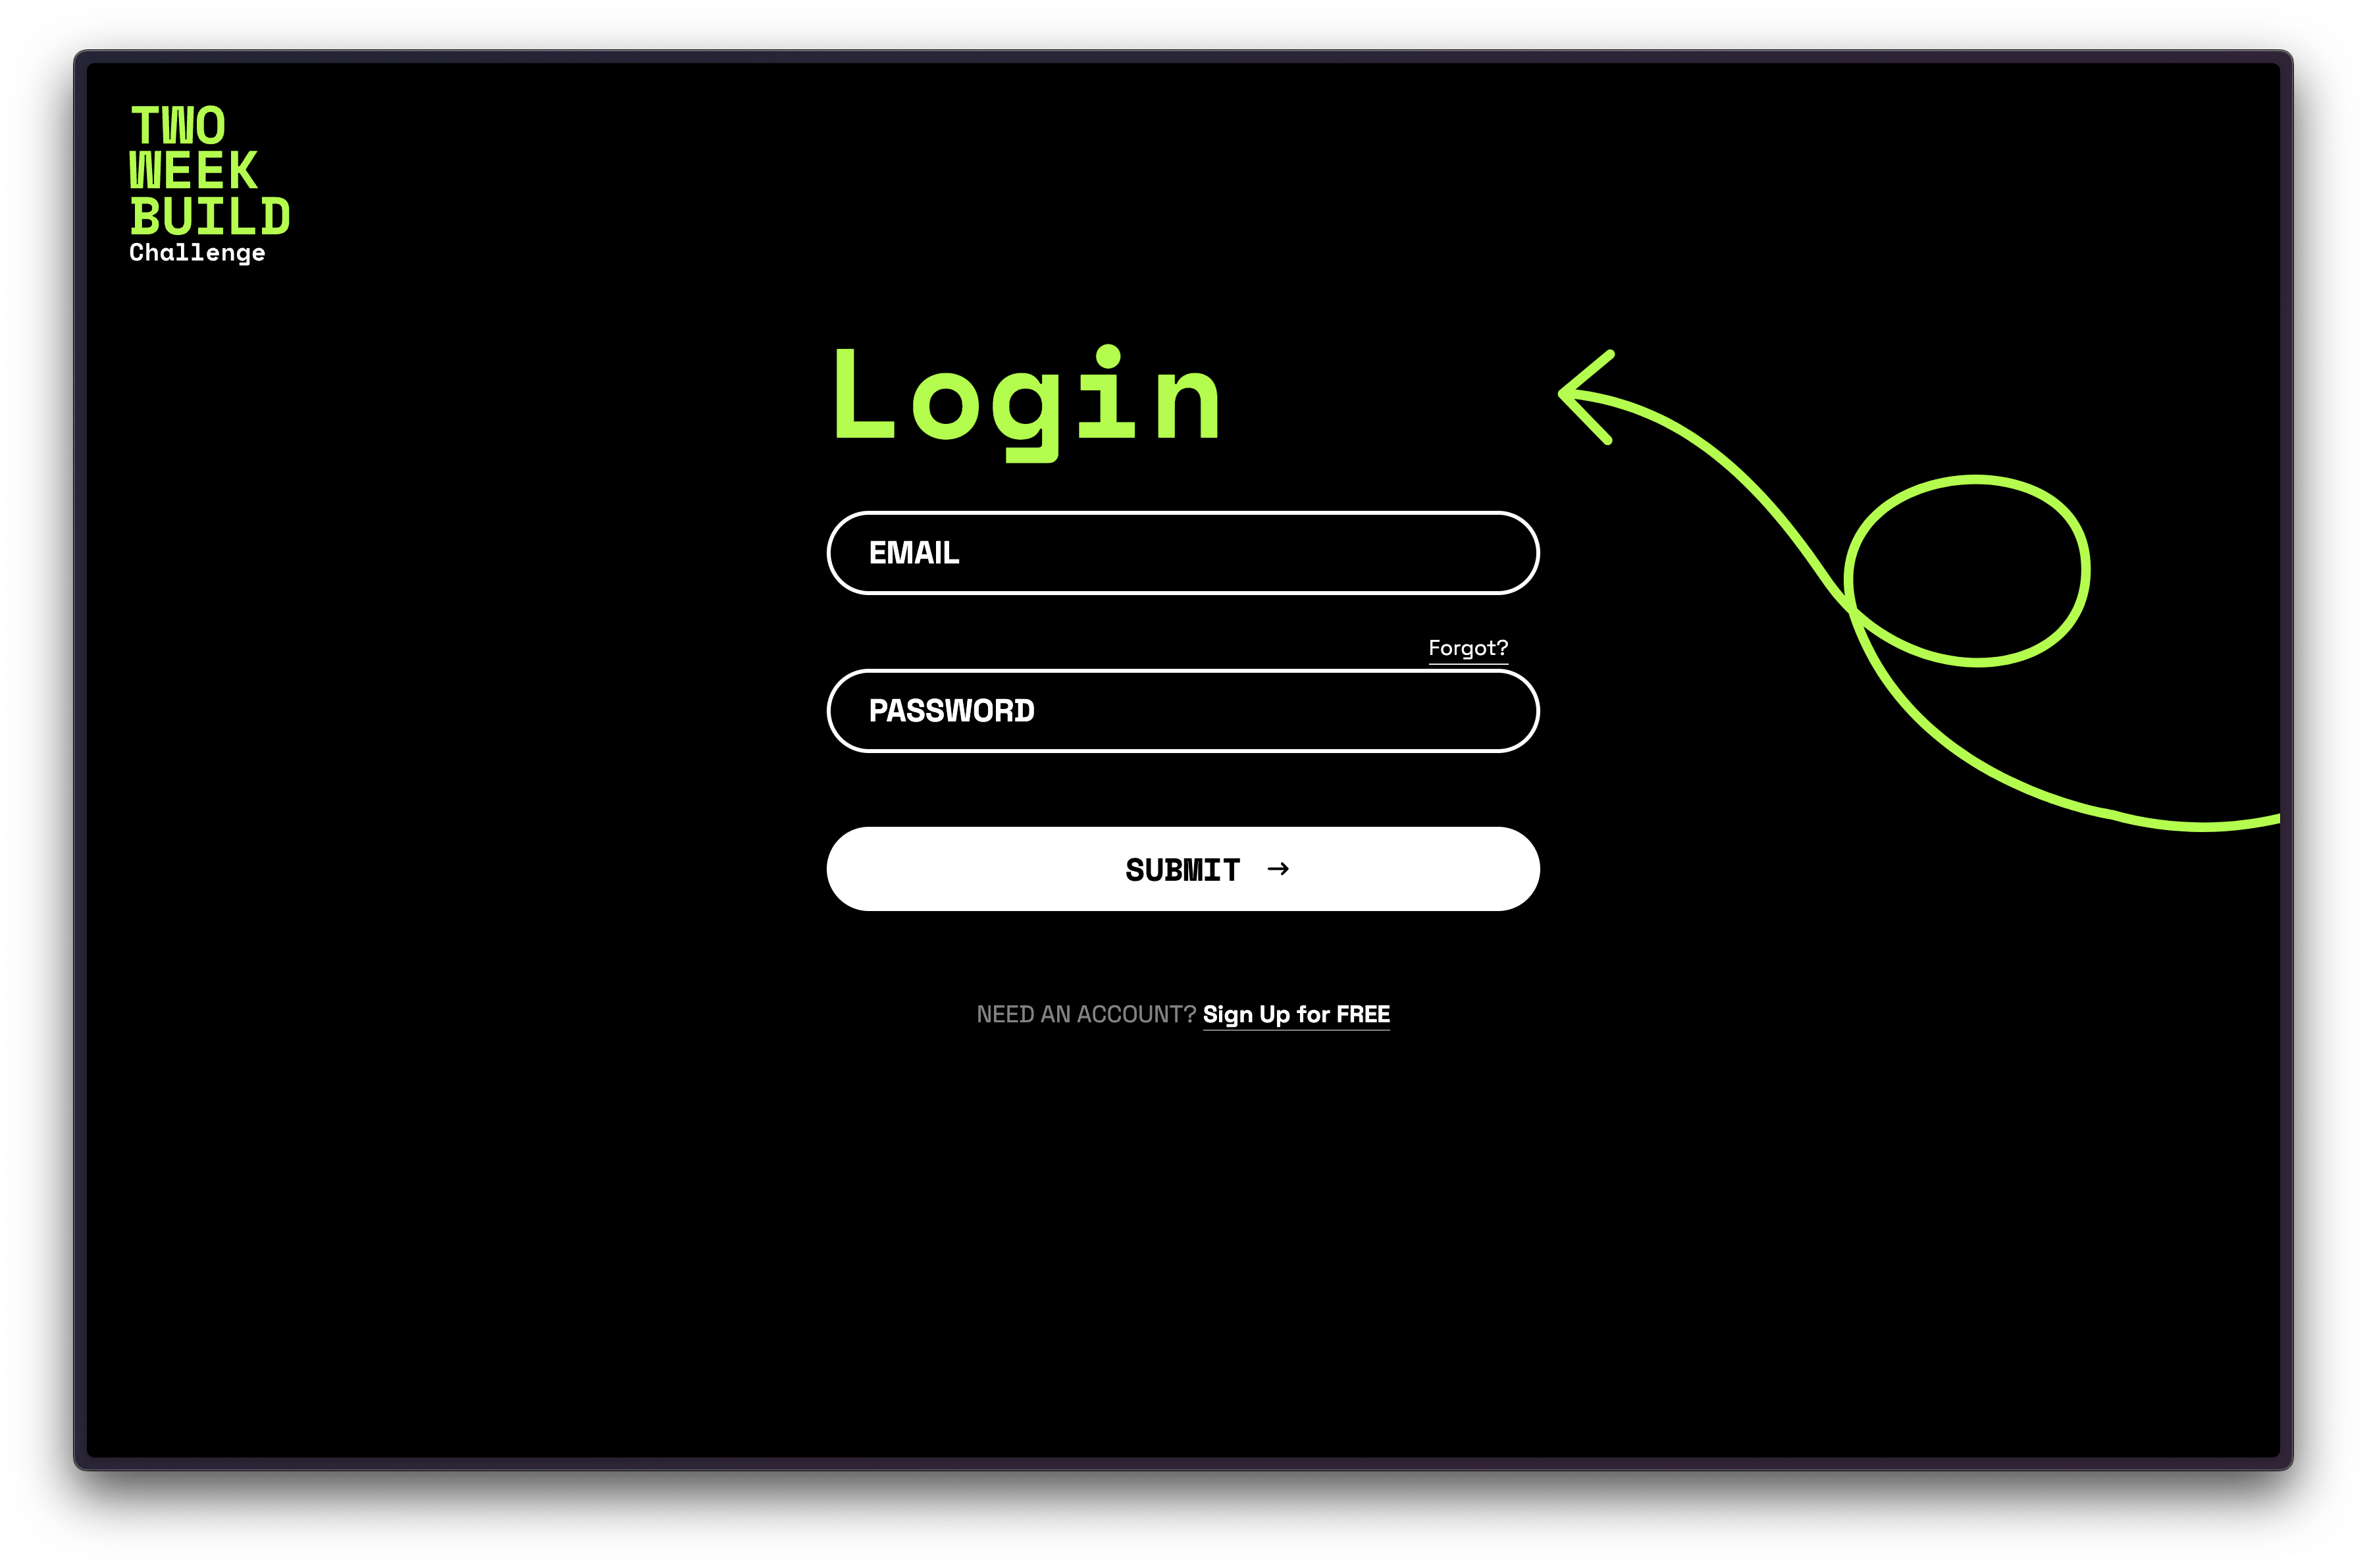
Login Page
Let’s take a look at the Login page. Mine is under app/routes/_auth.login/route.tsx
Using Remix’s router and folder structure, _auth/route.tsx is used to establish the layouts for any pages with _auth in their pathname. Here, my layout file only includes display information, used for the login, forgot password, register, and reset password pages.
On the login page (/login ) itself, the form fields are standard HTML label and input fields. I am wrapping the form fields with a Remix <Form> component:
import { Form } from "@remix-run/react";

...

const inputForm = useRef<HTMLFormElement>();

return (

    <Form ref={inputForm as RefObject<HTMLFormElement>}>

    <label htmlFor="email">Email</label>
    <input type="email" name="email" id="email" />

    <label htmlFor="password">Password</label>
    <input type="password" name="password" id="password" />

    <button onClick={(e) => handleSubmit(e)}>submit</button>

    </Form>

)
NOTE: Here, I simplified code (removed styles and such) for readability, full file here.
There are 2 things that make our form work for us. First, I have a ref on our Form tag. Later, this will make it easy to get the data submitted within the form.
Second, on the button tag, I have an onClick event handler. I’m passing the event onto the handleSubmit function, which allows me to prevent the default browser action (submitting the form to the server) from happening:
const handleSubmit = async (e: MouseEvent) => {
  e.preventDefault();

  // set up the Supabase client
  const supabase = createSupabaseBrowserClient();

  // get the form data
  const formData = new FormData(inputForm.current);
  const dataFields = Object.fromEntries(formData.entries());

  const { data, error } = await supabase.auth.signInWithPassword({
    email: dataFields.email as string,
    password: dataFields.password as string,
  });

  // check for errors
  if (error) {
    console.error(error);
    return;
  }

  // redirect to the user's page
  if (data.session) {
    navigate("/me");
  }
};
Walking through the code, we can start by creating the Supabase client. You’ll notice, we’re using the createSupabaseBrowserClient function that we set up within the app/supabase.client.ts file. Similarly, if we wanted to work with Supabase on the server (inside the loader or action), we’d use the createSupabaseServerClient from the app/supabase.server.ts file instead.
Then, let’s grab the content off the form:
const formData = new FormData(inputForm.current);
const dataFields = Object.fromEntries(formData.entries());
FormData is part of the Web API. We can pass it the ref that we set up earlier and reference current to get all the formData. Now we can access the email and password with dataFields.email and dataFields.password respectively.
Next, we can use the Supabase function signInWithPassword to determine whether the user entered the correct username and password.
const { data, error } = await supabase.auth.signInWithPassword({
  email: dataFields.email as string,
  password: dataFields.password as string,
});
It will return an object with the data or potentially an error.
Once the function runs, we can check to see if an error exists:
// check for errors
if (error) {
  console.error(error);
  return;
}
If there is an error, we can display it in the console: console.error and return, which will exit our handleSubmit function. Ideally, you’ll want to display the error message to the user.
If there are no errors, we’ll be able to get past this conditional. Then, I want to check to see if there’s a session on the data object. If there is, the login was successful, the user session was set up correctly, and I’ll navigate to the /me route.
// redirect to the user's page
if (data.session) {
  navigate("/me");
}
Easy, peasy right?!
Before we dive into the remaining auth pages, let’s take a look at the /me route. It’s a little different than the other routes in my project. I wanted to use /me almost as a shortcut for the user to quickly visit their profile page.
Within app/routes/me.tsx file:
import { LoaderFunction, redirect } from "@remix-run/node";
import { createSupabaseServerClient } from "~/supabase.server";

export const loader: LoaderFunction = async ({ request }) => {
  const supabase = createSupabaseServerClient(request);

  // get the current user
  const { data, error } = await supabase.auth.getUser();
  if (error) console.error(error);

  // if there's no user, redirect to the login page
  if (data.user === null) return redirect("/login");

  // get the current user's username
  const username = await supabase
    .from("users")
    .select("username")
    .eq("auth_id", data?.user?.id)
    .single();

  return redirect(`/${username.data?.username}`);
};
Notice, this route doesn’t have a component that gets displayed to the frontend. It’s using our createSupabaseServerClient to talk to Supabase and get the current user:
const { data, error } = await supabase.auth.getUser();
If the user isn’t logged in, I redirect them to the login page:
if (data.user === null) return redirect("/login");
However, if the user is logged in, then I need to figure out what their username is. If you’re using Supabase Auth, the Authentication table is locked down. You can’t add or change the existing fields.

If you want to keep track of any additional meta data for your users, you’ll need to create a separate table and then “tie” the two together with the User’s UUID (auth_id).

At first glance, this might seem a little cumbersome, but the security benefits make this structure worth it.
On the loader, I can take the auth_id of the logged in user (data.user.id) and then grab the associated username on the users table.
    const username = await supabase
    .from("users")
    .select("username")
    .eq("auth_id", data?.user?.id)
    .single();
Then, I can redirect the user to their profile page:
return redirect(`/${username.data?.username}`);
✏️ NOTE: One thing that’s important about working with Supabase is understanding how Row Level Security works.
Postgres Row Level Security (RLS) is a feature of Postgres that allows you to control which users are permitted to perform SELECT/INSERT/UPDATE/DELETE statements on specific rows within tables and views.
Reference: supabase.com/docs/guides/auth/row-level-sec..
By default, Row Level Security is turned on. So, if you don’t see any data after logging in, you may want to try temporarily turning off row level security to see if that’s causing a problem.
Sometimes it helps me if I can see all the code together, in context.
Let’s look at the other pieces we need for Authentication.
Logout
Once the user is logged in, they also need to be able to logout. I created a logout button that could be used on any page.
// app/components/Logout.tsx

import { useNavigate } from "@remix-run/react";
import { createSupabaseBrowserClient } from "~/supabase.client";

const Logout = () => {
  const navigate = useNavigate();

  const handleLogout = async () => {
    const supabase = createSupabaseBrowserClient({
      SUPABASE_URL: window.ENV.SUPABASE_URL,
      SUPABASE_ANON_KEY: window.ENV.SUPABASE_ANON_KEY,
    });
    const { error } = await supabase.auth.signOut();
    if (error) {
      console.error(error);
      return;
    }
    navigate("/login");
  };

  return <button onClick={handleLogout}>Logout</button>;
};

export default Logout;
Since this component is running on the client side, we’ll use our createSupabaseBrowserClient. Then, I can call the signOut function:
supabase.auth.signOut()
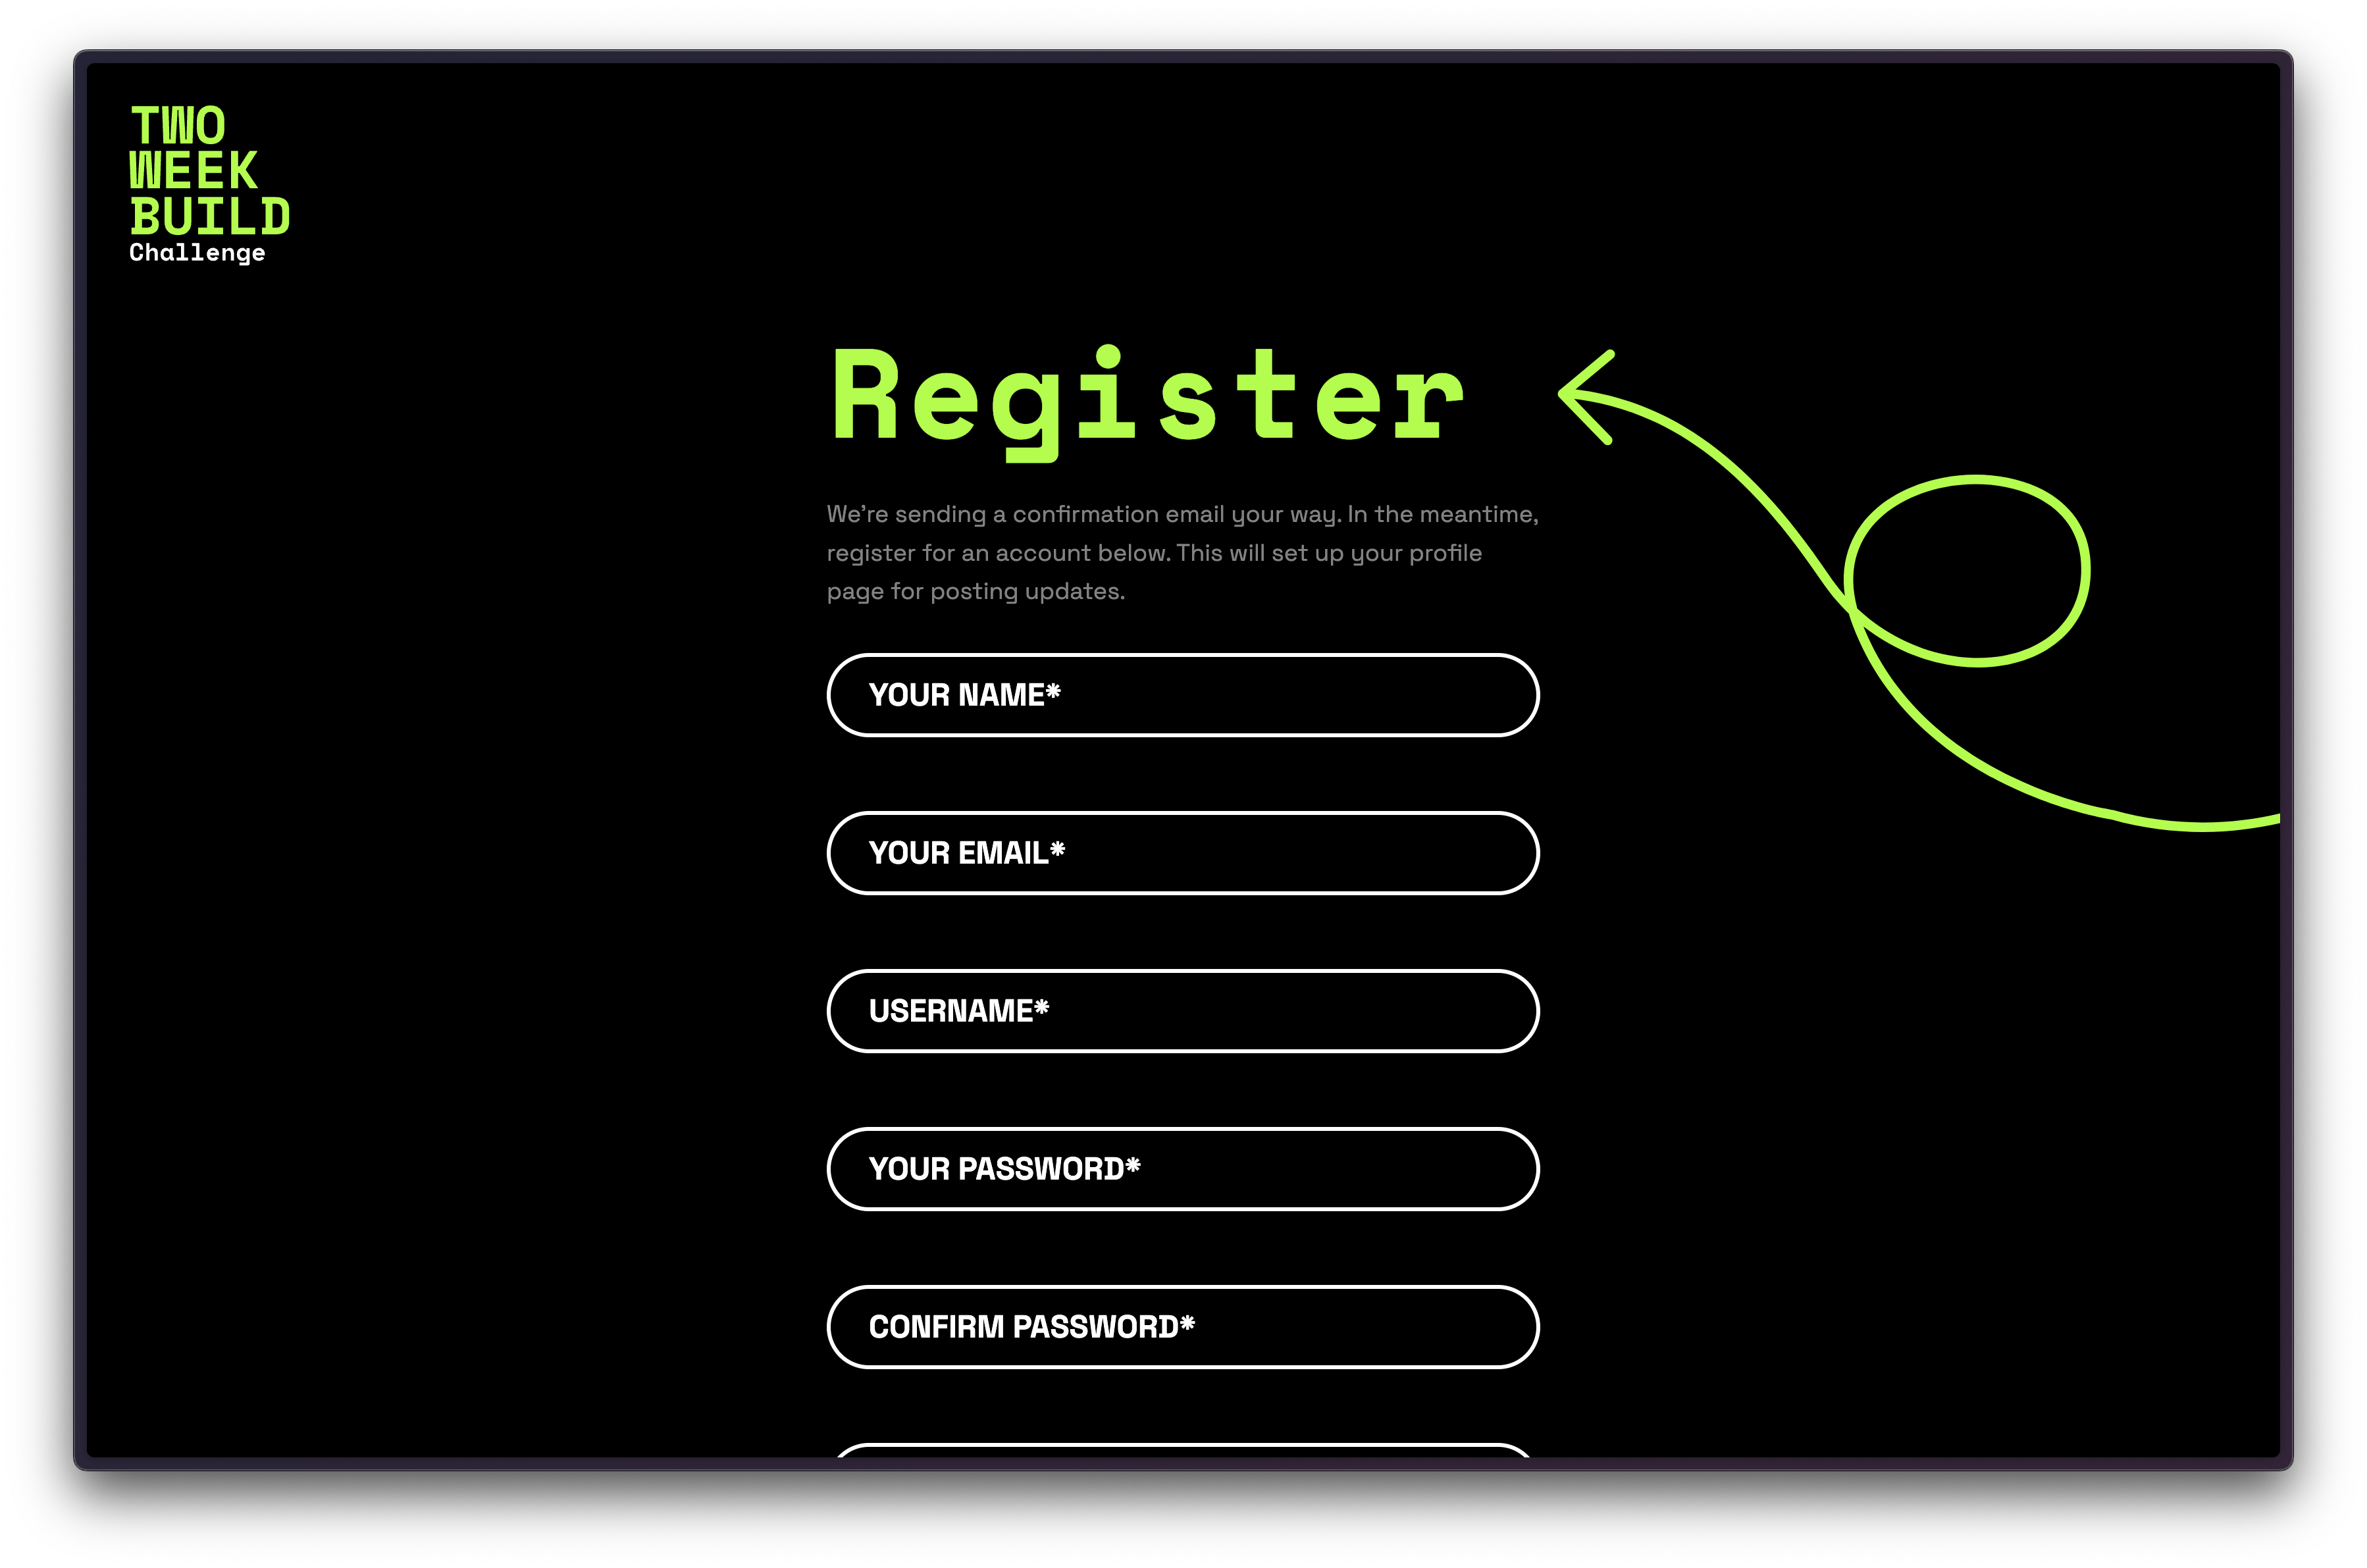
Sign Up Page
Our Sign up page allows a user to register for an account. Since our user details are spread across two separate tables, we’ll need to create the entry on the authentication table first. Then, once we have the user ID, we can add the additional meta data to our user table.
On my _auth.register/route.tsx file, my form is pretty standard, using HTML <label>s and <input>s.
My submit button at the end of the form, is a regular HTML button with a type of submit.
<button type="submit" className="auth-button">
  SUBMIT
</button>
This will trigger the default browser behavior, submitting the form. Let’s look at the <Form> tag:
<Form method="post" className="mb-20" ref={inputForm}>
This is a Remix Form element with a method attribute set to post. Because I haven’t specified an action attribute, it will default to the current route. I can handle the form by adding a function action to the _auth.register/route.tsx file:
export async function action({ request }: ActionFunctionArgs) {
This function is quite large, so I’ll chunk it out:
// get the form data
const formData = await request.formData();

const name = formData.get("name");
const email = formData.get("email");
const username = formData.get("username");
const password = formData.get("password");
const confirmPassword = formData.get("confirmPassword");
const location = formData.get("location");
const website = formData.get("website");
const github = formData.get("github");
const twitter = formData.get("twitter");
const discord = formData.get("discord");
const youtube = formData.get("youtube");
const tiktok = formData.get("tiktok");
const linkedin = formData.get("linkedin");
I’m going to start by grabbing all the form data and assigning each value to it’s own variable. This makes it easier to work with.
For example, the first thing I want to do is make sure the passwords match:
// passwords must match
if (password !== confirmPassword) {
  return json({ error: "Passwords do not match", ok: false });
}
If the password and confirmPassword don’t match, I return a JSON object that contains an error and sets ok to false. There’s nothing special about the property names error and ok, you can name it bananas and apples. The important thing is that you establish a convention for your application and stay consistent in handling errors.
Within the page function, I can retrieve this data using the useActionData hook:
const formResults = useActionData<typeof action>();
Then, I can conditionally display the error message by referencing the error property:
{formResults?.error && (
  <div
    className="bg-red-500 text-white mb-10 py-4 px-5 rounded-sm"
    ref={errorMessage}
  >
    <div className="font-bold text-xl">Whoops!</div>
    <div className="text-base font-sans">{formResults.error}</div>
  </div>
)}
On the server (within my action function) I also want to check to make sure all the required fields are completed:
if (!email || !password || !username || !name) {
  return json({ error: "Missing required fields", ok: false });
}
If data is missing, I return another JSON object with an error message and set ok to false.
Assuming we get past our form validation, we’ll want to create our user:
// create a new user
const supabase = createSupabaseServerClient(request);
const authResults = await supabase.auth.signUp({
  email: email as string,
  password: password as string,
  options: {
    emailRedirectTo: `${constants.BASE_URL}/login`,
  },
});
if (authResults.error) {
  console.error(authResults.error);
  return json({ error: authResults.error.message, ok: false });
}
Since this is on the server, we can use our createSupabaseServerClient function. Then, we can use the Supabase auth.signUp function to create a new user with the email address and password they provided. I also provided the emailRedirectTo which will be used in the messaging that Supabase emails to the user, asking them to confirm their email address.
Of course, I also check to make sure that there aren't any errors encountered along the way.
Assuming everything is successful, information about the new user will be saved in the authResults variable. — we’ll need the new user id to connect this entry to the user’s table with meta data.
Here, I’m using the Supabase API to insert a new entry on the users table, adding all the meta data we collected from our form. Notice the auth_id is set to the authResults.data.user.id from the auth table.
// create a user profile
const userProfileResults = await supabase
  .from("users")
  .insert([
    {
      username,
      name,
      auth_id: authResults.data.user?.id,
      location,
      website,
      github,
      twitter,
      discord,
      youtube,
      tiktok,
      linkedin,
    },
  ])
  .single();
// check for errors
if (userProfileResults.error) {
  console.error(userProfileResults.error);
  // since there was an error within Supabase, delete the user on the auth table
  // we don't need a user without a profile
  if (authResults.data.user?.id) {
    const userAuthDeleteResults = await supabase.auth.admin.deleteUser(
      authResults.data.user.id
    );
    if (userAuthDeleteResults.error)
      console.error("Error deleting user", userAuthDeleteResults.error);
  }
  return json({ error: userProfileResults.error.message, ok: false });
}
I also check to make sure that there aren’t errors. If there are, I also delete the user from the Authentication table. I don’t want to have an orphaned entry on the auth table! Instead, I’d rather delete it altogether and have the user try again.
If everything is successful, then the user is redirected to the /thank-you page:
 // redirect the user to create their project
  return redirect(`/thank-you`);
It’s important to note that the user isn’t logged in yet. Supabase will send them an email. They’ll need to follow the provided tokenized link, which will confirm their address and allow them to login. But, all that functionality is built-into the Supabase SDK! 🙌 No need to write that logic ourselves. 🥳
If you want to see all the code together, it’s here.
This is perfect for the happy path and everything goes according to plan. But, what if the user forgets their password?
Forgot Password Page
In the app/routes/_auth.forgot.route.tsx file, I have another form with a single input field, where the user can submit their email address.
<input type="email" name="email" id="email" />
The button that submits the form has an onClick event handler:
<button onClick={(e) => handleSubmit(e)}>
    Email me a Reset
</button>
Instead of invoking the default browser behavior, I call preventDefault, and handle everything within the client:
const handleSubmit = async (e: MouseEvent<HTMLButtonElement>) => {
    e.preventDefault();

    const formData = new FormData(inputForm.current);
    const dataFields = Object.fromEntries(formData.entries());

    const { error } = await supabase.auth.resetPasswordForEmail(
      dataFields.email as string,
      {
        redirectTo: `${constants.BASE_URL}/reset-password`,
      }
    );
    if (error) {
      console.error(error);
      setErrorMessage(error.message);
      return;
    }
    setIsSuccess(true);
  };
I grab the FormData from the form. I can do this because I’ve created a reference called inputForm and placed it on the <Form> tag:
const inputForm = useRef<HTMLFormElement>();

...

<Form method="post" ref={inputForm as RefObject<HTMLFormElement>}>
Then, I use the Supabase method auth.resetPasswordForEmail, sending it the user’s email address and setting the redirectTo the reset password page.
supabase.auth.resetPasswordForEmail(
  dataFields.email as string,
  {
    redirectTo: `${constants.BASE_URL}/reset-password`,
  }
);
Lastly, I check for errors. If there are none, I’ve created a piece of state called isSuccess and set that to true. This is pretty simple, it conditionally displays a success message on the page so that the user knows everything went through properly and they need to check their inbox.
{isSuccess && (
  <div className="alert bg-success text-white">
    We emailed you a link to reset your password. Please check your inbox.
  </div>
)}
All the code for this page, can be found here.
Supabase will automatically handle emailing the user. They’ll receive a tokenized link to follow and reset their password.
Reset Password Page
For the Reset Password page, I have a generic form, with a password input for the New Password and the Confirm Password:
<Form method="post" className="pt-3" ref={inputForm}>
    <label htmlFor="email">New Password</label>
    <input
      type="password"
      name="password"
      id="password"
      placeholder=""
    />
    <label htmlFor="email">Confirm Password</label>
    <input
      type="password"
      name="confirmPassword"
      id="confirmPassword"
      placeholder=""
    />
  <button
    type="submit"
    className="auth-button"
    onClick={(e) => handleSubmit(e)}
  >
    Update Password
    <Icon name="arrow" size="xxl" />
  </button>
</Form>
When the user clicks on the button to submit the form, it triggers the handleSubmit function.
I prevent the default browser behavior from happening and then grab all the content from the form:
const formData = new FormData(inputForm.current!);
const password = formData.get("password") as string;
const confirmPassword = formData.get("confirmPassword") as string;
Again, the ref on the Form element, makes it easy to reference: FormData(inputForm.current!)
I do some validation to ensure that the new password and confirm password fields match:
if (password !== confirmPassword) {
  return setErrorMessage("Passwords do not match");
}
If there is an error, I save the error message in a piece of state and then conditionally displaying it on the page:
{errorMessage && <div className="alert bg-error">{errorMessage}</div>}
If everything checks out, then I’ll update Supabase, using the createSupabaseBrowserClient and the auth.updateUser function that Supabase provides.
const supabase = createSupabaseBrowserClient();
const { error } = await supabase.auth.updateUser({ password });
if (error) {
  setErrorMessage(error.message);
  return;
}
If I’m able to successfully reset the password, then I redirect the user to their profile page:
navigate("/me");
If you want to see all the code in context, it’s on GitHub.
This method works great. But, what happens if the user is already logged in? Say they want to go to their account page and change their password. We don’t need to send the user an email, so they’re not coming from a tokenized link. How does that work?
Resetting the Password within the Application
I have a route for /account by creating a file app/routes/_app.account/routes.tsx
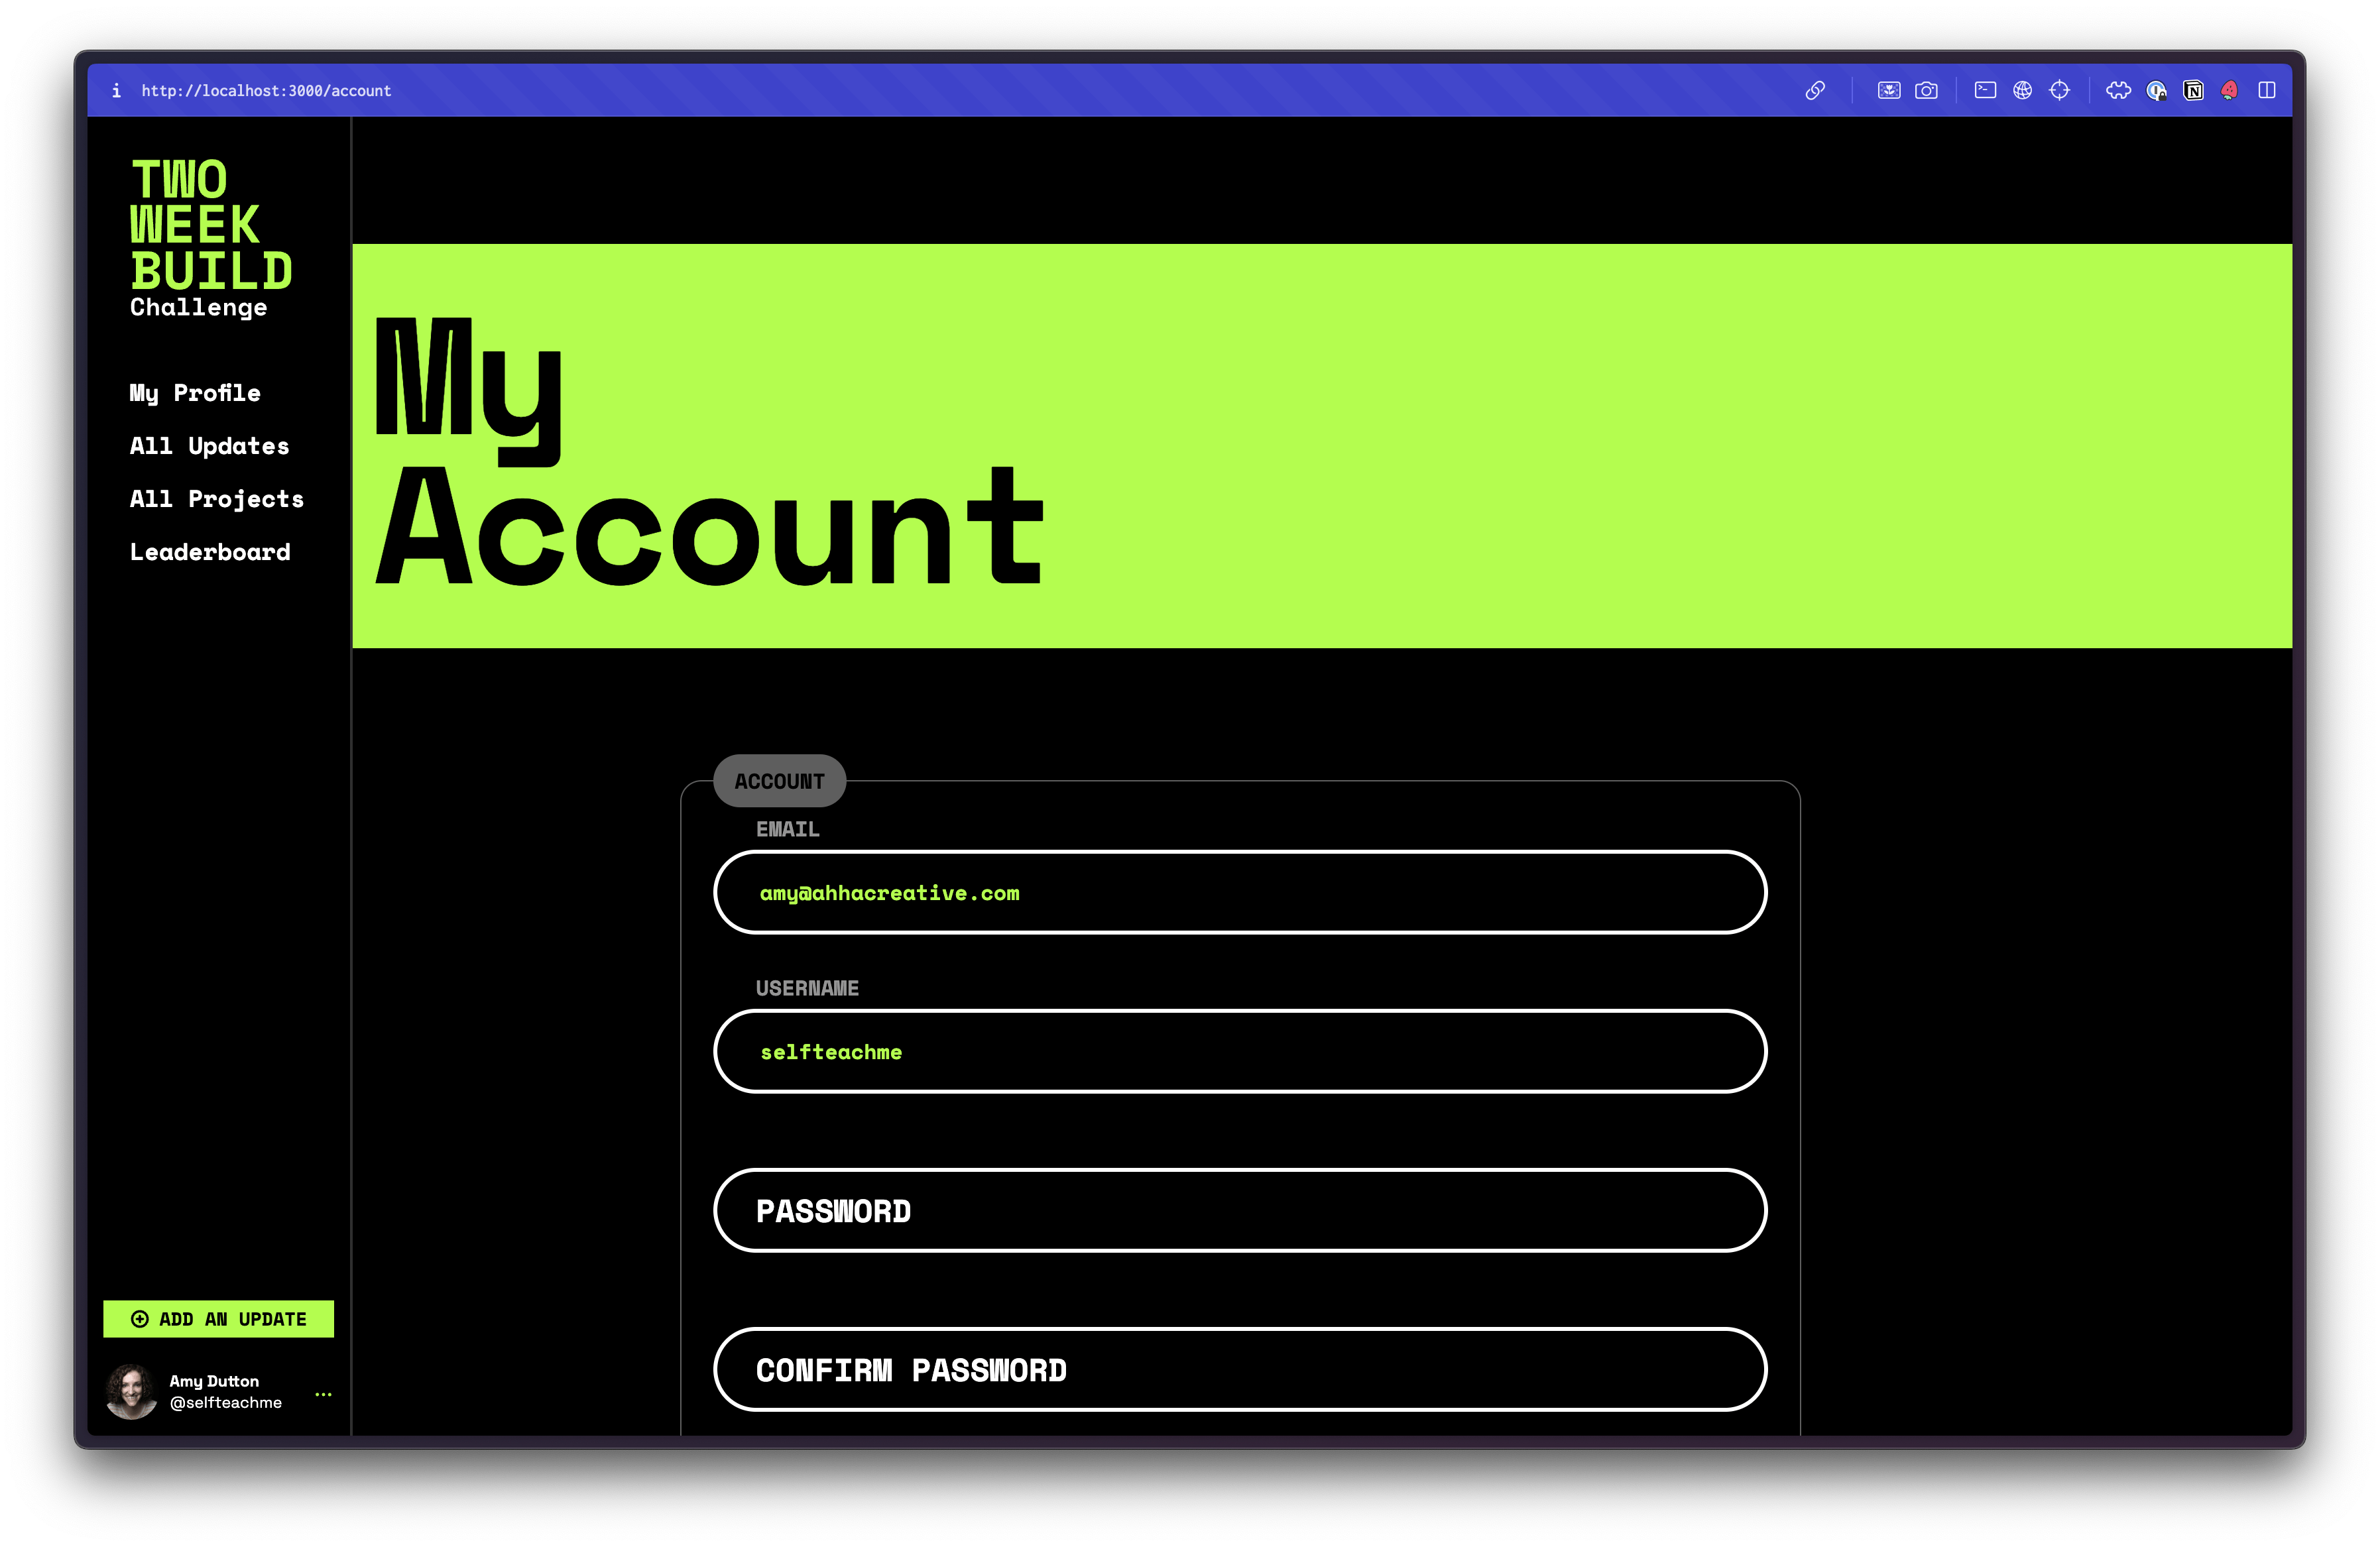
This page contains a form with several fields, not just fields for resetting the user’s password. This is worth noting because:
We’re not going to retrieve and display the user’s password for security purposes.
The user probably won’t provide a password and a confirmed password unless they’re trying to reset it.
If the password field is blank, we don’t want to remove what’s currently in the database.
When this form is submitted, I defer to the default browser behavior.
<div className="page-grid" ref={pageTop}>
    {/* FORM ERROR MESSAGES */}
    <Form method="post" encType="multipart/form-data">
        ...
        <button
          type="submit"
          onClick={() => {
            pageTop?.current?.scrollIntoView({ behavior: "smooth" });
          }}
        >
          Submit
          <Icon name="arrow" />
        </button>
    </Form>
</div>
But, I still put an onClick event handler on the button so that it will scroll to the top of the page (utilizing a ref on the wrapping div). This way the user will see the success or error message displayed at the top of the page. Otherwise, it will feel like nothing happened. The user needs visual feedback.
On the Remix Form element, we specified the post method, but no action attribute. Therefore, it will use the default action within the same route/file.
export async function action({ request }: ActionFunctionArgs) {
First, we want to get all the data, submitted on the form:
// get all the data from the form submission
const formData = await request.formData();
const currentUserId = formData.get("id");
Then, we need to do some form validation, checking to make sure the username and email values exist.
On the HTML input, I do have a required attribute, but you still want to perform server side form validation to prevent malicious or invalid data from entering the database.
<input type="email" name="email" defaultValue={data.user.email} placeholder="" required />
...
<input type="text" name="username" defaultValue={data.user.username} placeholder="" required />
Assuming everything checks out, we can use our createSupabaseServerClient to update the user.
First, we want to check to see if the user is trying to change their username. I saved the username in a hidden field called oldUsername. If they match, then everything should stay the same and we don’t need to do anything. Otherwise, we need to check to see if the username already exists. If it does, then we’ll return json with a error property saying the “Username is already in use.”
  // if the user tried to change their username, make sure it's unique
  // if there aren't any problems, the username gets updated later
  if (formData.get("username") !== formData.get("oldUsername")) {
    const { data, error } = await supabase
      .from("users")
      .select("username")
            .eq("username", formData.get("username") as string)
      .single();
    if (error) {
      console.error(error);
      return json({ error: error.message, ok: false });
    }
    if (data) {
      console.error("Username already in use.");
      return json({ error: "Username already in use.", ok: false });
    }
  }
Next, we want to check to ensure that the password and confirmPassword match. Then, we’ll use an else if statement to see if the user is trying to change their password. The reason we’re doing this additional check is because the user could leave the password and confirmPassword fields blank. Since they’re both empty, they match! Then, we only want to run auth.updateUser if a new password exists. Otherwise, it will remove the existing password altogether.
// if the user tried to change their password, make sure the password and confirm password match
if (formData.get("password") !== formData.get("confirmPassword")) {
  return json({ error: "Passwords do not match.", ok: false });
} else if (formData.get("password")) {
  const resetPasswordResults = await supabase.auth.updateUser({
    password: formData.get("password") as string,
  });
  if (resetPasswordResults.error) {
    console.error(resetPasswordResults.error);
    return json({ error: resetPasswordResults.error.message, ok: false });
  }
}
We also need to run similar to checks for the email field. I saved the old email address inside a hidden input called oldEmail. If the email field and oldEmail field don’t match, then we want to update it using auth.updateUser. Because this is using Supabase’s auth system, it will run the check for us, ensuring that email address isn’t already in the database.
// if the user tried to update their email address
let message = "";
if (formData.get("email") !== formData.get("oldEmail")) {
  const emailResults = await supabase.auth.updateUser({
    email: formData.get("email") as string,
  });
  if (emailResults.error) {
    console.error(emailResults.error);
    return json({ error: emailResults.error.message, ok: false });
  }
  message = "Please check your email to confirm the change.";
}
It might seem a little strange doing all these checks, but one of the reasons we’re using this logic is because each field has different rules. And the code for the user and their profile are stored in two different tables within Supabase.
Now that we’ve performed all our validation, let’s get the remaining content out of the form and update the users table.
const user = await supabase
    .from("users")
    .update({
      discord: formData.get("discord") as string,
      youtube: formData.get("youtube") as string,
      github: formData.get("github") as string,
      location: formData.get("location") as string,
      twitter: formData.get("twitter") as string,
      username: formData.get("username") as string,
      website: formData.get("website") as string,
      tiktok: formData.get("tiktok") as string,
      linkedin: formData.get("linkedin") as string,
      avatar: avatarUrl,
    })
    .eq("id", currentUserId as string);
    if (user.error) {
    console.error(user.error);
    json({ error: user.error?.message, ok: false });
    }
    return json({ error: message, ok: true });
If you want to see all the code in context, it’s on GitHub.
Supabase Storage
Supabase also has storage built-in. Since I was already using the Suapbase database and auth, their storage product is an obvious choice.
For the MVP version of the application, the only image I really wanted the user to be able to upload is their avatar.
First, let’s set this up within Supabase. Under the Storage section, I added a new bucket. I set the name to avatars and made it a Public bucket.
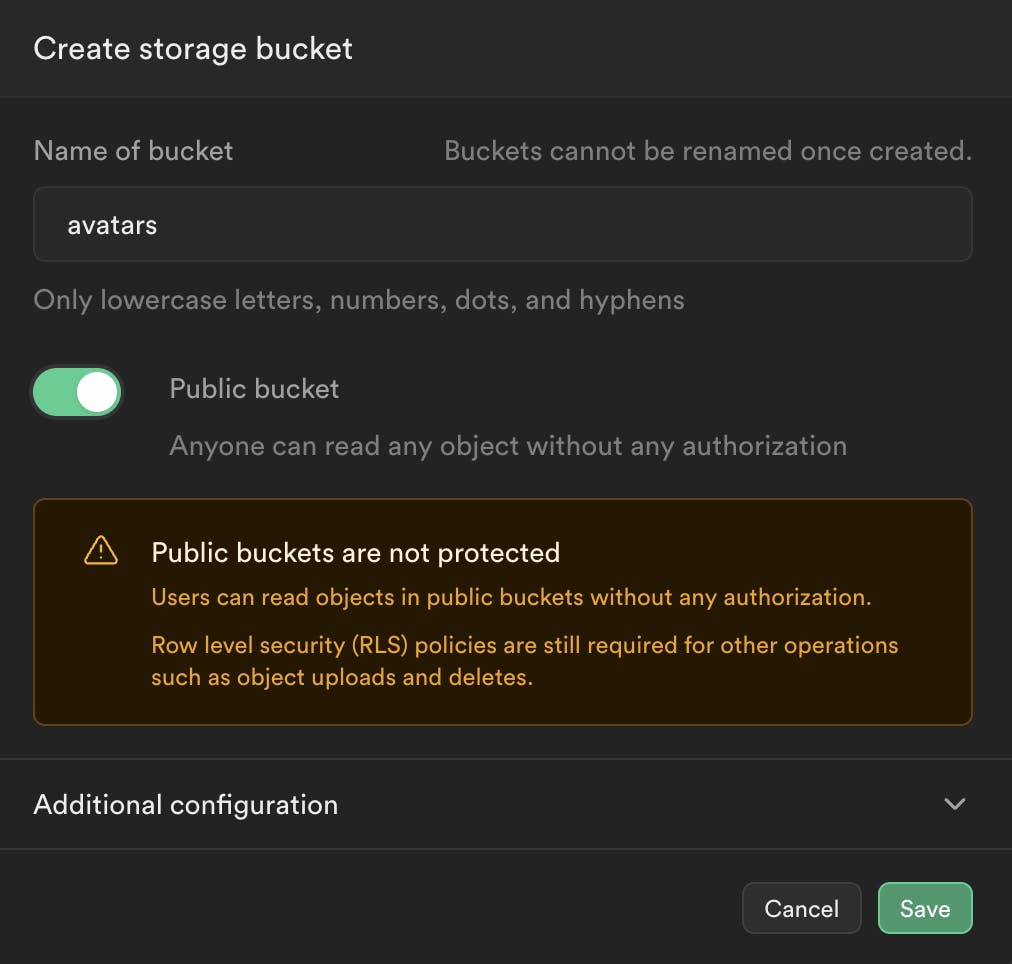
You’ll notice there are some warnings when you make a bucket public, but in our case, I want anyone visiting the site to be able to see the avatars.
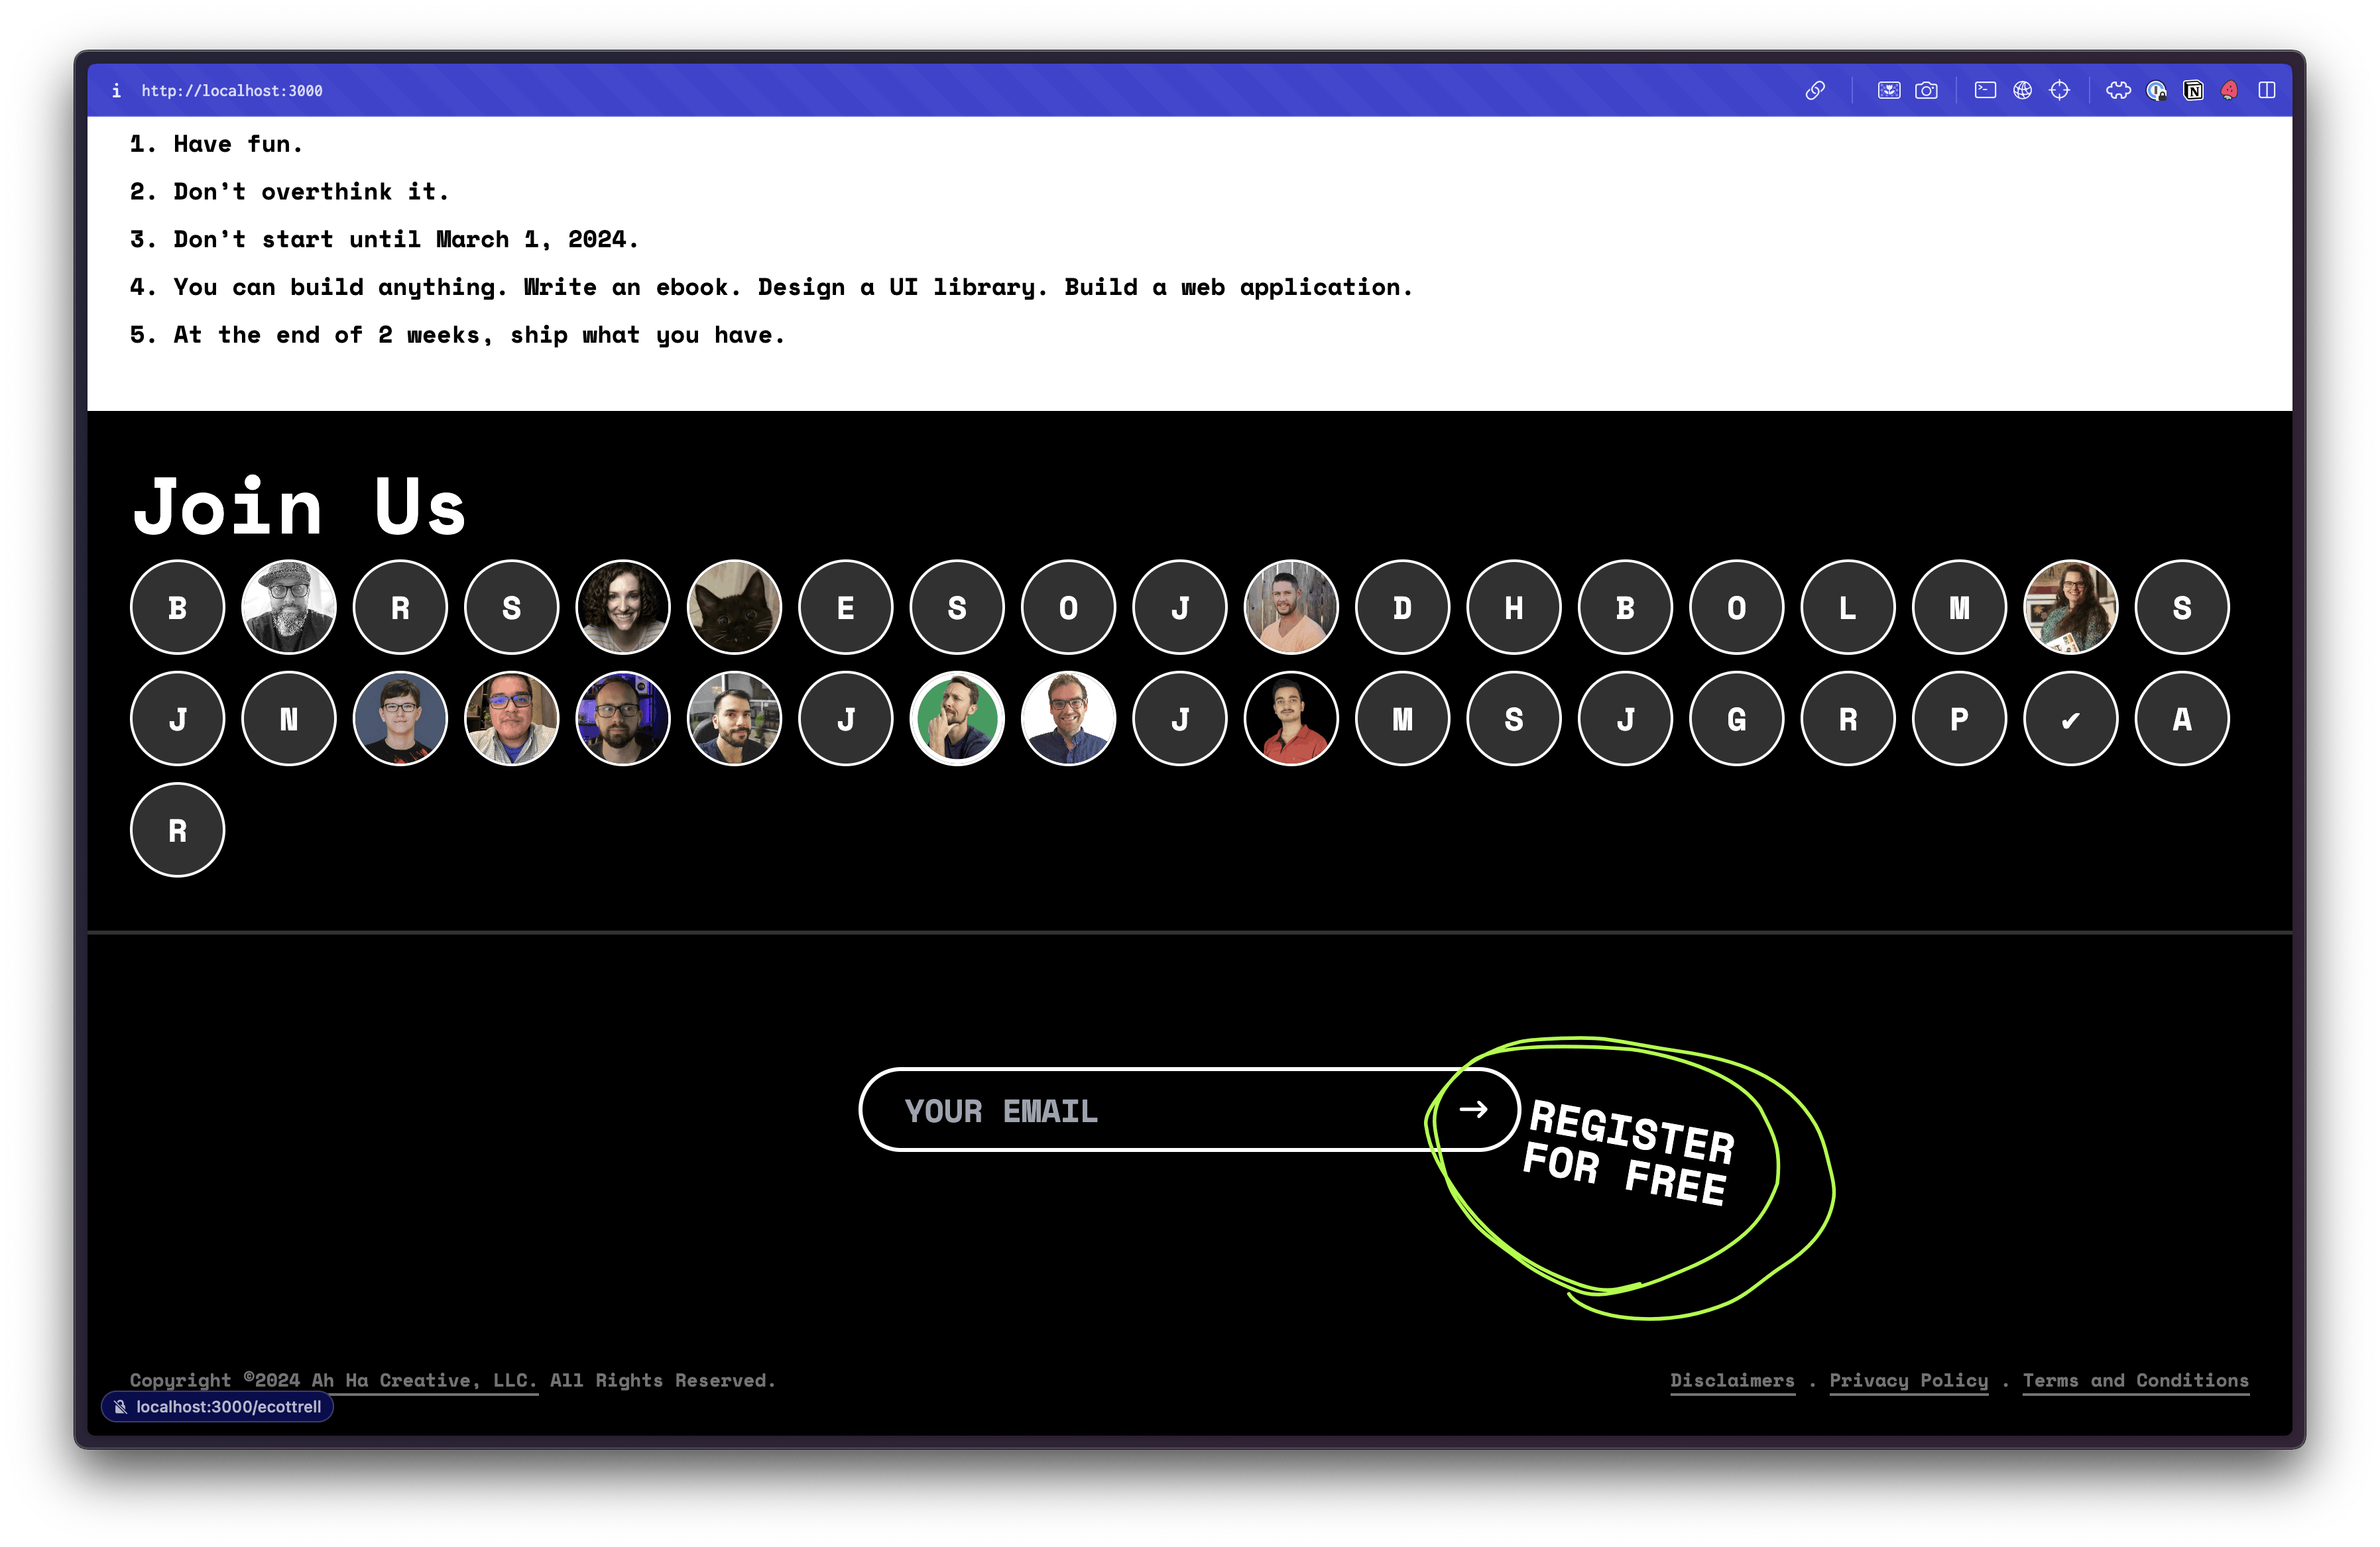
They appear at the bottom of the home page:
As well as each user’s profile page:

On the user’s account page, they can upload their avatar:

This input is a standard HTML input field, with a type="file"
<div className="field">
  <label htmlFor="avatar">Your Avatar</label>
  <input type="hidden" name="oldAvatar" />
  <input
    type="file"
    name="avatar"
    className="border-2 border-dashed border-white px-4 py-6 rounded-full w-full"
  />
</div>
The key to making this work is the Remix Form tag. I have an attribute of encType set to multipart/form-data
<Form
  key={data.user.id}
  method="post"
  encType="multipart/form-data"
>
I set the method to post. Since I didn’t specify an action attribute, it will use the action function within the same file.
const avatar = formData.get("avatar") as File | null;

let avatarUrl = "";
if (avatar) {
  const bytes = await avatar.arrayBuffer();
  const bucket = supabase.storage.from("avatars");
  const extension = avatar.name.split(".").pop();
  const fileName = `${currentUserId}.${extension}`;

  const avatarResults = await bucket.upload(fileName, bytes, {
    upsert: true,
  });
  if (avatarResults.error) {
    console.error(avatarResults.error);
    return json({ error: avatarResults.error.message, ok: false });
  }
  avatarUrl = bucket.getPublicUrl(fileName).data.publicUrl;
} else {
  avatarUrl = formData.get("oldAvatar") as string;
}
Inside, I grab the content off the form.
const avatar = formData.get("avatar") as File | null;
Check to see if avatar exists.
if (avatar) {
Then, we can leverage the browser API to get details about the file:
const bytes = await avatar.arrayBuffer();
const bucket = supabase.storage.from("avatars");
const extension = avatar.name.split(".").pop();
const fileName = `${currentUserId}.${extension}`;
Then, we can use the Supabase API to upload the file:
const avatarResults = await bucket.upload(fileName, bytes, {
  upsert: true,
});
Assuming the upload was successful, I’ll save the avatar URL in a variable.
avatarUrl = bucket.getPublicUrl(fileName).data.publicUrl;
You may have noticed that above the conditional, I initialize the variable:
let avatarUrl = "";
Then, we update it within the if statement, when I get the publicUrl back from Supabase. Or, within the else statement, I can infer that the user didn’t try to upload a new avatar and can set avatarUrl to whatever the value was previously (oldAvatar is set within a hidden input field.):
avatarUrl = formData.get("oldAvatar") as string;
Now, that we have the publicUrl, we can save it into the database, associating it with the appropriate user.
If you want to see all the code for this page, together, click here.
Complex Supabase Queries
On each user’s profile page, I’m running some complex queries to get the information I need to display to the user. In these scenarios, you want the database to do as much of the work for you. This reduces making multiple calls to the database, as well as, putting cognitive load on the browser for sorting and filtering.
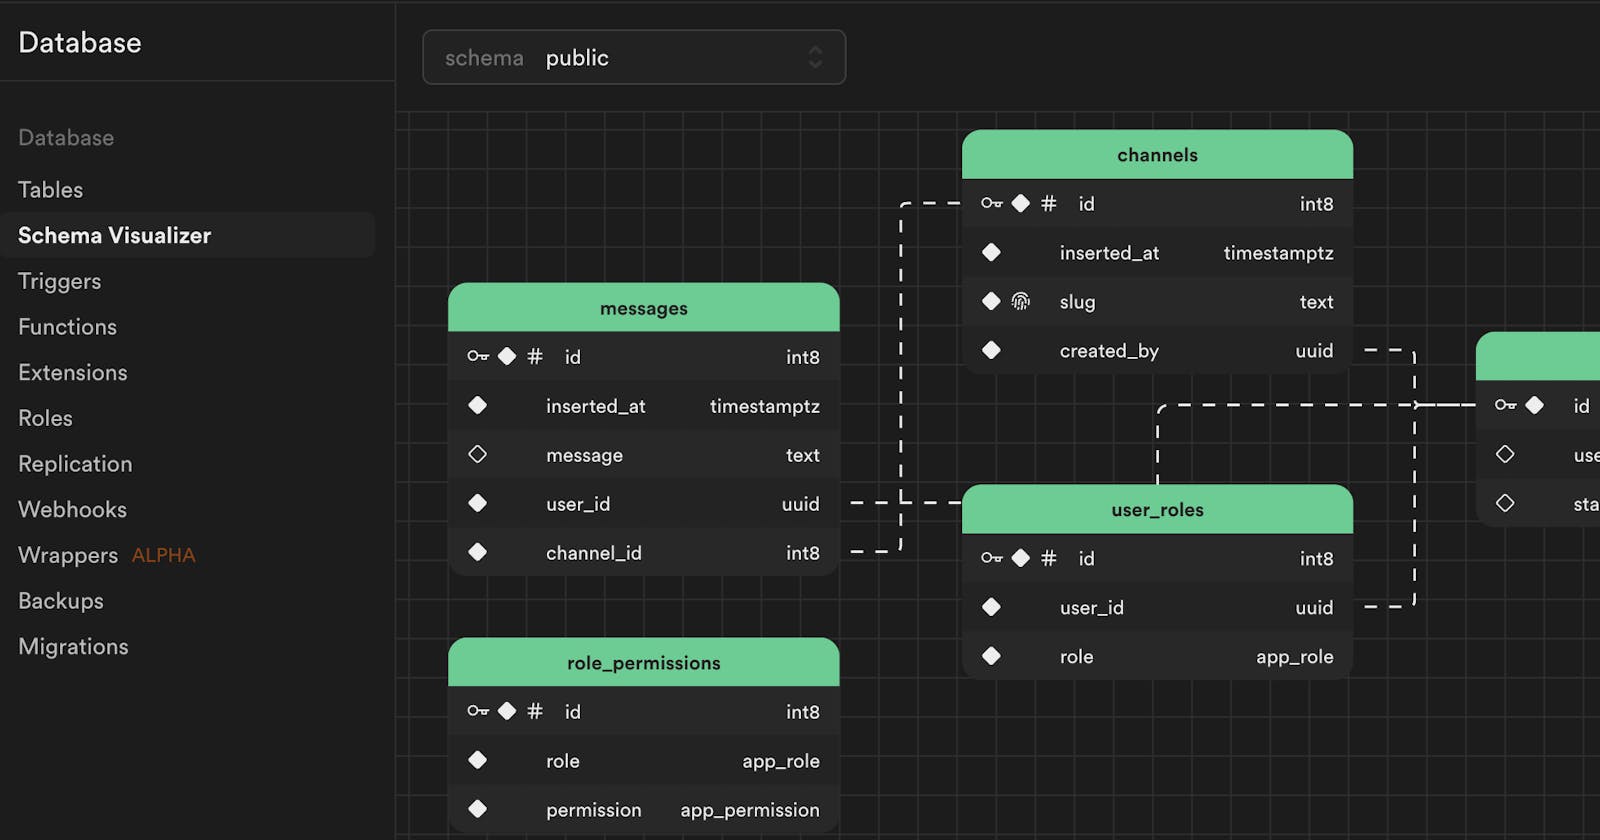
Here’s a visual representation of my database schema.

This image was generated by the Schema Visualization tool within Supabase. 🤩
For the profile page, I needed:
All the meta data for a specific user
Details about their project
Updates for the project
Comments on on each update
For each comment, there’s also some user information required (their name, avatar, and username)
Project updates should be ordered by the date they were created so that the most recent updates appear at the top of the page
If a user has more than one project, I only want their most recent project. (You can only have 1 project per cohort.)
I was so impressed by Supabase’s API and that it was able to handle everything I needed within a single call!
  const username = params.profile as string;
  const result = await supabase
    .from("users")
    .select(
      "*, projects(*, updates(*, comments(*, users(id, avatar, name, username))))"
    )
    .order("created_at", {
      referencedTable: "projects.updates",
      ascending: true, // this actually puts the oldest first because I'm reordering them with CSS
    })
    .order("created_at", {
      referencedTable: "projects",
      ascending: false, // combined with limit, this grabs the most recent project
    })
    .limit(1, { referencedTable: "projects" })
    .eq("username", username)
    .single();
I’ll walk through each section.
First, we need to get the username. This is passed in from the URL. For example: https://twoweekbuild.com/selfteachme will load the profile for selfteachme.
This route’s file is named app/route/_app.$profile._index/route.tsx . The $ in front of $profile denotes that it is a parameter that can be passed in through the URL.
Inside the page’s loader function, the params get passed in by default:
export async function loader({ request, params }: LoaderFunctionArgs) {
I can get the profile value by saying:
const username = params.profile as string;
Then, I want to query all of our data from the users table. (.from("users")) I can use the select method to grab all the properties I want:
.select(
  "*, projects(*, updates(*, comments(*, users(id, avatar, name, username))))"
)
I want everything
*on theuserstable.projectsis a related table. Supabase is smart enough to determine the connection between theuserstable and theprojectstable. I can list any fields on theprojectstable that I want to include by listing them insideprojects(). Again, I want everything*updatesis related to theprojectstable. I want everything*on that table, too.commentsis related to theupdatestable. I want everything*.usersis related to thecommentstable. This is theuserthat authored the comment. Here, I only need theirid,avatar,name, andusername.
That’s a lot! We have 5 layers of data and relationships. But, it gets even more complicated. I want the updates to be sorted based on the date they were created_at .
.order("created_at", {
  referencedTable: "projects.updates",
  ascending: true, // this actually puts the oldest first because I'm reordering them with CSS
})
I also want the projects to be sorted, based on the date they were created at:
.order("created_at", {
  referencedTable: "projects",
  ascending: false, // combined with limit, this grabs the most recent project
})
Then, I’m only going to grab 1 project. Since we’re sorting, based on the date, this should be the most recently created project:
.limit(1, { referencedTable: "projects" })
I only want to grab this content for a specific user, based on the username .
.eq("username", username)
And I only want to grab 1 user:
.single();
This is by far the most complex query in the application and the Supabase API was able to handle everything, without having to make multiple calls to the API.
If you want to see the entire code, in context. It’s on GitHub.
Supabase Custom Functions
There are a couple areas of the application where I reached for a Custom Supabase Function. Why? Well, the logic was more complex than what I could achieve with the Supabase API. Plus, it required taking the data and making some computations.
Of course, I could have grabbed the database and then processed everything on the server or within the browser, but it’s more performant to have the database do the heavy lifting.
There are two key areas where I reached for a custom function:
Leaderboard
Emoji Reactions
Leaderboard
For the leaderboard, I needed to grab all updates for a specific project, count how many days a person made an update, and then grab the specific dates for their update.
The tricky part is there’s no limit to the number of updates a person can make each day. I didn’t want someone to make 50 updates in a single day and “hack” the leaderboard. It’s more about consistency over time. One update on Day 1 counts as 1. Ten updates on Day 1 counts as 1.
Postgres, which is the underlying database for Supabase, is smart enough to make all these calculations.
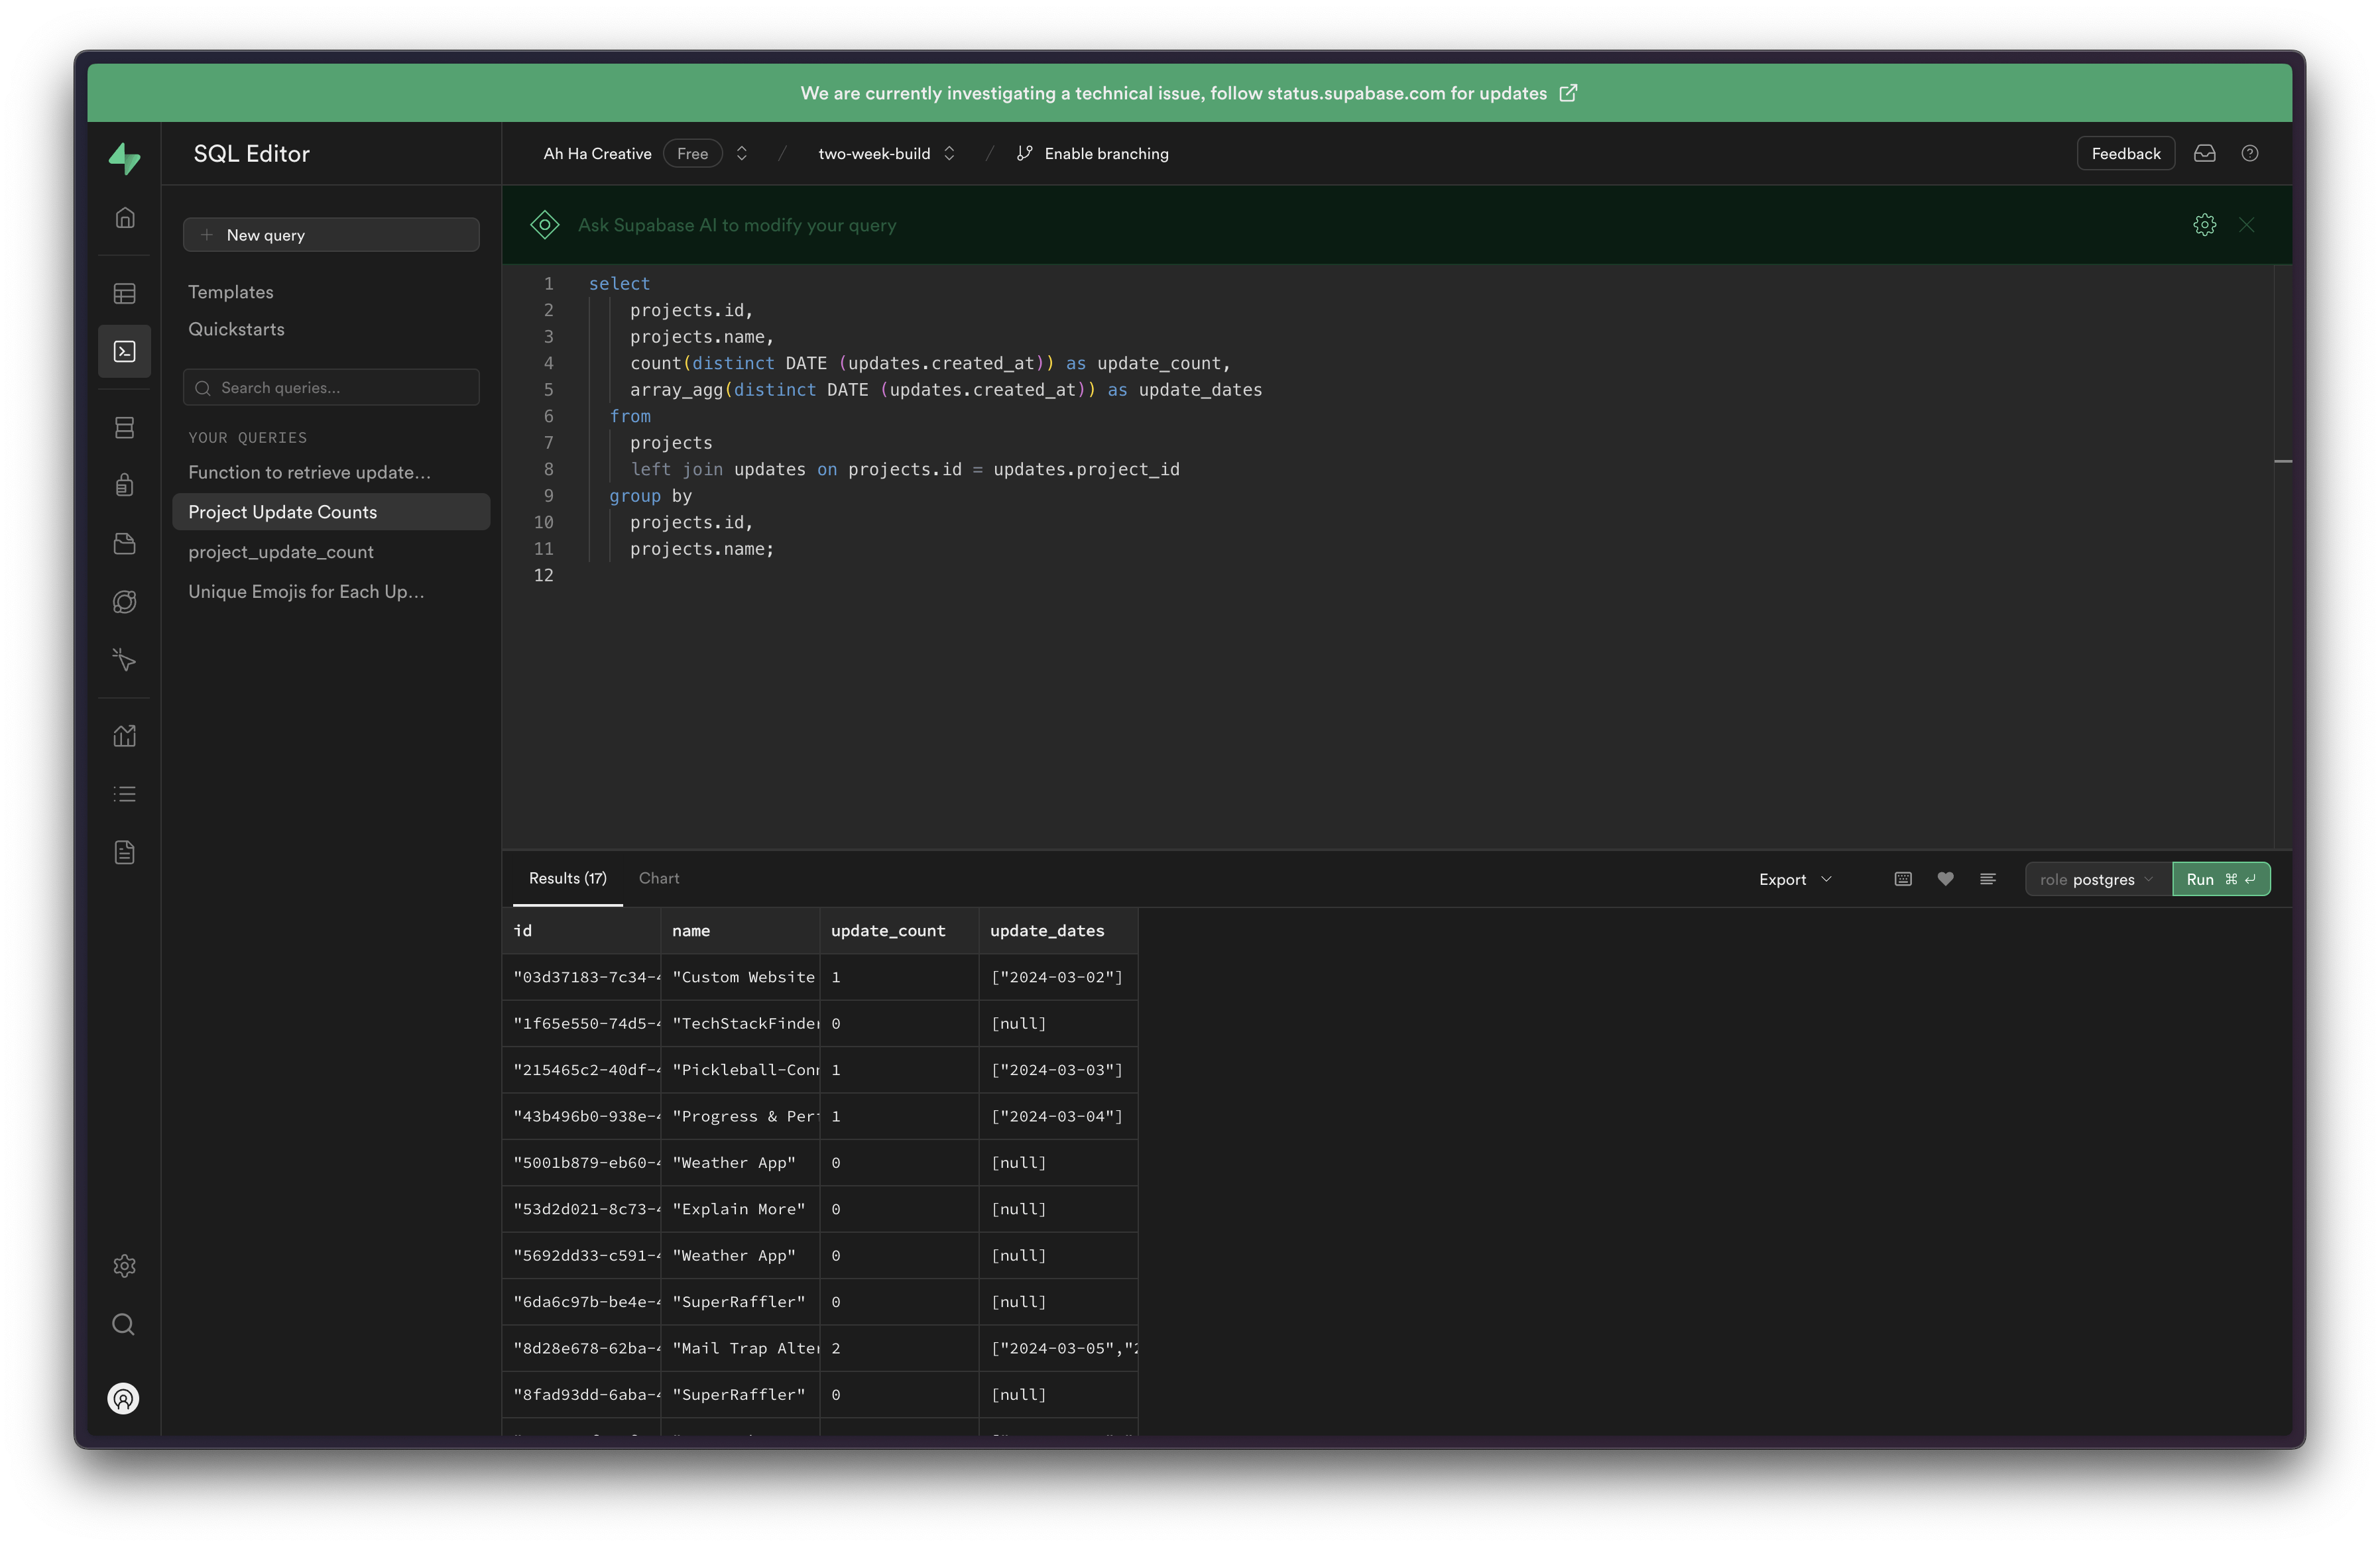
Within Supabase, there’s a SQL Editor. I know SQL, but I hate writing it and it’s been a while since I’ve had to write raw queries. Fortunately, Supabase also has an AI feature! You can tell Supabase AI what you’re trying to do and it will help you write the query. Similarly, if your query returns an error, Supabase AI will also help you troubleshoot. In the end, this is the query that returned the results I was looking for:
select
    projects.id,
    projects.name,
    count(distinct DATE (updates.created_at)) as update_count,
    array_agg(distinct DATE (updates.created_at)) as update_dates
  from
    projects
    left join updates on projects.id = updates.project_id
  group by
    projects.id,
    projects.name;
I’m grabbing (
select) theidandnamefields on theprojectstable.I can use the Postgres function
countto count all theupdates, but I’m referencing thedistinctentries and saving the value asupdate_countI create an array
array_aggofdistinct DATEs based on thecreated_atdate and saving that value asupdate_datesI’m working
fromtheprojectstableand connecting (
left join) theupdatestable by theidfield on theprojectstable and theproject_idfield on theupdatestable.I’m grouping the results by the
project.idandproject.name
You can also see the resulting tabular data within the editor:

Now, we need to turn this into a function that can be reused. You can modify the SQL to create or replace function.
Here, I’m calling my function project_update_count() and telling it to return table:
-- Supabase AI is experimental and may produce incorrect answers
-- Always verify the output before executing

create
or replace function project_update_count () returns table (
  id uuid,
  name text,
  update_count bigint,
  update_dates date[]
) language sql as $$
  select
    projects.id,
    projects.name,
    count(distinct DATE (updates.created_at)) as update_count,
    array_agg(distinct DATE (updates.created_at)) as update_dates
  from
    projects
    left join updates on projects.id = updates.project_id
  group by
    projects.id,
    projects.name;
$$;
As soon as you run the query, your database function will be created. 🙌
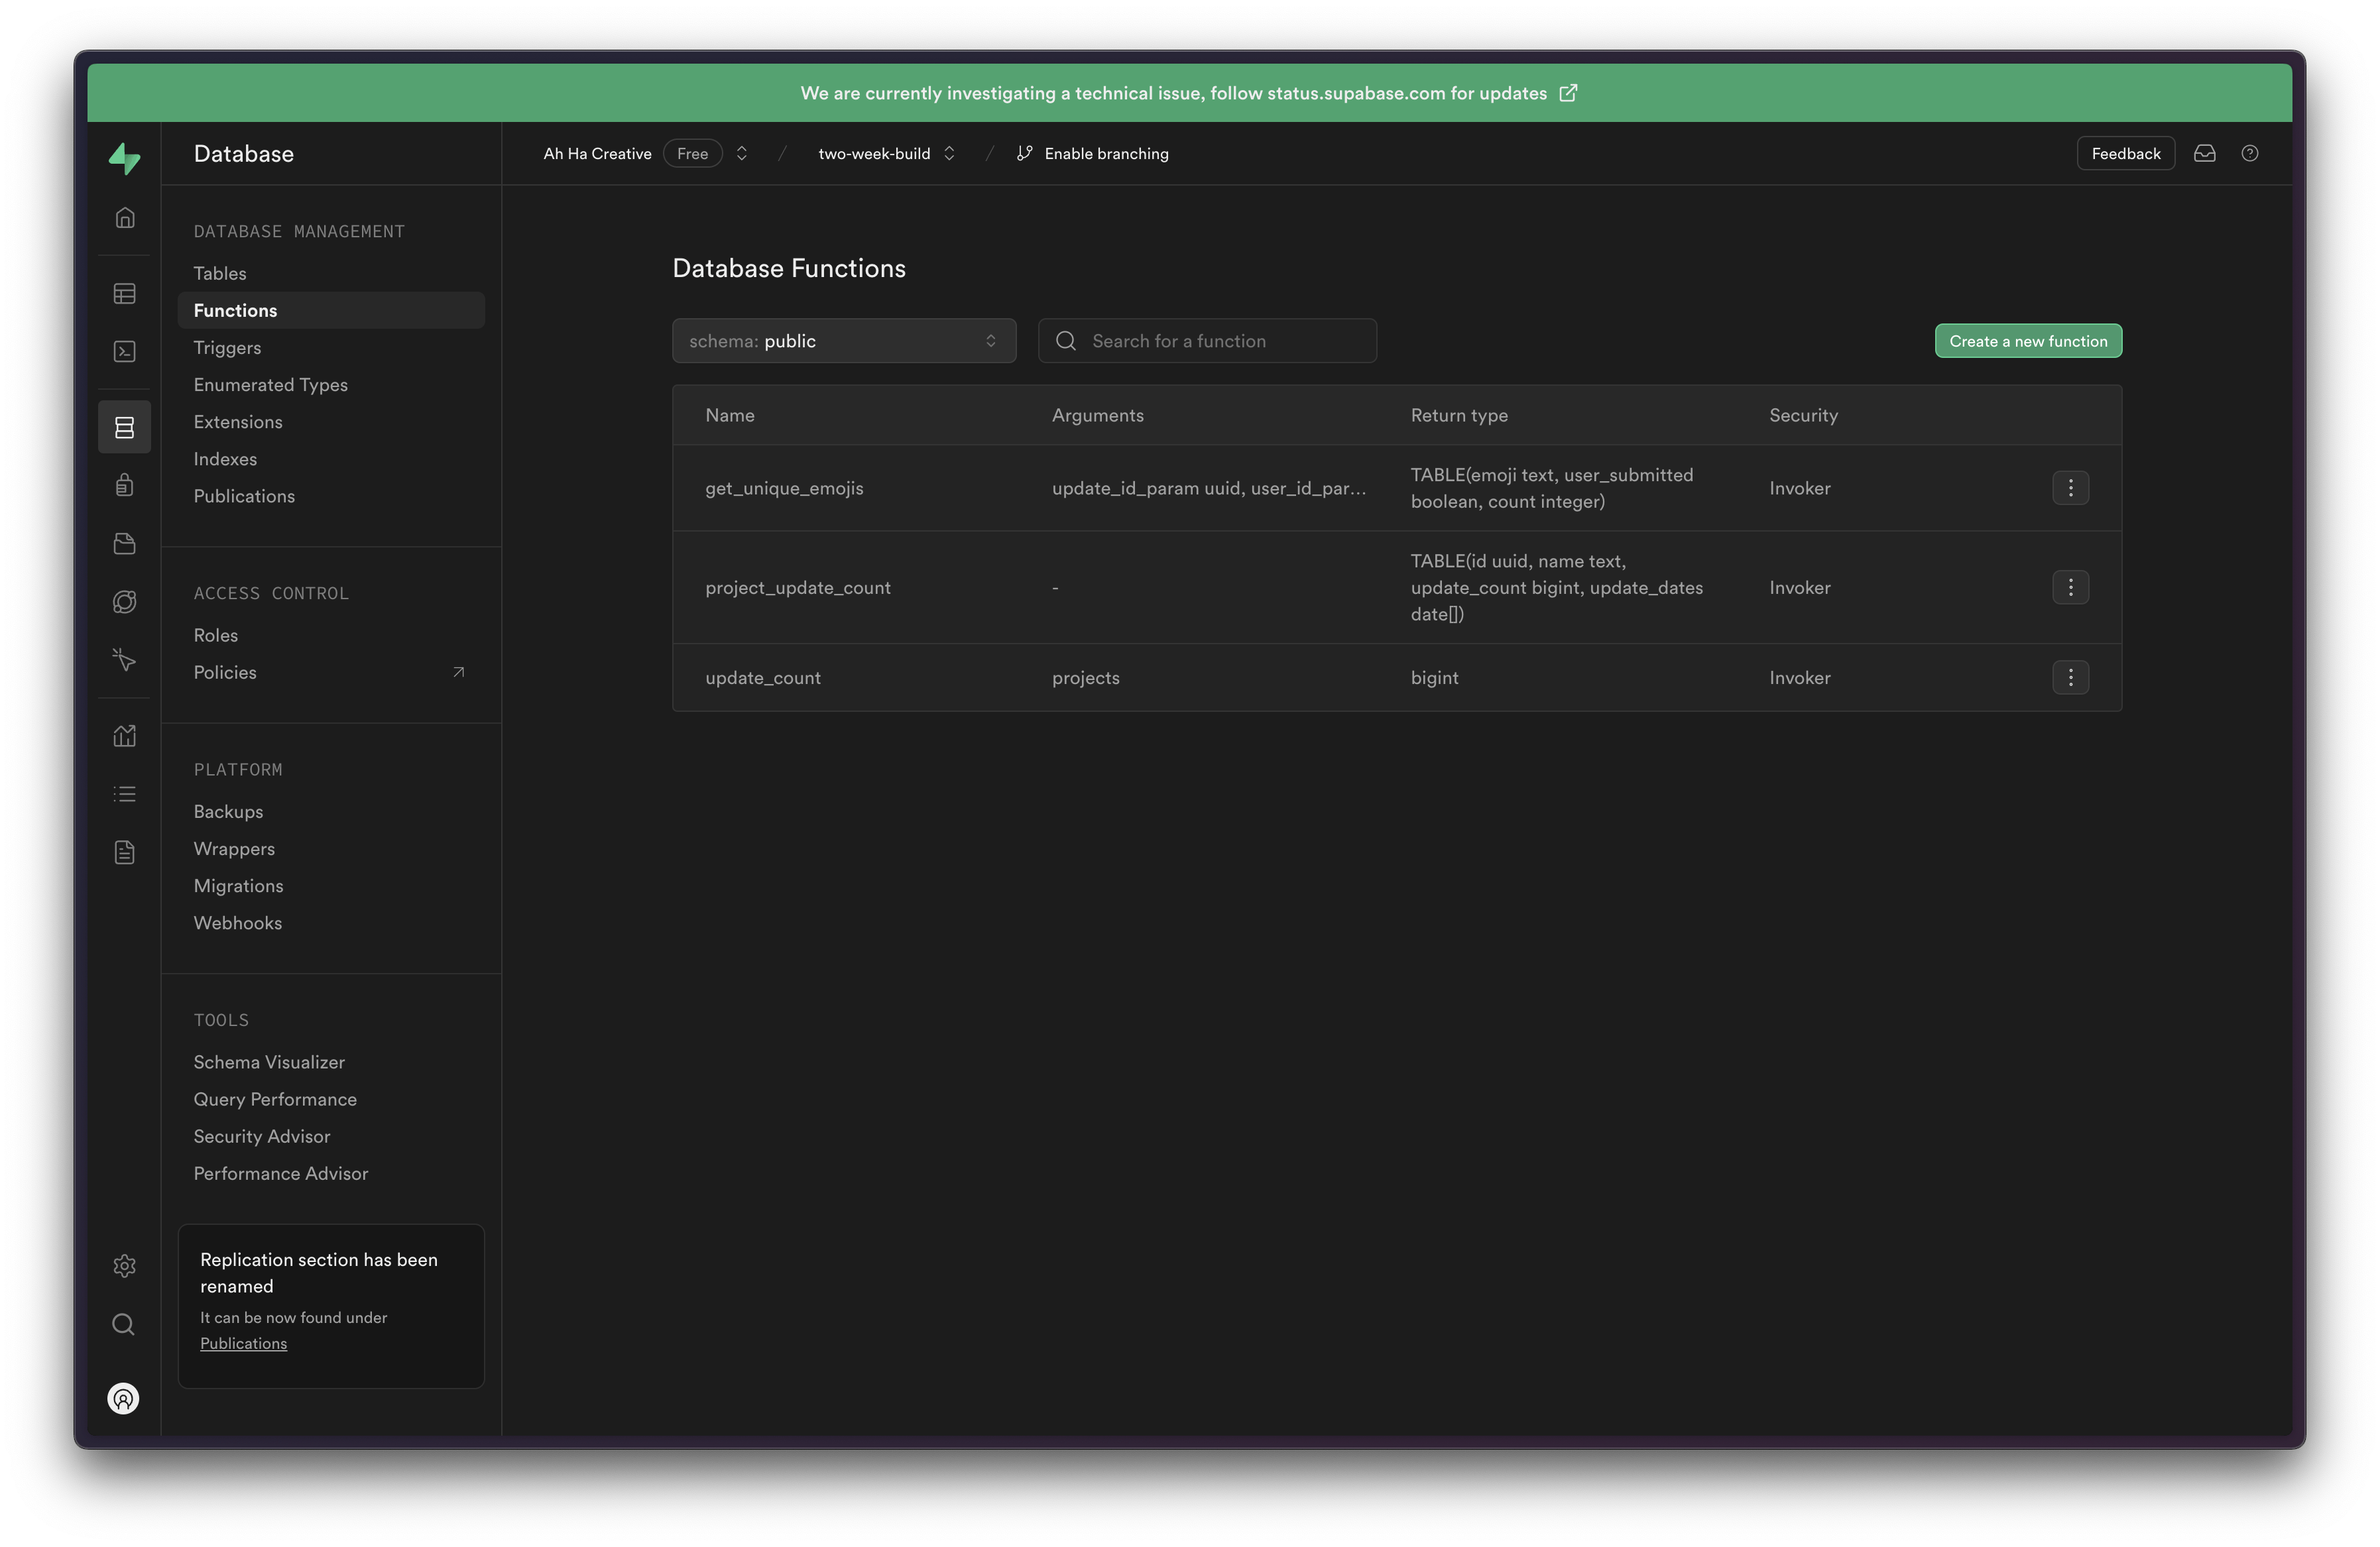
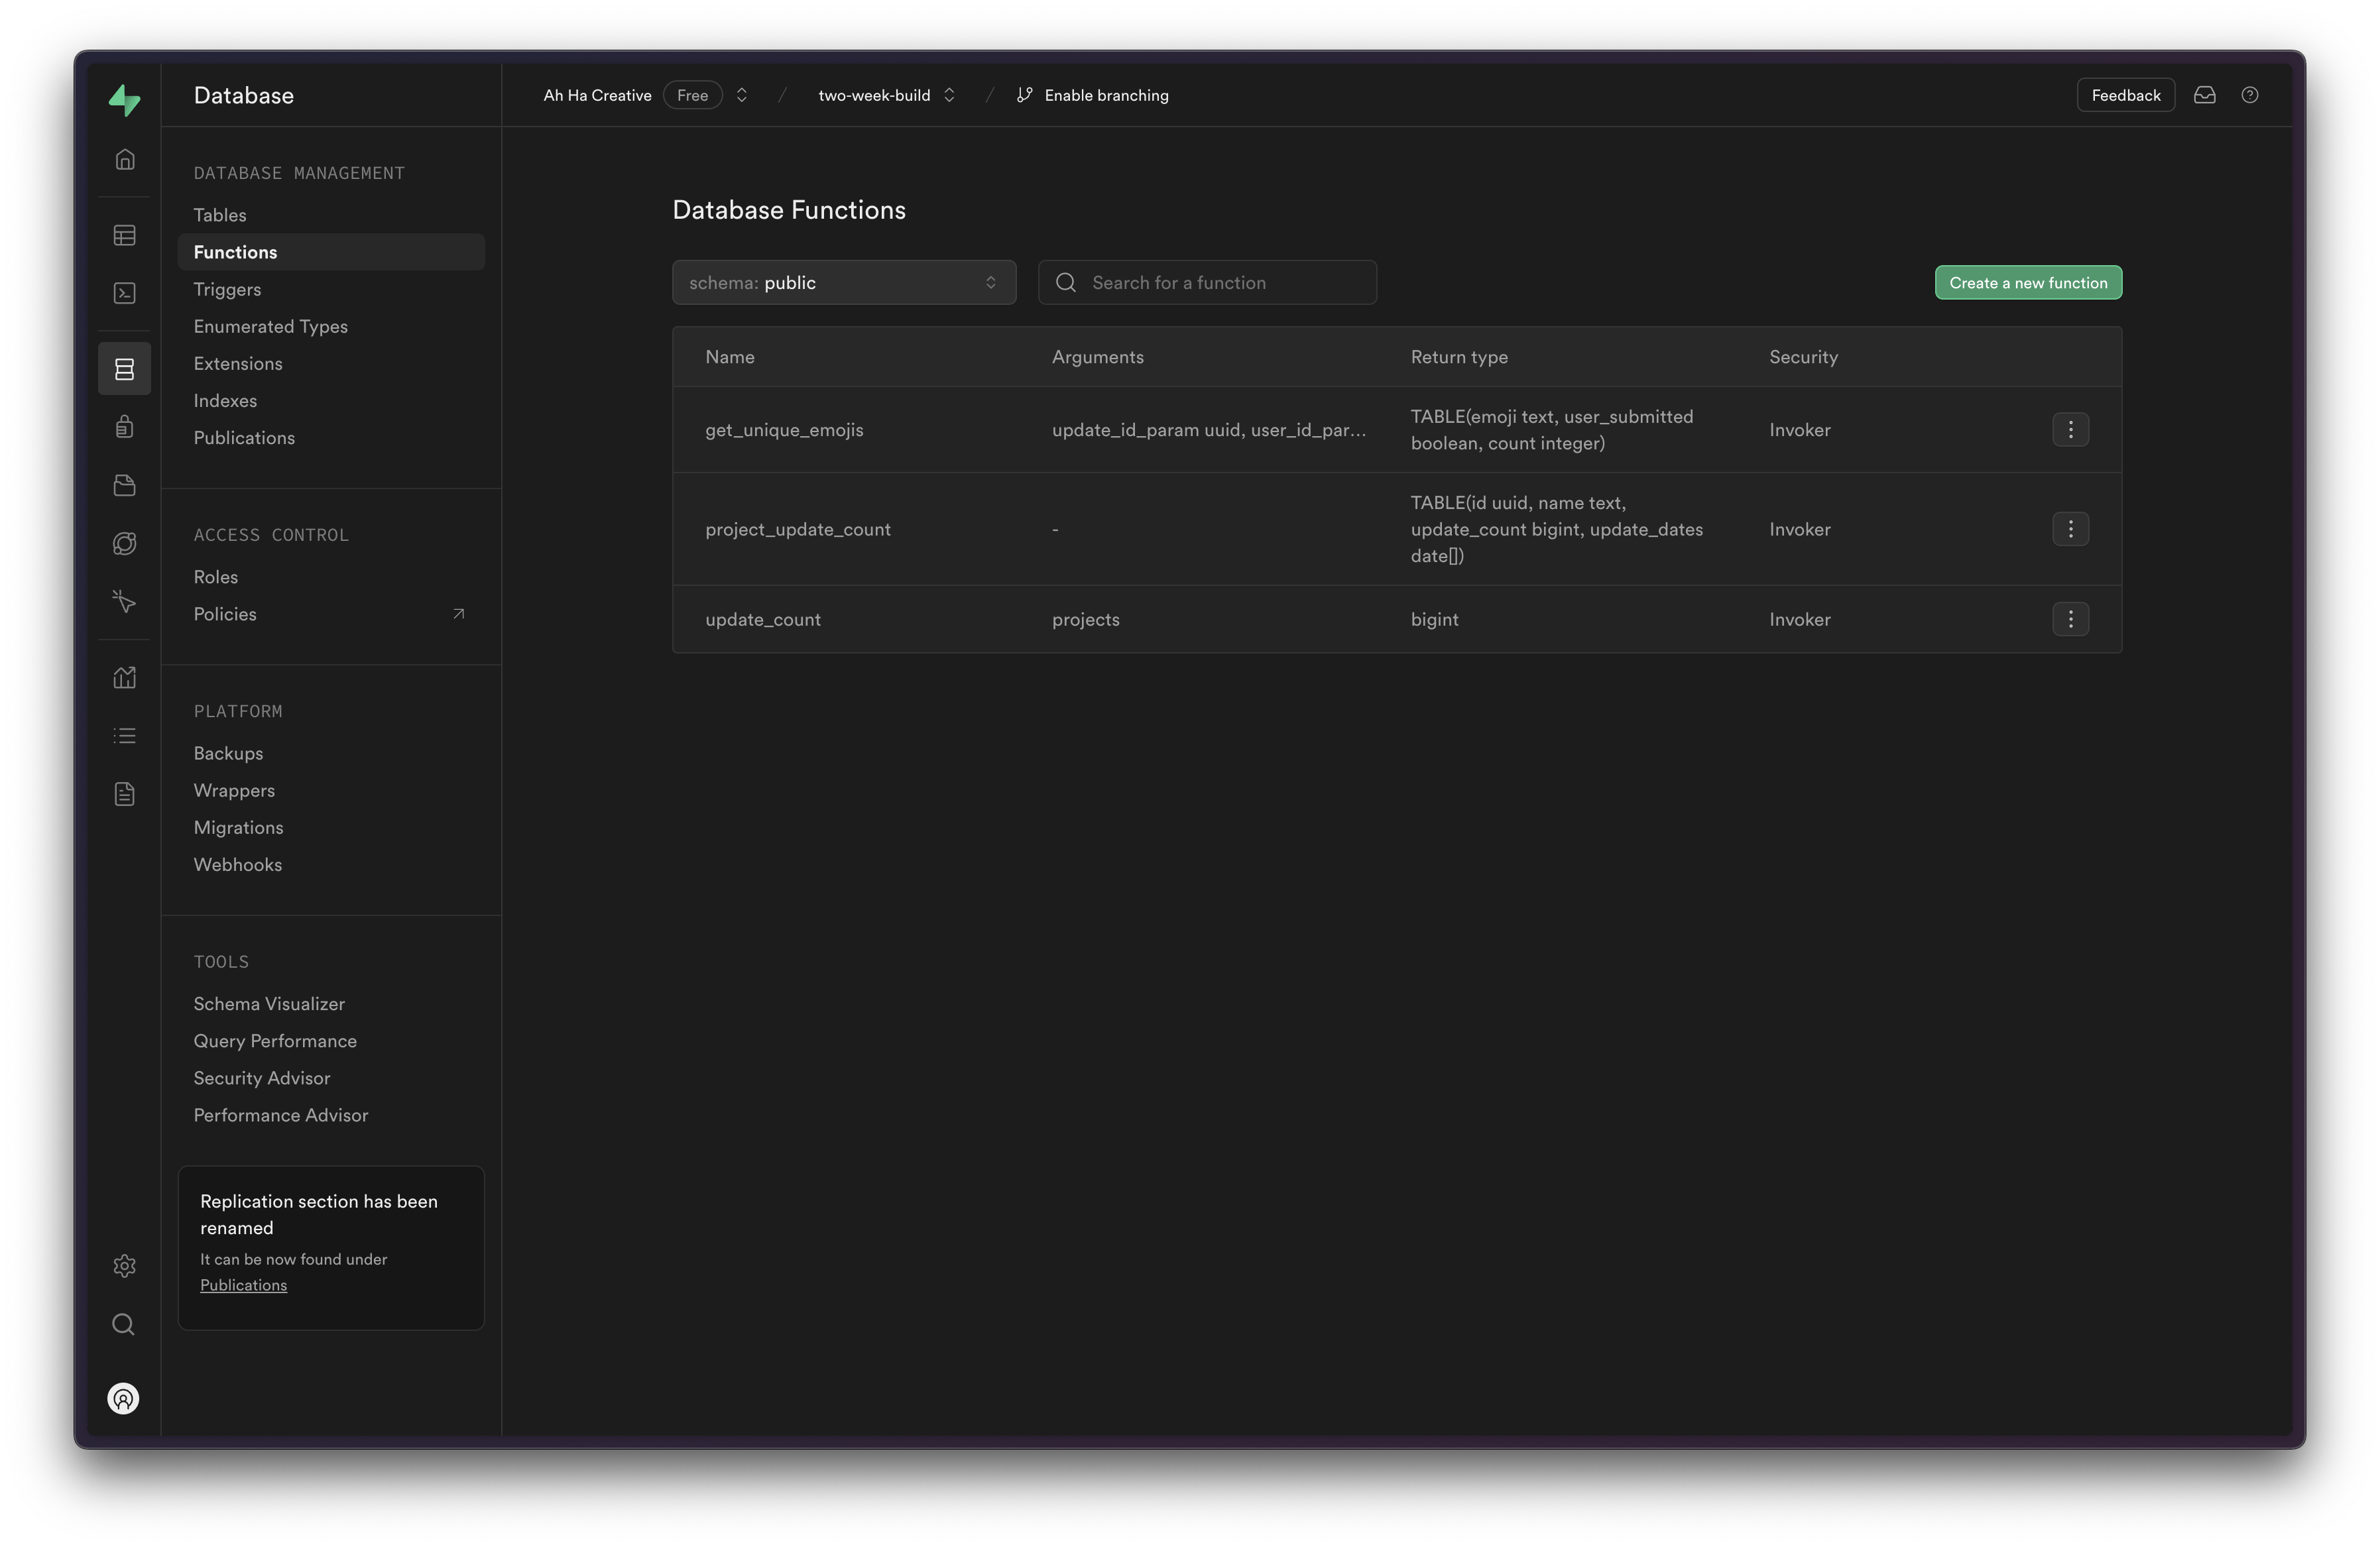
Now, if you navigate to Database > Functions, you’ll see a list of all the functions you’ve created:
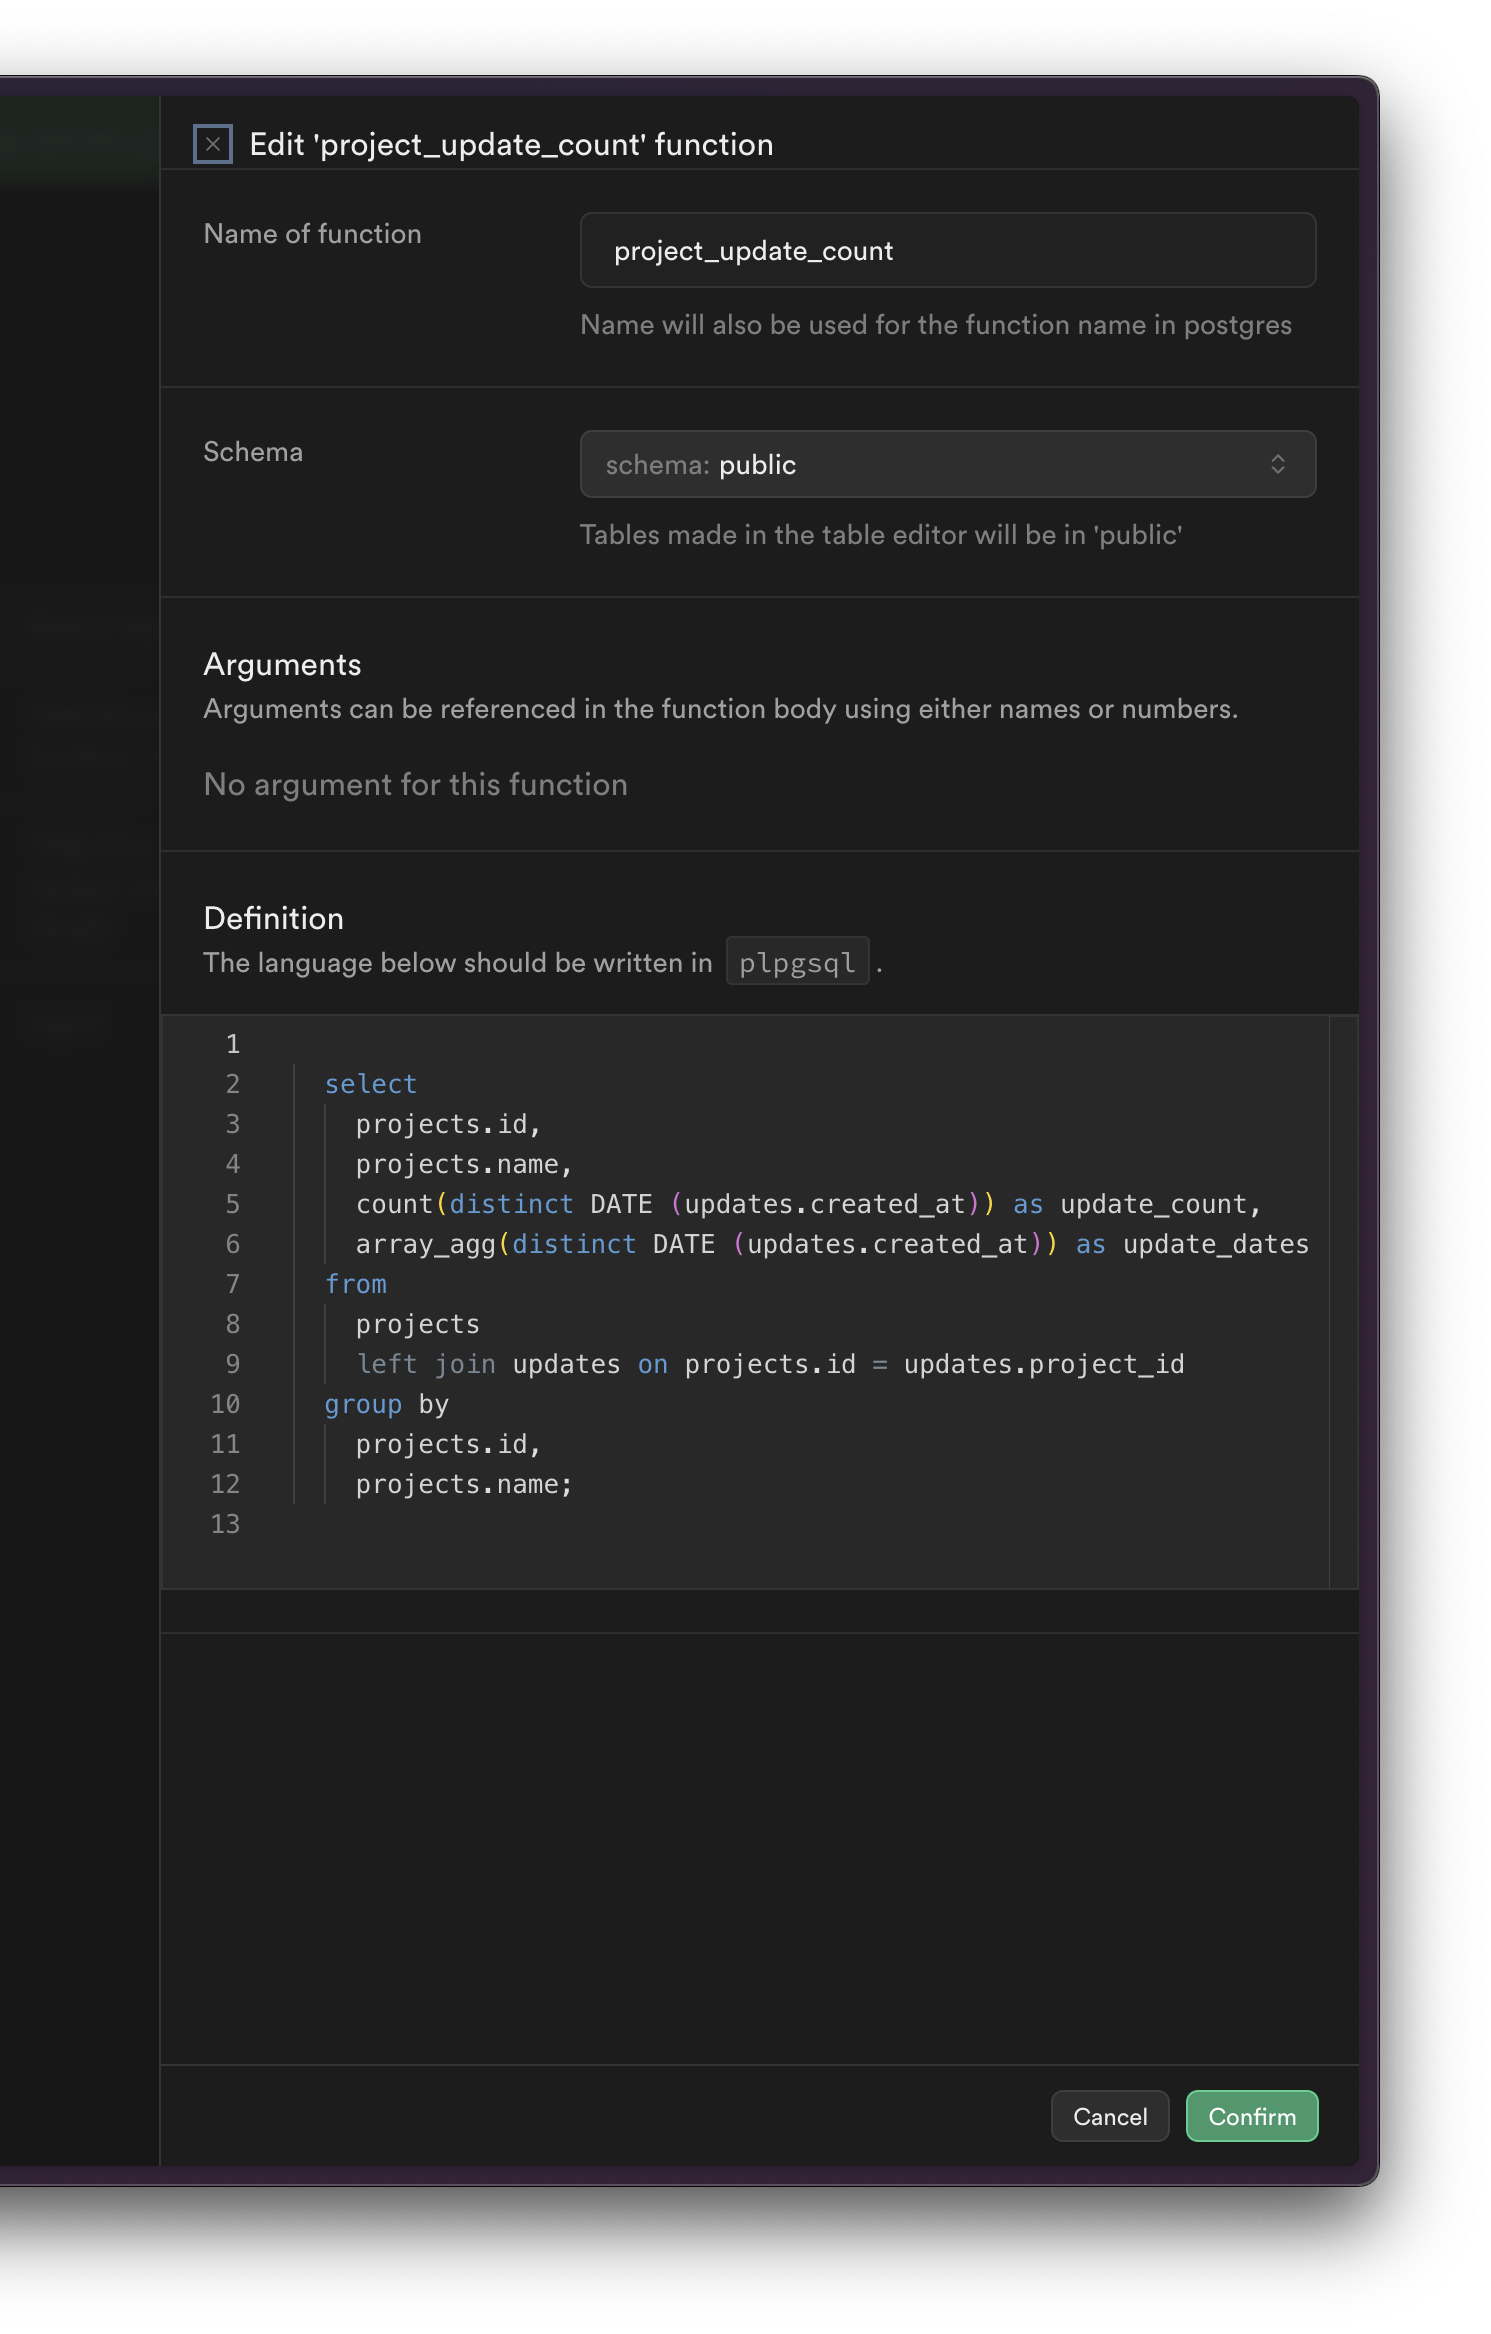
If you look at the details of the our project_update_count() function, you’ll see the SQL query that we created:
Now, we can use this function within our project. By using the rpc method, we can call our project_update_count function:
const supabase = createSupabaseServerClient(request);
const { data, error } = await supabase.rpc("project_update_count");
Pretty cool!
Emojis
I also used a Supabase function for aggregating the emoji reaction for each update. This was even more complex!
For any update, the user has the ability to respond with any emoji.

On GitHub, I found an open source JSON file of all the emojis.
I have a separate table in the database that records the emoji the user selected, the user ID that submitted the reaction, and the update that it’s associated with.
A user can respond with multiple emojis, but they but each response must be unique. In other words, I can only respond with 1 🤩, not 2 🤩.

Within the application, I didn’t want to return all the emoji entries. If an update goes viral, that has the potential to be thousands, if not millions of records! It would be more performant, for the database to report the count for each. But, I also need the database to tell me if the logged in user has responded with a specific emoji or not.
Again, Supabase Functions!
I used the SQL Editor to build the following query:
select distinct
    emojis.emoji,
    bool_or(user_id = user_id_param) as user_submitted,
    count(emojis.emoji)::int as count
from
  emojis
where
  emojis.update_id = update_id_param
group by
  emojis.emoji;
This,
selects thedistinctemoji on theemojistable.It gives me a true or false value
boolean_orif the user ID I provide (so I’m passing in a parameter!) submitted that emoji.I uses the Postgres function
countto count all theemojisI’m limiting the result to a specific
update_id— based on the update ID parameter that I’m providingFinally, I
group bythe emoji.
Then, I can create this function, by altering the query slightly within the SQL Editor:
create
or replace function get_unique_emojis (update_id_param uuid, user_id_param uuid)
returns table (emoji text, user_submitted boolean, count int)
as $$
  BEGIN RETURN QUERY
  select distinct
    emojis.emoji,
    bool_or(user_id = user_id_param) as user_submitted,
    count(emojis.emoji)::int as count
from
  emojis
where
  emojis.update_id = update_id_param
group by
  emojis.emoji;
END; $$ language plpgsql stable;
My create or replace function looks slightly different.
get_unique_emojis (update_id_param uuid, user_id_param uuid)
I’m calling my function get_unique_emojis and I’m establishing the 2 parameters that I’m going to pass in: update_id_param uuid and user_id_param uuid
Then, I can reference this function within my application:
const emojiResults = await supabase.rpc("get_unique_emojis", {
  update_id_param: update.id,
  user_id_param: result.data.id,
});
Unfortunately, you can’t chain a Supabase select statement and an rpc function together. So, I did need to make a call to the database to get all the updates. Then, run a loop over each update to get all the emojis associated with it. Nevertheless, this way is still more efficient than running the computation on the server or the browser.
Sweet. 😎
Supabase Email + Resend
When I was running tests through Supabase, especially, the registration flow, I was routinely getting an “email limit / threshold error.”
I did a little digging and Supabase limits you to 30 emails in one hour. You can reach out to them directly if you’re launching a product and need to raise the limit, but it requests that you give them 2 weeks worth of notice.
Since I was trying to launch my project that day, plus, I didn’t want to worry about this long term, I ended up reaching for a custom SMTP server. Fortunately, Resend offers exactly what I needed, out of the box.
I already have an account set up with Resend, but I did need to add the custom DNS settings to verify my domain.
Then, I generated an API key from Resend. Save this for later, because you’ll need to use it as the SMTP password.

Then in Supabase, under Project Settings > Authentication, I have “Enable Custom SMTP” turned on. Then, I added the Resend Provider Settings.
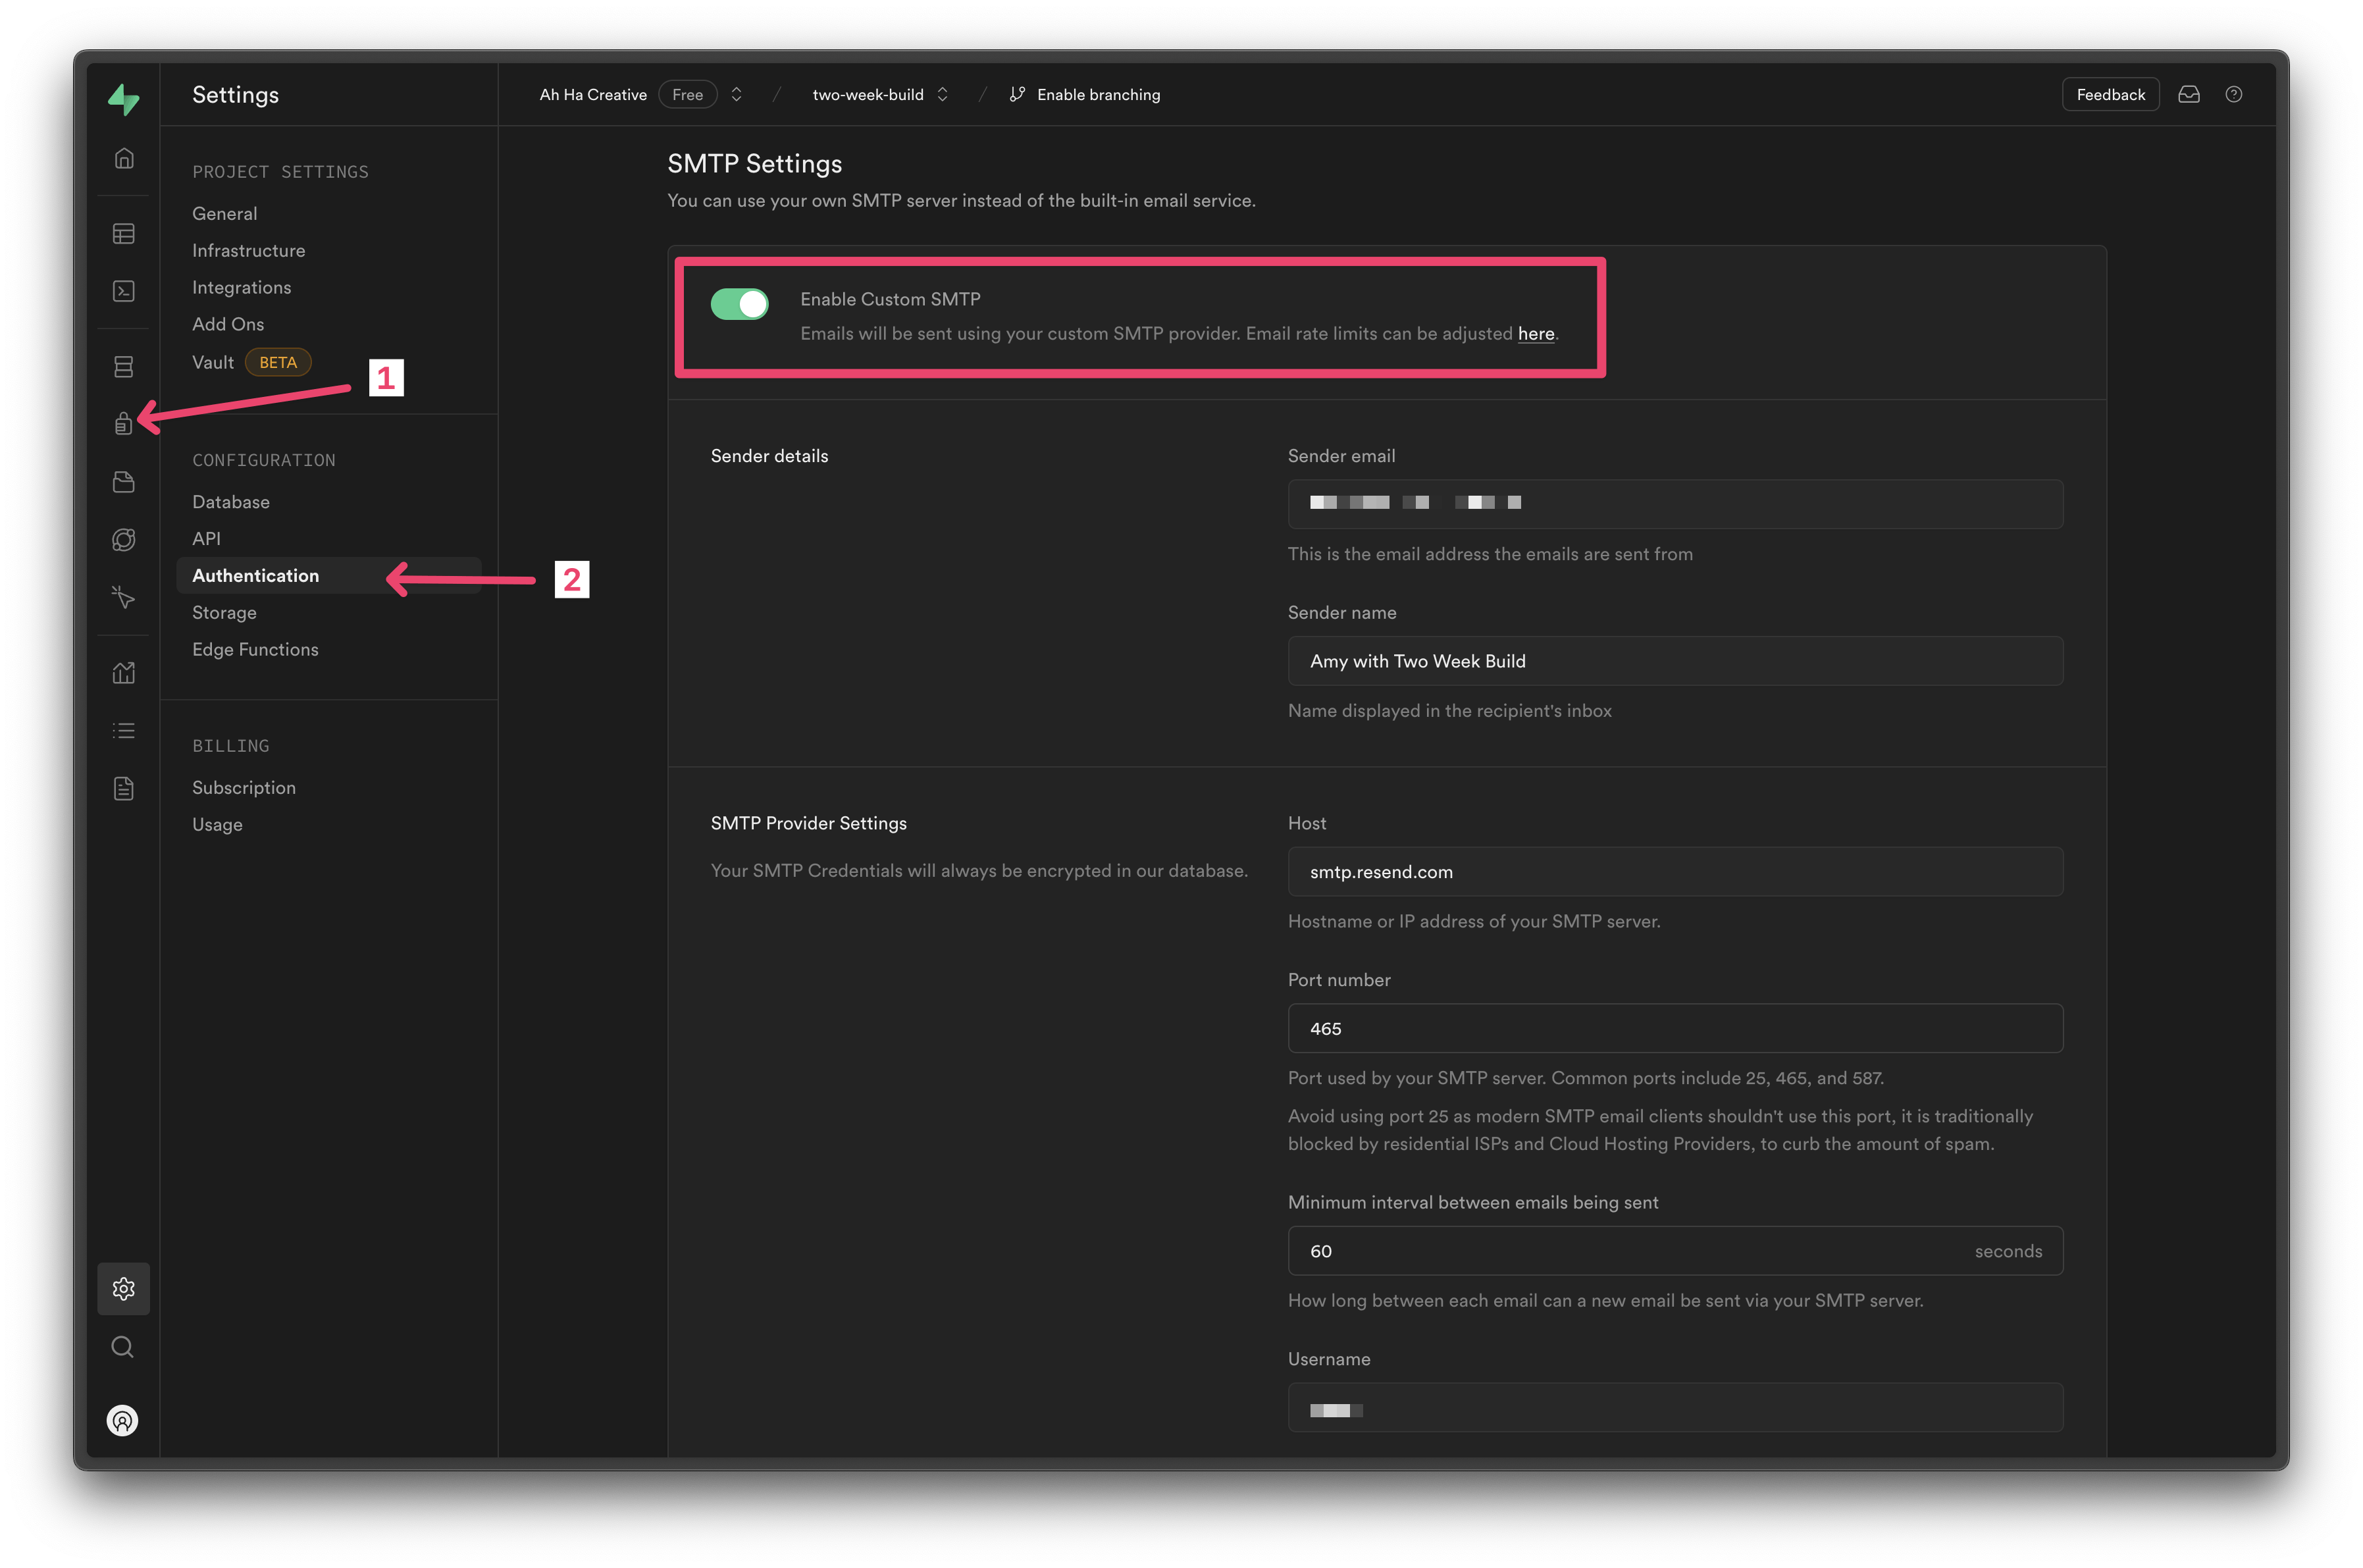
Easy Peasy.
As an added benefit of using Resend, you also have insight into what emails are being sent out.
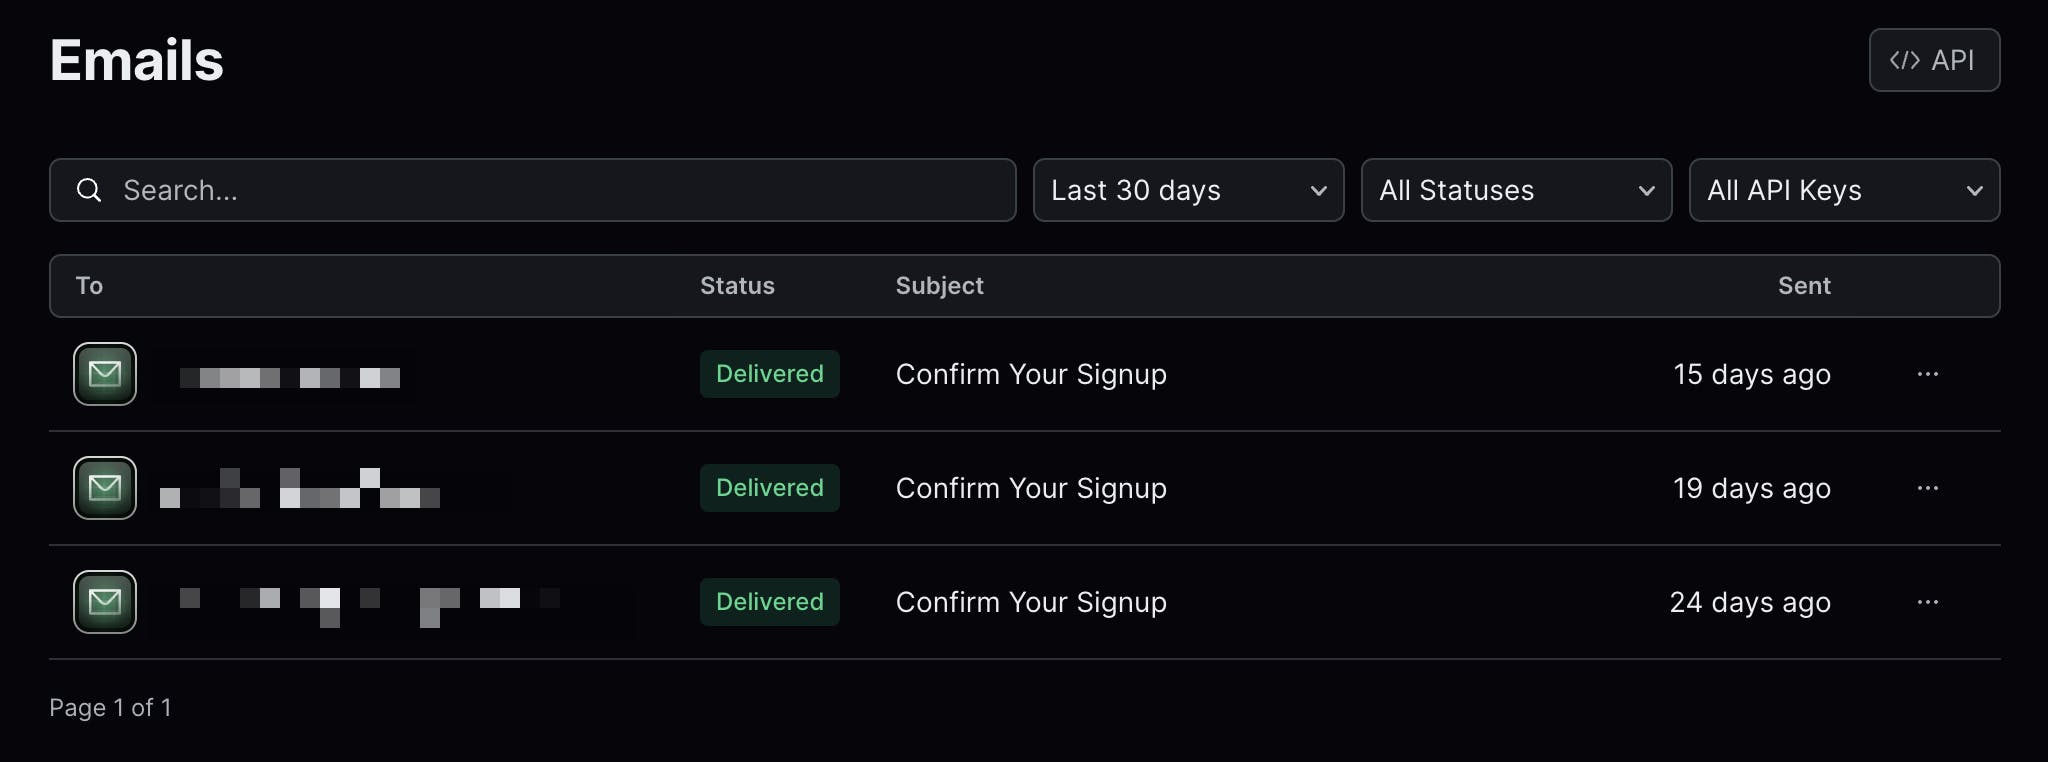
Lovely. 🤩
Conclusion
Before I built this project, I was already in love with Supabase, but this project made me fall even more in love. I was blown away by how Supabase made even the hard parts of this application easy and allowed me to build and iterate quickly.